CMS Connect Examples
Here are some examples of how to set up CMS Connect in your site.
Learn how to display HTML content in your site using CMS Connect. This example shows you how to bring in HTML header, footer, and banner content from Adobe Experience Manager (AEM).
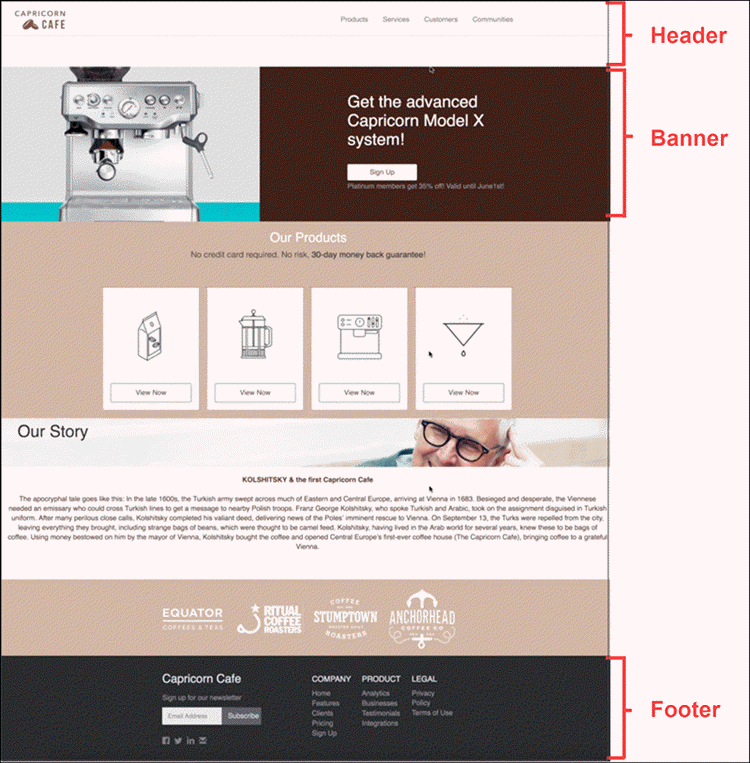
Suppose that you use AEM to create content for your site, which is named Capricorn Cafe. To promote the Capricorn Cafe brand in your site, you want to maintain the same look and feel. You can create a connection to your CMS and configure settings to retrieve the header and footer. You can then add a CMS Connect (HTML) component to include a banner.
Before you set up a CMS connection, pinpoint the location of your content, which varies depending on your CMS and setup. Although we test connections to AEM, Drupal, SDL Tridion, Sitecore, and WordPress, a CMS connection isn’t provider-specific. You can retrieve and display HTML and JSON content by specifying the endpoints and paths for the data that you want to display.
Examining the content structure on your CMS can help locate the paths. For this example, the content endpoint is https://capricorn-cafe.com/content/capricorn/en. In the AEM developer interface, note the path names for the HTML header, footer, and banner.
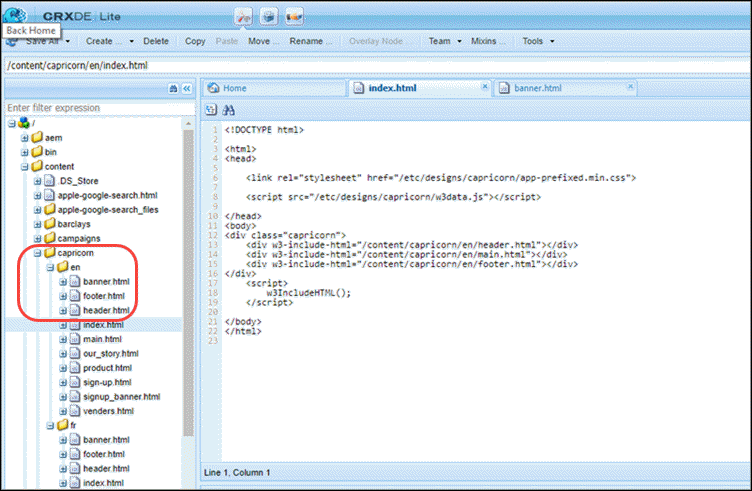
-
Under Connection Details, provide this information.
- Name—
Capricorn - CMS Source—AEM
- Connection Type—Public
- Server URL—
https://capricorn-cafe.comIf your CMS isn’t listed, select Other as the CMS source. For the server URL, enter a fully qualified domain name for a CMS server that’s accessible with HTTPS.
- Name—
-
(Optional) Set a root path for your CMS content. For example,
content/capricorn/en. The root path is relative to the server name. It’s a shortcut so that you can avoid entering the full path name when you add components later. -
(Optional) If your content has multiple languages, you can also include a placeholder for the language in the root path. For example,
content/capricorn/{language}. To configure the connection to support multiple languages, select Enable language mapping. Select a language, and enter the CMS language directory that’s in AEM. Make sure that each language that you add is enabled in your Experience Builder settings. Go to Experience Builder, and click Settings | Languages. If any are missing, add them. -
Save your connection settings.
To bring in the HTML header and footer content, use Experience Builder settings, and not CMS Connect (HTML). Defining the header and footer in Settings renders them before other page content.
-
From Experience Builder, go to Settings | CMS Connect.
-
Specify the connection and paths to the header and footer content.
-
For Header Source, select the connection, and enter a header path. For example,
content/capricorn/en/header.html. -
For Footer Source, select the connection, and enter a footer path. For example,
content/capricorn/en/footer.html.If you defined the root path as
content/capricorn/en, enterheader.htmlandfooter.htmlfor the header and footer paths.
Sometimes pulling in your CMS content requires a little creativity. For example, a SiteFinity master template generally contains other content in addition to a header and footer, all in the same file. In this case, the header content and footer content don’t have separate paths. As a workaround, you can construct separate templates: one that contains only the header content and another that contains only the footer content. You can then specify different paths in CMS Connect.
-
To display other HTML content from your CMS, such as the banner, use a CMS Connect (HTML) component from Experience Builder.
-
Drag a CMS Connect (HTML) component to a location on your site page.
-
Configure the component’s properties.
-
For CMS Source, select the connection.
-
Enter the path to the content. For example,
content/capricorn/en/banner.html. If you defined the root path in the connection ascontent/capricorn/en, enterbanner.html.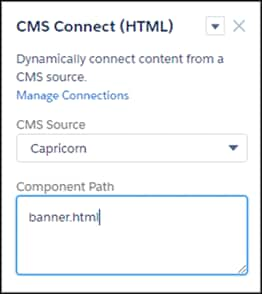
-
Your site now displays the site’s header, footer, and banner content.
- Set Up a Connection for Your JSON CMS
- Add CMS Header and Footer Components to Your Experience Builder Site
- Add CMS Connect (HTML) Components to Your Site Pages
This example shows you how to set up JSON content in your site using CMS Connect.
Let’s say you have a WordPress site called Capricorn Cafe, and you want to configure a CMS Connect (JSON) component that pulls blog content from that site into your site.
These example endpoints show the location of the JSON content for a content list and a single content item.
- Content list:
https://public-api.wordpress.com/rest/v1.1/sites/capricorncafeblog.wordpress.com/posts?number=6&page=1 - Content item:
https://public-api.wordpress.com/rest/v1.1/sites/capricorncafeblog.wordpress.com/posts/38
Suppose that you want to pull in a series of blogs with links to the individual blogs in full.
-
Under Connection Details, provide this information.
- Name—
Capricorn - CMS Source—WordPress
- Connection Type—Public
- Server URL—
https://public-api.wordpress.com
- Name—
-
Because you’re adding JSON content, don’t enter an HTML root path, CSS, or scripts. Those sections are for CMS HTML connections.
-
In the JSON section, click Add JSON.
-
For Content Type Name, enter
Blog Feed.A content type name groups lists and items for easy management. You can have up to 5 content types, each with up to one content item and 10 content lists.
-
Click Add content list, and provide this information.
- Name—
Blog List - Path—
rest/v1.1/sites/capricorncafeblog.wordpress.com/posts?number={itemsPerPage}&page={pageNumber}The path has two variables used for pagination. {itemsPerPage} is the number of items to display on a page. {pageNumber} is the current page number. The variable {offset} also applies to pagination and specifies a page offset. Variable values are computed dynamically when the CMS Connect (JSON) component is displayed. - Node Path—
postsBecause a JSON expression is expected in the Node Path, don’t enter an @.
- Name—
-
To generate a detail page and a link for each blog in the list, make sure that the content type has a content item and a content list. Click Add content item, and provide this information.
-
Name—
Blog Item -
Path—
rest/v1.1/sites/capricorncafeblog.wordpress.com/posts/{component}The {component} variable adds the component path dynamically. It uses the component path entered for the CMS Connect (JSON) component in Experience Builder.
-
ID Path—
ID -
Title Path—
title
Because JSON expressions are expected for ID Path and Title Path, don’t enter them with an @. JSON expressions are case-sensitive, so ID is different than id. Match what’s used in your JSON response.
-
-
-
Save your work.
-
In Experience Builder, drag a CMS Connect (JSON) component to a page.
-
Open the property editor, and configure the connection.
Use the @ symbol to denote JSON expressions.
- CMS Source—
Capricorn - JSON Content—Blog List
- Component Path—For a content list, leave this field blank.
- CMS Source—
-
Under Content List Layout, select Grid, and provide this information.
- Items Per Page—Enter a value, for example,
5. - Columns—Enter a value, for example,
2.
- Items Per Page—Enter a value, for example,
-
Under Content List Item Layout, select Card, and enter properties for the layout.
- Title—
@title - Author—
@author/name - Published On—
@date - Body—
@content - Image Source—
@featured_image
- Title—
-
Under Navigation, set up how the list redirects to a specific blog.
- Link Text—
Read More - Type—Community Page
- Link Text—
-
In the proper editor, click Save. After saving, you see the name created for the detail page. For example, Capricorn-Blog_Feed. The detail page shows the full blog item in the series.
To change the name or URL of the detail page, locate the page in the Pages menu in the top toolbar. Then modify its properties.
Your site page now displays the blog series using your CMS content. After you publish the changes, you can click the Read More link under a blog item in the series. The link takes you to a detail page generated dynamically for the blog.
After you publish your site, you can change your CMS connection settings. For example, suppose that you modify a content list path to point to news items instead of blog items. Because CMS connections are cached for the guest user, when you republish your site, the guest can see the update without a delay.
-
Create a CMS connection. For this example, let’s reuse the same connection.
-
In Experience Builder, drag a CMS Connect (JSON) component to a page.
-
Open the property editor, and configure the component.
-
CMS Source—
Capricorn -
JSON Content—Blog Item
-
Component Path—Enter the ID for the blog, for example,
38When you specify the component path for a content item, you can also use a dynamic variable, such as
{!id}. When you click a Read More link, for example, an ID value replaces the variable.
-
-
Under Content List Item Layout, select Detail, and enter properties for the item’s layout.
- Title—
@title - Author—
@author/name - Published On—
@date - Body—
@content - Image Source—
@featured_image
- Title—
-
Save your work.
Your site page is now configured to display your blog item.