Create a CMS Connection
Create a connection between your content management system and your Experience Builder site so you can render headers, footers, banners, blogs, and other content on your site pages.
-
Open Experience Workspaces.
-
Click Content Management | CMS Connect.
-
Click Add CMS Connection, if your site doesn’t have connections, or New.
-
For Name, enter a friendly name for the connection. The name shows up in your CMS workspace and other internal areas. (An API name is created for the connection behind the scenes, based on the name you enter.)
-
Select your CMS source.
If your CMS server isn’t listed, select Other. CMS Connect works with the HTML, JSON, CSS, and HTTP standards and isn’t provider-specific.
-
Select a connection type.
-
To create an authenticated connection, select Authenticated (1), and then select a named credential (2) that you defined previously to authenticate the connection to your external system. Authenticated connection types only work with JSON content.

Then, go to step 11.
-
To create a public connection, select Public (1), and then enter a server URL (2).
Enter the full path to a CMS server that’s accessible using HTTPS, and use a fully qualified domain name, such as
https://www.example.com. Public connection types work with all connection methods.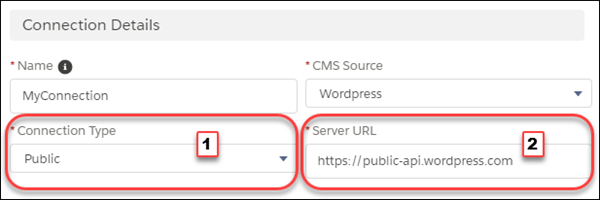
Then, go to step 7.
If your Content Security Policy is set to Strict CSP, you can receive a warning that the source doesn’t work. Test your connection to determine if you must choose a different CSP option for your site to use CMS Connect.
If your Content Security Policy is set to Relaxed CSP, the new URL is automatically added to the CSP Trusted Sites for your org. In addition:
- The new listing is named the same as the CMS connection, with a context of Experience Cloud site.
- If the URL is already in your list, no additional entry is made.
- If the name of the CSP Trusted Site is already taken, it’s made unique by appending a number (1, 2, 3, and so on).
- If you experience issues when testing your site, confirm the necessary URLs are in CSP Trusted Sites and try again. Content from external sources can contain other URLs that must be allowlisted to work properly.
-
-
For an HTML connection, enter the root path to the directory that your CMS content is in. You can include placeholders for language and component. Here’s an example of a root path to content in AEM:
content/mywebsite/{language}/{component}The
{language}placeholder isn’t required, but if you include it in your root path, enable language mapping and add at least one language. See Build a CMS Connect Root Path and Component Paths for details on root paths and how they work with component paths. -
If your CMS source is Adobe Experience Manager (AEM) and your HTML content is set up with personalization, you can use that personalized content in your site. To do that, enable Use Personalization. See Personalize Your External CMS Content for details on setting up personalization.
To use personalization, enable it for the components you want to personalize. Do that in Builder Settings for header and footer, and in Experience Builder for banners or other components.
-
To include CSS, click Add CSS to add one or more URLs to your CSS files. If your CSS is scoped, you can specify it in the Scope field. Style sheets load in the order listed. Use the up and down arrows to change the order.
-
To include JavaScript, click Add Script to add one or more URLs to your JavaScript files. Scripts load in the order listed. Use the up and down arrows to change the order.
-
To connect JSON content such as blogs, click Add JSON and enter a name, type, and path for each JSON component you want to add. See Set Up a Connection for Your JSON CMS for details.
-
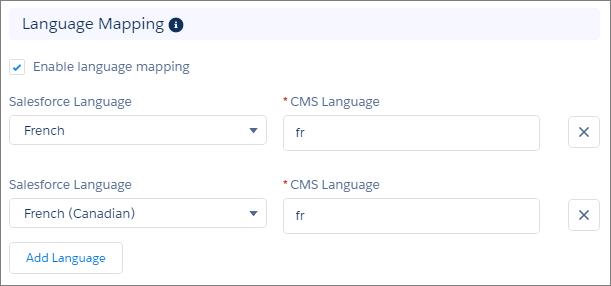
If your content has multiple languages, select Enable language mapping. See Set Up Language Mapping in Your CMS Connection for more information on setting up language mapping.
In the Salesforce Language dropdown, English is selected by default. To map English, for CMS Language, enter the directory name of your English language folder from AEM. For example, enter en.
To add more languages, click Add Language. For each language that you add from your CMS, make sure that it’s enabled in your Builder Settings. Go to Experience Builder, and click Settings | Languages. If any are missing, add them.
If you want to map languages from your site that you don’t have in your CMS, define the language in which the CMS content is displayed. For example, if your site has French and French Canadian enabled, you can set it up so the French Canadian site displays French content.
-
Save your work.
See Also