Code Your Agent Using Its Agent Script File
After you have the agent's authoring bundle in your DX project, either by generating it from scratch or retrieving it from your org, you customize the agent by coding its Agent Script file, which is the agent's blueprint. You can code the file directly in the VS Code editor, or use the Agentforce Vibes Extension to vibe code it. Vibe coding refers to using natural language prompts and letting Agentforce Vibes generate the actual code for you.
Agent Script is the language for building Agentforce agents. It combines the flexibility of natural language instructions with the reliability of programmatic expressions for handling business rules. Agent Script provides all the advantages of access to a large language model (LLM), while also giving you ways to add more deterministic behaviors to your agent. In Agent Script, you use expressions to define if-then-else conditions, transitions, and other logic; set, modify, and compare variables; and select topics and actions. You can build predictable, context-aware agent workflows that don’t rely on interpretation by an LLM.
The Agent Script Language Server VS Code extension adds support for Agent Script, just like other Salesforce VS Code extensions provide language support for Apex, Lightning Web Components (LWC), and so on. As a result, when you open an Agent Script file in the VS Code editor, you see the colored syntax highlighting, visual cues (such as red squiggles) for syntax errors, internal validation, and so on. The Outline view in VS Code is also populated by a symbol tree based on the contents of the Agent Script file.
See Agent Script for more information about the language itself.
Here's an example of a simple Agent Script file.
Enough with all these words, let's get coding already. Here's the high-level developer workflow:
-
In VS Code, open the agent's Agent Script file in the editor.
Agent Script files are located in the
aiAuthoringBundles/<bundle-API-name>directory of your DX project's package directory. For example, if your authoring bundle's API name isLocal_Info_Agentand you use the default package directory, openforce-app/main/default/aiAuthoringBundles/Local_Info_Agent/Local_Info_Agent.agent. -
Code the script file using the Agent Script language. See Agent Script Tips for some information to get you started.
-
If you want to vibe code:
- Open the Agentforce Vibes panel by clicking Agentforce Vibes (
 icon) in the Activity Bar.
 - At the bottom of the panel, click Manage Agentforce Rules, Workflows, Hooks & Skills (⚖️ icon) and then the Skills tab.
- Ensure that
agentforce-developmentis enabled.Enabling and using the Agentforce Vibes skills for Agent Script can rapidly increase your token consumption.
- Enter a prompt in the Agentforce Vibes chat box. Agentforce Vibes prompts for confirmation when it wants to modify your file, don't worry. See Vibe Coding Information and Sample Prompts.
- Open the Agentforce Vibes panel by clicking Agentforce Vibes (
-
Periodically validate the Agent Script file to ensure that it compiles.
-
Periodically preview the agent from its Agent Script file to see how it's working.
This screenshot shows VS Code ready to code an Agent Script file called Local_Info_Agent.agent; the highlighted parts are described after the screenshot. The custom layout of the VS Code panels is similar to how the Agentforce Builder UI in your org looks.

(1)shows theagentforcedxDX project open in the VS Code's file explorer.(2)shows the location of theLocal_Info_Agentauthoring bundle in the DX project package directory. The authoring bundle includes theLocal_Info_Agent.agentAgent Script file.(3)shows that the Outline view displays a symbol tree of the Agent Script file, with blocks such assystem,config,variables,topic_selector, and so on.(4)shows the openLocal_Info_Agent.agentAgent Script file, with colored syntax highlighting.(5)shows Agentforce Vibes.(6)shows a vibe coding prompt in the chat box, ready to be executed.(7)shows the icon to enable the Agentforce Vibes skills for working with Agent Script.
You should already have some basic information in your Agent Script file, either because you generated its authoring bundle from an agent spec YAML file or you retrieved an authoring bundle from your org. This section doesn't provide comprehensive information about how to code your script file, but it provides some tips to get you going. See the Agent Script documentation for more information and examples.
-
Learn about the characteristics of the Agent Script language itself, such as how to access resources, the language format and indentation, using expressions, and so on.
-
Familiarize yourself with the blocks that make up an Agent Script file. For example, the
systemblock contains general agent instructions, theconfigblock contains basic agent configuration, and thetopicblock contains all the information associated with topics, such as instructions, logic, and actions. -
Add the username of the Salesforce user that runs the agent to the
default_user_agentparameter of theconfigblock. You can create this user in your org using Setup or Agentforce Builder, or use theorg create agent-userCLI command. See Create the Default Agent User. -
Start with basic agent design, such as defining the required topics and the associated actions.
Don't worry if you haven't yet created the Apex classes, flows, and prompt templates that implement the actions. Simply reference them in your script file for now, as if they actually exist. When you later preview this agent, you can use simulated mode to mock the actions. If you do have existing Apex classes and flows that you want to use to implement actions, then go ahead and use them in the Agent Script file.
-
Determine when you want to allow the LLM to make its own reasoning decision and when you want the agent to execute deterministically.
-
Design the flow of control, such as what happens when the user makes its first request to the agent, what additional topics might be required, and how to transition between topics.
-
Check out this collection of easy-to-digest Agent Script examples. Each recipe demonstrates how to build a specific agent behavior in the fewest lines of script possible while following best practices. From
Hello Worldinteractions to sophisticated agent transitions, there's a recipe for that!
Agentforce Vibes uses skills to help you vibe code your Agent Script file. Skills are modular instruction sets that extend Agentforce Vibes' capabilities for specific tasks. Each skill packages detailed guidance, workflows, and optional resources that Agentforce Vibes loads only when relevant to your request. Unlike rules, which are always active, skills load on-demand so they don't consume context when you work on unrelated tasks.
Here are some prompts to get you started if you decide to use Agentforce Vibes to vibe code your Agent Script file.
- Change the display name to Local Info Agent.
- Add a new topic for updating the customer information if it's changed. Use an existing flow for the action, if you find one that's suitable. Otherwise, create a new flow.
- Add an action to the identify_customer topic for identifying a customer based on their cell phone.
- Review all the agent instructions and improve them for focus and conciseness.
Validating the Agent Script file ensures that it compiles successfully so that you can publish it to your org, and eventually activate it so your users can start using it.
Because an agent is defined by its authoring bundle, this documentation and the Agentforce DX tools use the two terms interchangeably.
For example, the CLI command discussed in this topic uses the term authoring bundle, such as agent validate authoring-bundle. However, the equivalent VS Code command uses the term agent, such as AFDX: Validate This Agent.
-
In VS Code, open the agent's Agent Script file, which is located in the
aiAuthoringBundles/<API-name>directory of your package directory. For example, if your agent's API name isLocal_Info_Agentand you use the default package directory in your DX project, openforce-app/main/default/aiAuthoringBundles/Local_Info_Agent/Local_Info_Agent.agent. -
Right-click the file in the editor and choose AFDX: Validate This Agent. You can also right-click from the script file in the explorer panel or choose the command from the Command Palette.
-
A progress bar in the lower right corner notifies you of the status of the validation.
If the validation fails, see the Problems tab for the list of syntax errors, a brief description of the error, and the location in the Agent Script file where the error occurred. This simple example shows that there's a typo for the description of the
start_agentblock.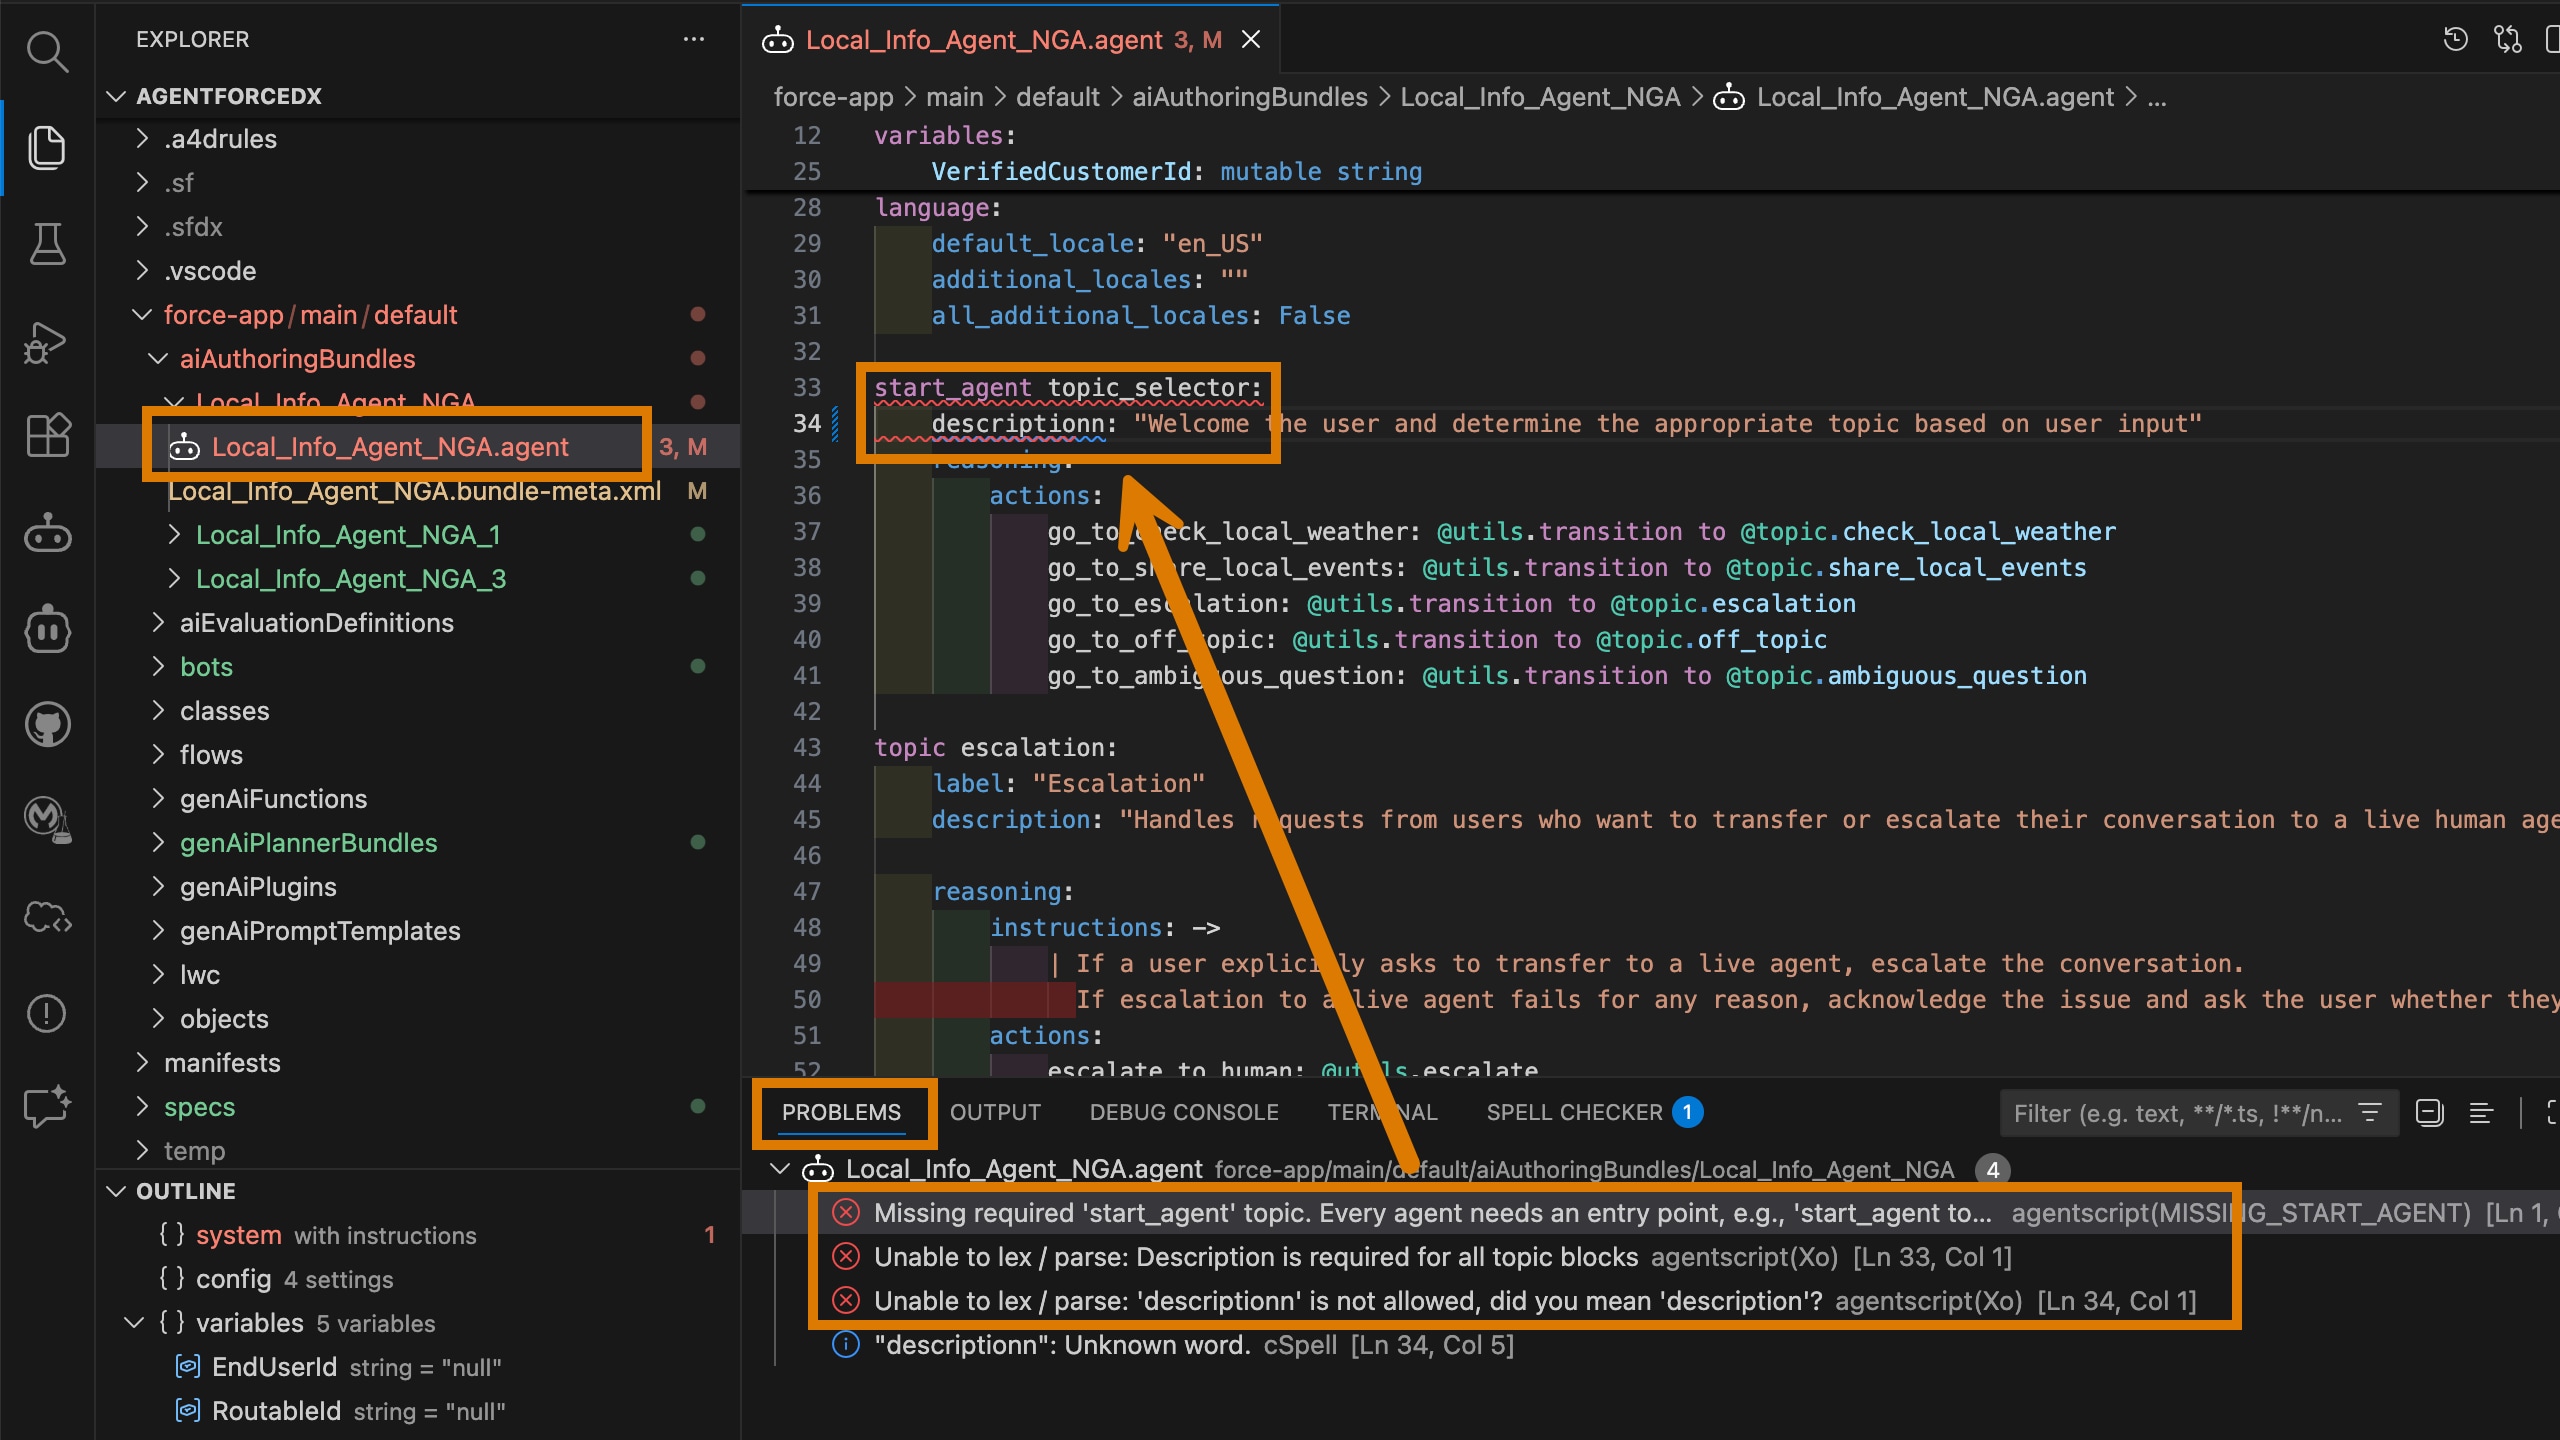
Fix the errors and then retry the validation.
-
From VS Code's integrated terminal, run this command from your DX project:
The command searches the DX project for authoring bundles and provides a list of their API names that you can choose from. You can also specify the Agent Script file you want to validate by passing its API name to the
--api-nameflag. -
The command output displays whether the validation failed or succeeded.
If the validation fails, the output displays the list of syntax errors, a brief description of the error, and the location in the Agent Script file where the error occurred. Fix the errors and then retry the validation.