Display Flow Stages with a Progress Indicator on the Flow Screen

If you track stages in your flow, display them at runtime by adding a custom component to the flow’s screens. Create a progress indicator component that displays the flow’s active stages and current stage, and make sure that it’s available for flow screens. When you add the component to each flow screen, pass the $Flow.ActiveStages and $Flow.CurrentStage global variables into the component’s attributes.

  1. Create the custom flowStages component.

    The flowStages component uses lightning:progressindicator to display the flow’s stages.

    1<aura:component implements="lightning:availableForFlowScreens">
    2    <!-- Attributes that store $Flow.ActiveStages and $Flow.CurrentStage -->
    3    <aura:attribute name="stages" type="String[]"/>
    4    <aura:attribute name="currentStage" type="String"/>
    5    <aura:handler name="init" value="{!this}" action="{!c.init}"/>
    6    <a href="#"/>
    7    <lightning:progressIndicator
    8        aura:id="progressIndicator"
    9        currentStep="{!v.currentStage}"
    10        type="path"/>
    11</aura:component>
  2. Create the design resource for the flowStages component.

    The design resource includes the stages and currentStage attributes so that they’re available in Flow Builder.

    1<design:component>
    2    <design:attribute name="stages" label="Stages" description="what stages are active"/>
    3    <design:attribute name="currentStage" label="Current Stage" description="the current stage"/>
    4</design:component>
  3. Create the CSS style resource for the flowStages component.

    1.THIS .slds-path__nav { margin-right: 0; } .THIS .slds-path__item:only-child { border-radius:
    215rem; }
  4. Create the client-side controller for the flowStages component.

    For each item in the stages attribute, the init method adds a lightning:progressStep component to the flowStages component markup.

    1({
    2  init: function (component, event, helper) {
    3    var progressIndicator = component.find("progressIndicator");
    4    for (let step of component.get("v.stages")) {
    5      $A.createComponent(
    6        "lightning:progressStep",
    7        {
    8          "aura:id": "step_" + step,
    9          label: step,
    10          value: step,
    11        },
    12        function (newProgressStep, status, errorMessage) {
    13          // Add the new step to the progress array
    14          if (status === "SUCCESS") {
    15            var body = progressIndicator.get("v.body");
    16            body.push(newProgressStep);
    17            progressIndicator.set("v.body", body);
    18          } else if (status === "INCOMPLETE") {
    19            // Show offline error
    20            console.log("No response from server, or client is offline.");
    21          } else if (status === "ERROR") {
    22            // Show error message
    23            console.log("Error: " + errorMessage);
    24          }
    25        },
    26      );
    27    }
    28  },
    29});
  5. Create a flow in Flow Builder.

    1. From Setup, in the Quick Find box, enter Flows, and then select Flows. Then click New Flow.

    2. Select Start From Scratch, and then click Next.

    3. Select Screen Flow as the flow type, and then click Create.

  6. Configure the stages in your flow.

    1. Click the Manager panel icon Manage panel icon, and then click New Resource. Then select Stage.

    2. Enter a label and order, and then specify whether the stage is active by default.

      If you select Active by default, the stage is added to {!$Flow.ActiveStages} when a flow interview starts.

  7. Configure the screen elements in your flow.

    1. Click the Add Element icon Add Element icon on the canvas.

    2. Select the Screen interaction element.

    3. To the screen, add the custom flowStages component. For Current Stage, enter {!$Flow.CurrentStage}. For Stages, enter {!$Flow.ActiveStages}. In the Advanced section, select Manually Assign Variables.

  8. Configure the assignment elements in your flow.

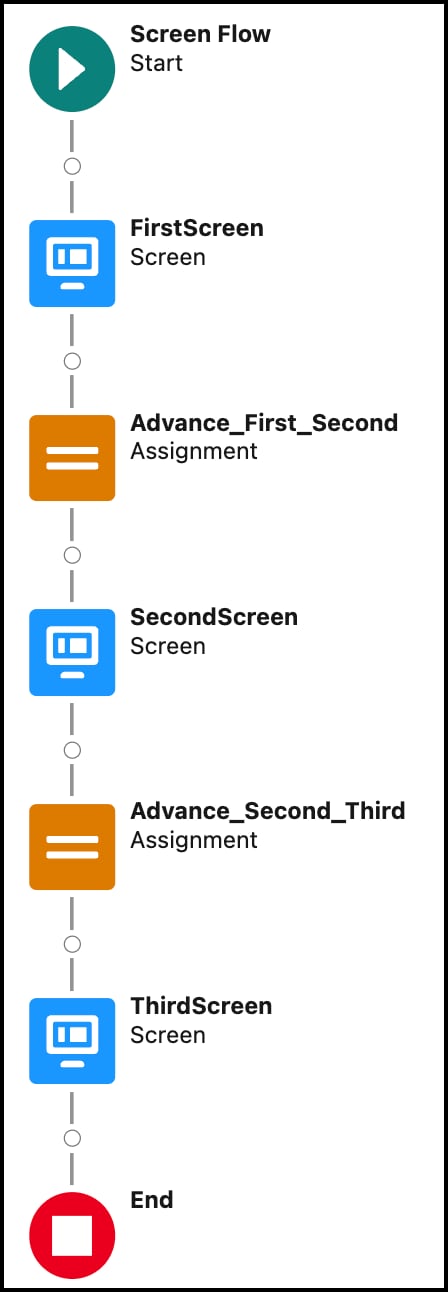
    1. Between each screen element, click the Add Element icon Add Element icon on the canvas.

    2. Select the Assignment logic element.

    3. Set the Current Stage variable equal to the following stage in the flow.

      For example, for the assignment element between the screens that contain the first and second stages, set the Current Stage equal to name_of_second_stage.

  9. Save your flow.

An example flow in Flow Builder that uses the custom flowStages component.

See Also