Build a Lightning App Using Agentforce Vibes
Transform your ideas into custom Lightning apps that extend CRM workflows directly in Lightning Experience. Through conversations with Agentforce Vibes, implement custom objects and fields, complex business logic, and dynamic UI components.
Before you begin, make sure that Agentforce Vibes is configured correctly in your development environment. For full prerequisites and enablement steps, see Set Up Agentforce Vibes Extension.
To activate the Metadata Experts MCP Server (Beta) and the Metadata API Context MCP Server (Beta) in your org, follow these steps.
- From Setup, in the Quick Find box, enter
MCP, and then select MCP Servers. - On the MCP Servers page, select metadata-experts.
- On the Metadata Experts MCP Server page, click Activate.
- Return to the MCP Servers page, and then select salesforce-api-context.
- On the API Context MCP Server page, click Activate.
After you activate the Salesforce MCP servers, open Agentforce Vibes IDE or VS Code with the Agentforce Vibes extension.
- If you use VS Code with the Agentforce Vibes extension, confirm that you have the latest versions of the Salesforce CLI and the Salesforce Extension Pack installed.
- To open the Agentforce Vibes panel, from the Activity Bar, click Agentforce Vibes
 .
. - If you use VS Code with the Agentforce Vibes extension, create or open a Salesforce DX project, and then connect to a Salesforce org. In Agentforce Vibes IDE, a connected Salesforce DX project is created automatically.
- To confirm that these MCP servers are enabled and connected to your org, from the Agentforce Vibes panel, click Manage MCP Servers
 , and verify their status.
- Salesforce DX MCP server
- Salesforce Metadata Experts MCP server
- Salesforce API Context MCP server
- To confirm that all Salesforce skills and all Salesforce rules are enabled, click Manage Rules, Workflows, Hooks & Skills
 , and verify their status.
If you encounter setup issues, check out the Troubleshooting Checklist.
While vibe coding thrives on iteration and experimentation, following a structured roadmap helps ensure consistent outcomes. For the best results, use this recommended workflow and refer to Common Development Workflows and Best Practices for guidance.
The easiest way to create a Lightning app is from the Agentforce Vibes welcome page.
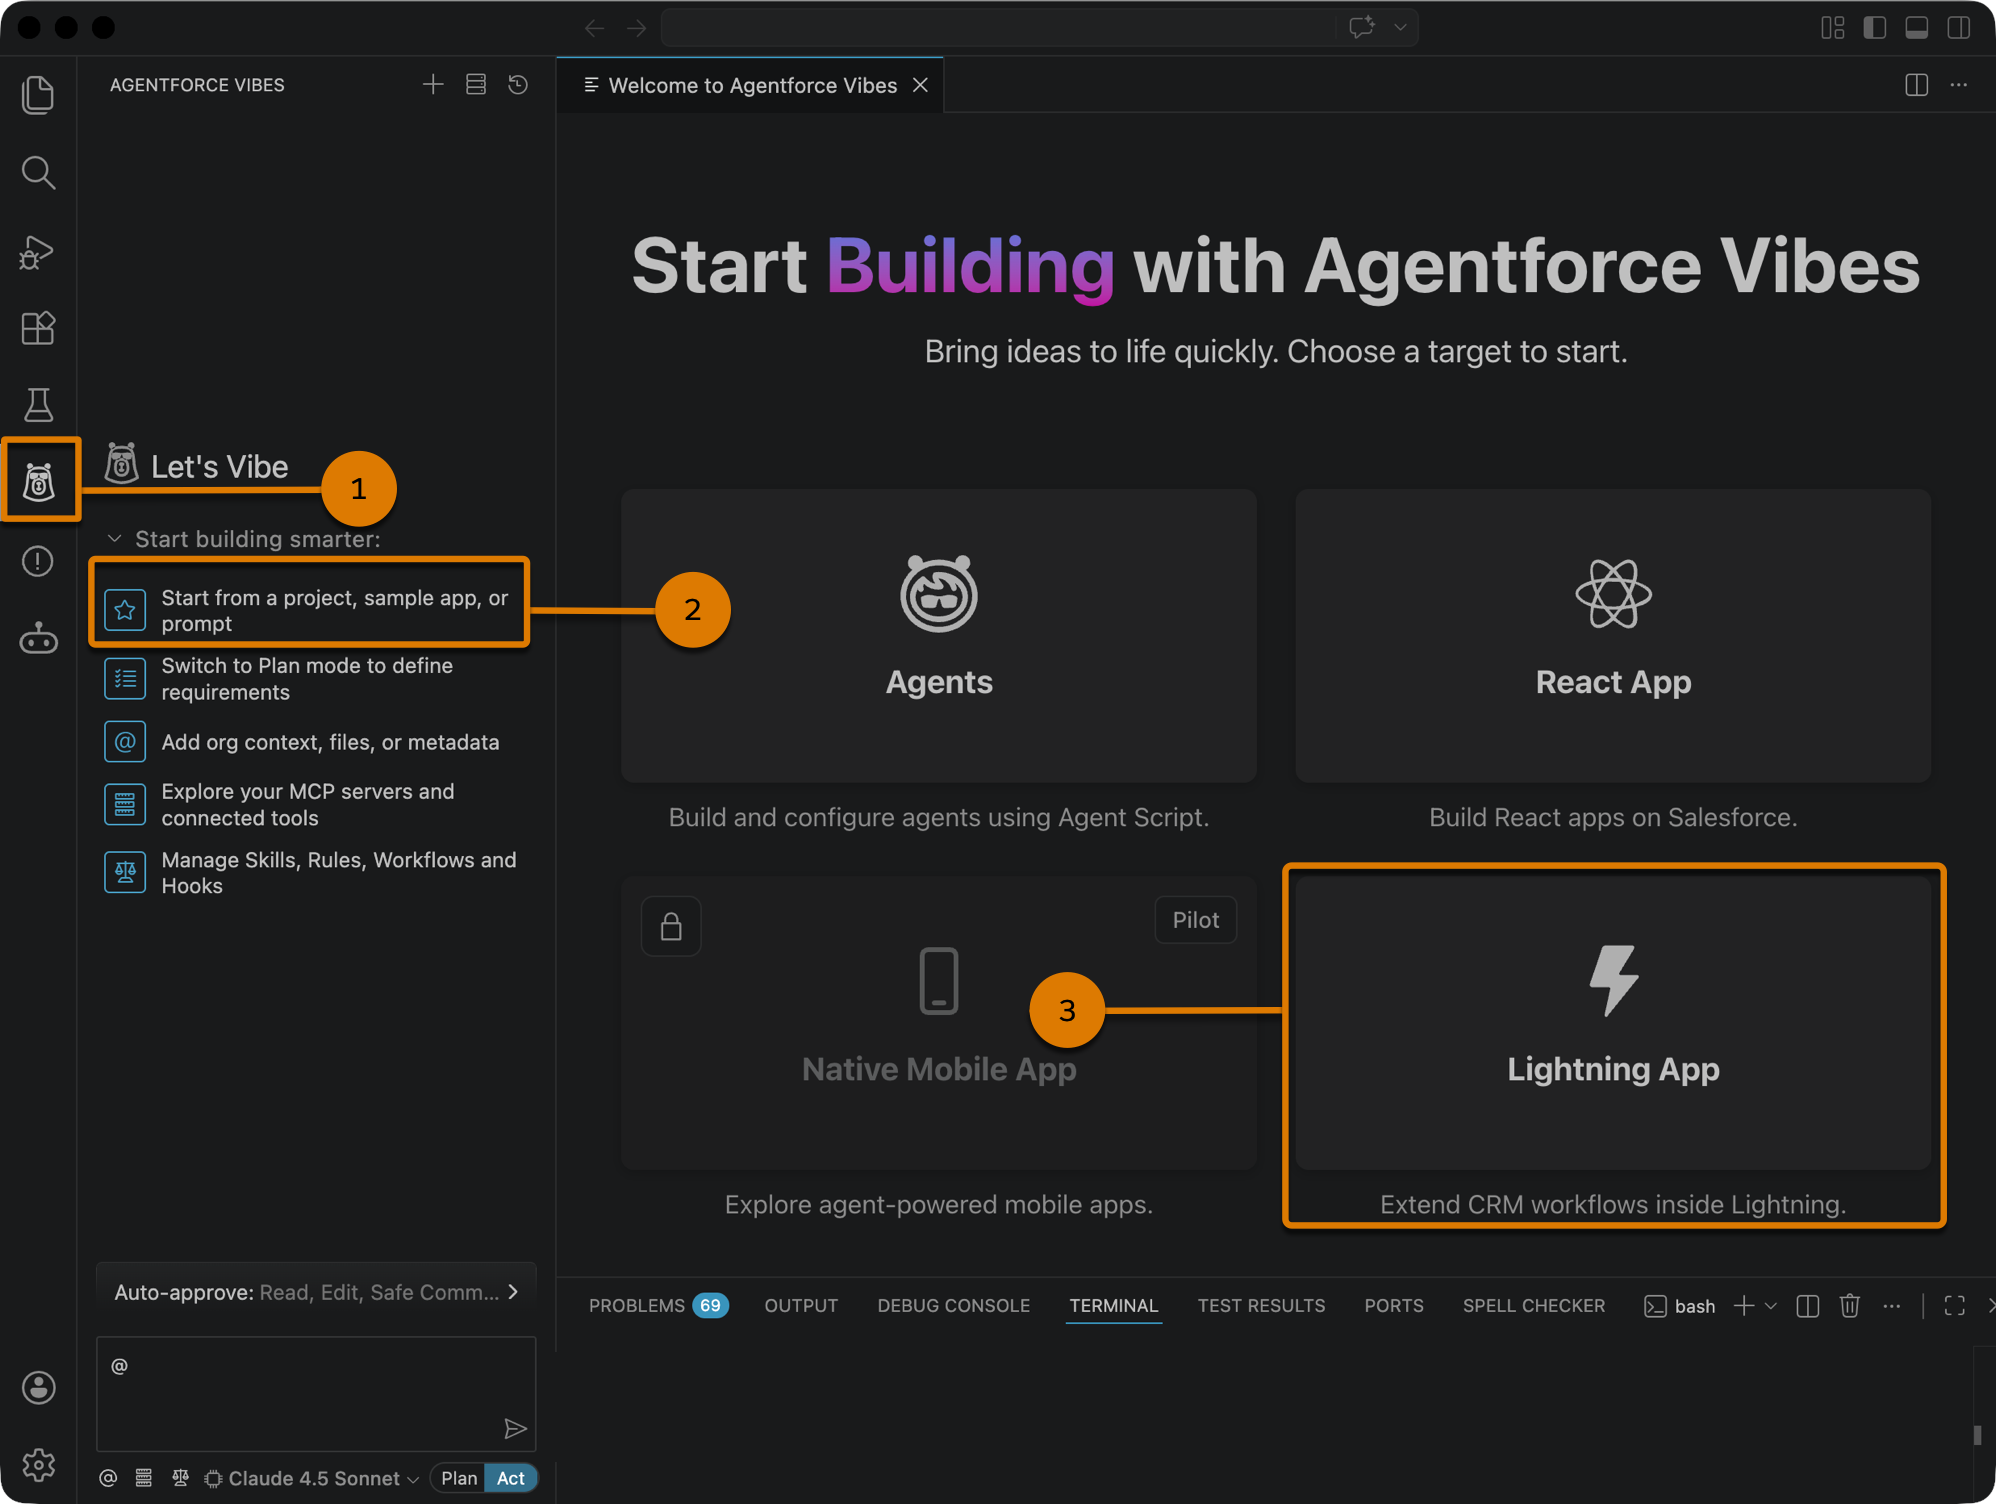
To open the Agentforce Vibes welcome page:
- If you use VS Code with the Agentforce Vibes extension, create or open a Salesforce DX project, and then connect to a Salesforce org. In Agentforce Vibes IDE, a connected Salesforce DX project is created automatically.
- To open the Agentforce Vibes panel, from the Activity Bar, click Agentforce Vibes (1).
- To open the Agentforce Vibes welcome page, select Start from a project, sample app, or prompt in the Agentforce Vibes chat interface (2).
Alternatively, you can open VS Code Command Palette (⇧⌘P) and enter Agentforce: Show Welcome Page. - Click Lightning App (3).
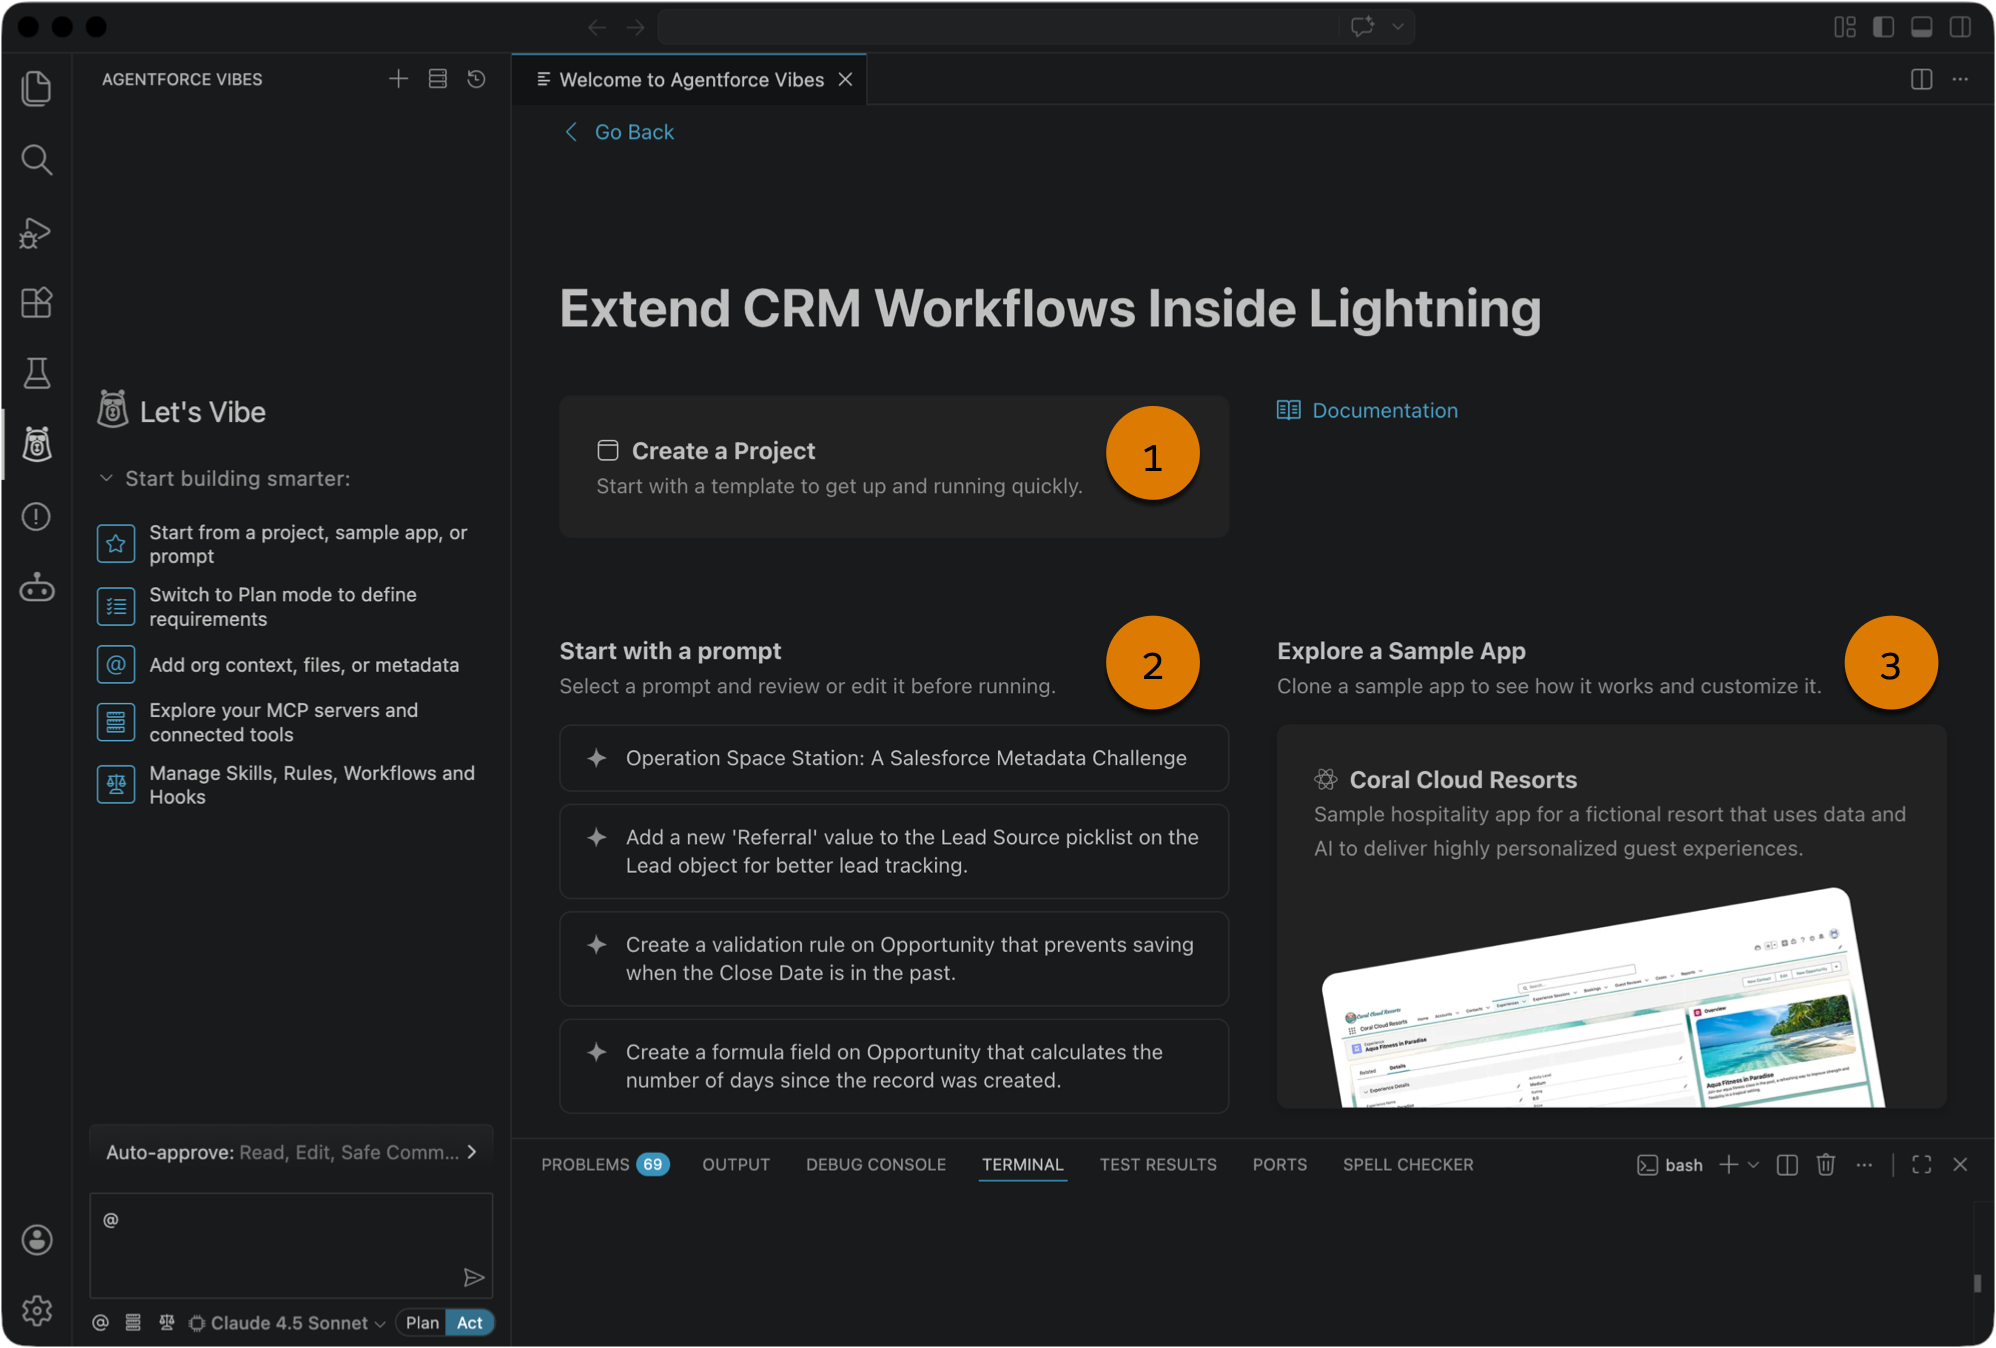
From this page, choose a starting point based on your project scope, familiarity with Lightning apps, and experience with vibe coding. You can start from a project template (1), a prompt (2), or a sample Lightning app (3).
To build a Lightning app from scratch, create a project from the standard Salesforce DX template. The standard DX template provides the project structure necessary to deploy local sources to an org, but doesn’t contain any prebuilt app components or metadata.
If your connected org has existing metadata that’s relevant to the project, retrieve the source to the project before you begin a conversation with Agentforce Vibes. By doing so, you provide Agentforce Vibes with the full context of your org, so it can produce better responses.
If you’re less familiar with agentic development, get some inspiration by using one of the sample prompts. Select the prompt to paste it into the Agentforce Vibes chat interface of the open Salesforce DX project.
The available sample prompts vary in scope and complexity, which demonstrates the diverse range of development workflows that Agentforce Vibes supports.
For example, the Operation Space Station prompt lists all project requirements upfront. The prompt includes descriptions of custom objects and fields, permission sets, custom tabs, a highlights panel, and a record-triggered flow. By using this type of prompt, you can build a complete Lightning app with minimal back-and-forth conversations.
Other sample prompts focus on single, discrete tasks, such as creating a picklist value, a validation rule, or a formula field. These shorter prompts are ideal if you prefer to develop apps incrementally. They’re also great if you use a smaller LLM model, which can struggle with the comprehensive analysis often required for multistep tasks.
For other sample prompts that are relevant to building Lightning apps, see Write Effective Prompts.
For even more inspiration, create a new Salesforce DX project that automatically includes the metadata for one of these sample Lightning apps. Use this metadata as a starting point for experimentation with Agentforce Vibes.
- Coral Cloud Resorts: A sample hospitality app that showcases Coral Cloud Resorts, a fictional resort that uses data and AI to deliver highly personalized guest experiences. It presents different ways and benefits of bringing generative AI into business workflows, including new smart automation capabilities, content generation, and summarization.
- E-Bikes: A sample app that helps E-Bikes, a fictional electric bicycle manufacturer, manage its products and reseller orders. The app features a rich user experience built with Lightning web components and integration with an Experience Cloud site.
Because a Lightning app is architecturally complex, we recommend starting the development process in Plan Mode. Plan Mode is a read-only interaction mode that helps you build a comprehensive implementation plan with the context of the connected org and the existing project code.
In Plan Mode, you can start with a short, general prompt so Agentforce Vibes can guide you through its project recommendations. Alternatively, you can provide a longer prompt that includes full project requirements, similar to the sample Operation Space Station prompt. In Plan Mode, Agentforce Vibes responds with its interpretation of your requirements, flag potential gaps, and ask you for clarification if necessary.
For more details, see Agentforce Plan and Act Modes.
After you confirm your project requirements, switch to Act Mode. In this mode, Agentforce Vibes generates metadata according to the plan that you created. It uses Salesforce-hosted MCP servers and Salesforce Skills, along with any external MCP servers, rules, workflows, hooks, and skills that you enable.
In general, Agentforce Vibes creates metadata in this order.
- Create the data model, including custom objects and fields.
- Create business logic, such as validation rules, Apex triggers, and flows.
- Create UI components, such as Lightning pages, Lightning web components, and custom tabs.
- Create permission sets.
- Create the Lightning app.
As Agentforce Vibes creates metadata files, you can review each modification by using checkpoints.
In the same Agentforce Vibes task, ask Agentforce Vibes to build unit tests. Your request can be simple, for example “Generate comprehensive tests for my Lightning app.”
With the context of your Salesforce DX project, Agentforce Vibes can create a custom test suite that meets code coverage requirements. Apex test methods can test validation rules, flows, object and field relationships, and so on. If your app includes Lightning web components, Agentforce Vibes can help you create Jest tests.
Thoroughly review generated tests for consistency in logic, meaningful assertions, and coverage of edge cases.
Before you can run Apex tests, you must deploy your project metadata to an org. To deploy, ask Agentforce Vibes to “Deploy all metadata to my org.” After deployment, Agentforce Vibes provides the deployment results, a deployment summary, and recommended next steps.
After the first deployment, request Agentforce Vibes to help you complete these additional tasks.
- Assign the Lightning app to the appropriate users.
- Assign permission sets to the appropriate users.
- Activate flows.
Then redeploy your Lightning app.
After you deploy your Lightning app, run the unit tests. In your project, request Agentforce Vibes to “Run all test classes” or “Run the test classes that I just deployed.” Agentforce Vibes provides the test results, along with suggestions if any of the tests failed.
As you preview your deployed app, you may find areas that you want to fix or improve. To refine your app, use the same Salesforce DX project and begin another conversation with Agentforce Vibes. You can even ask Agentforce Vibes to analyze your project and suggest specific areas for improvement.
After refinement, redeploy your Lightning app.
If you encounter issues while building a Lightning app, first review the general Agentforce Vibes troubleshooting checklists.
Here’s some other common issues and solutions relevant to Lightning app development.
Agentforce Vibes Unable to Generate Metadata
- Confirm that the required Salesforce MCP servers, skills, and rules are active.
- As Agentforce Vibes responds to your requests, confirm that it invokes the relevant MCP tools and Salesforce skills.
- Confirm that your custom MCP tools, skills, and rules don’t conflict with the Salesforce MCP tools, skills, and rules.
Lightning App Not in App Launcher
Confirm that the Lightning app is assigned to your user. If not, you can ask Agentforce Vibes to assign app permissions, and then redeploy the app.
Objects or Fields Not Visible or Editable in Lightning Pages
Confirm that the correct permission sets are assigned to your user. If not, you can ask Agentforce Vibes to assign these permissions, and then redeploy the app.