


CRM Analytics Configuration
Now that the Lightning Web Component code is ready to go, it’s time to bring the component into a CRM Analytics dashboard.
Basic Configuration
After pushing your code into a Salesforce org, go to the CRM Analytics dashboard designer and create a blank dashboard.
-
To create a dashboard component, drop a component widget (
 ) onto a dashboard.
 -
Select the Lightning Components tab.
If you don’t see this tab, you must enable this feature. For enablement information, see the Setup page.
Note
-
Choose the Hello World Lightning Web Component that you created from the list.
-
To see the title attribute, expand the Component Attributes on the right-hand side. Type your name in the box, and then watch your code in action.
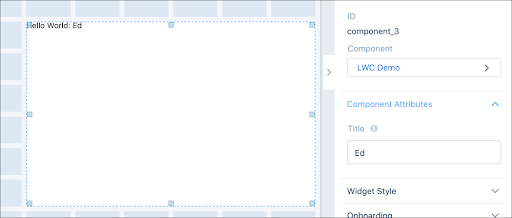
You can use Preview to run the dashboard, but many attributes update during design time, for faster testing.
Note
Advanced Configuration - SOQL Query
Let’s make your component dynamic by adding some user attributes. You can use SOQL with a filter by the current user token to grab any field from your user object. For this example, use the First.Name field.
-
On your dashboard, click Edit.
-
In the dashboard editor, click a blank space.
-
At the top-right, click the Create Query button.
-
Select the Salesforce Object tab.
-
Select the User object.
-
To edit the SOQL, click
 .
. -
Paste this SOQL into the editor:
1SELECT FirstName, COUNT(Id) FROM User WHERE Id= '!{User.Id}' GROUP BY FirstName ORDER BY FirstName ASC LIMIT 1 -
Name the query and click Done.import chartjsPluginSubtitle from ‘@salesforce/resourceUrl/chartJsPluginSubtitle’;
Now you have a query that returns one row containing the current user’s first name. Use the interactions UI to wire it into your step.
- To bring up the query panel to the right, click a blank space on the dashboard.
- Find your new SOQL query, and then from its dropdown menu, select Properties.
- Click Advanced Editor.
- Under Source Query, select your query.
- For Source Data, choose
cell,0, andFirstName. - For Interaction Type, keep
Result. - Optionally, add a default value in case no results are found. This example uses
You. - Copy the interaction.
- Save your work.
- Click on your component and then click Advanced Editor in the Widget menu.
- In the editor, paste the interaction as the title value and click Save.
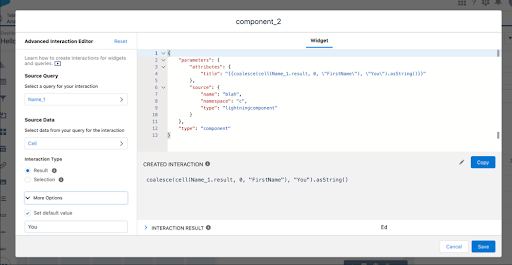
Next. Try it out. You have a dynamic value automatically set by the current user viewing your content. If it’s not working, preview your results from the query panel to verify the data is coming back correct. To debug for typos, use the Advanced Editor, or cmd+e/CTRL+e to view the dashboard JSON.
Advanced End-User Configuration - Static Step UI
Using bindings, you can create any dynamic value from existing queries and selections. Let’s make a set of discrete values that an end user can select that drives an attribute in your LWC code.
- Drag a toggle widget onto the dashboard page.
- To configure the widget, click the Toggle button.
- At the bottom of the configuration menu, choose Create Custom Query.
- Under the Display column, add a few options. This example uses the many names of Salesforce Analytics:
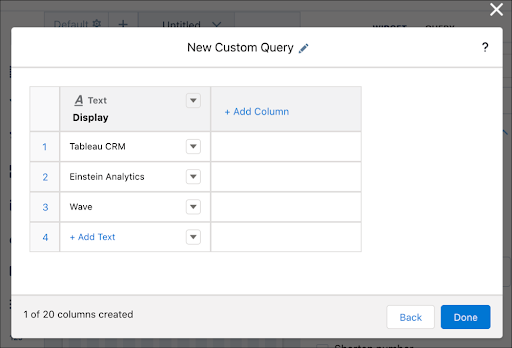
- Click Done.
- To show the Properties panel on the right, click your LWC Component.
- Click Advanced Editor.
- To create an interaction, choose the static query you created.
- For Source Data, select
cell,0, andDisplay. - Choose a selection binding.
- Optionally, add a default value in case no results are found. This example uses whoever the user is.
- Copy and paste the interaction as the title value.
- Save your changes.
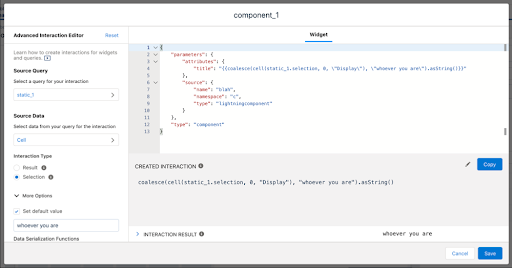
Instead of setting a default value, you can go into the query properties and set the selection mode to SingleRequired. This setting ensures there’s always a selection for the query.
Note
And there you have it. Preview your dashboard to try it out. Select a name from the toggle and then watch your Lightning Web Component say “Hello” to that name.
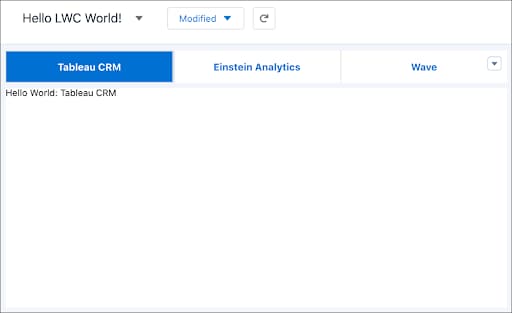
Now that you have an understanding of attributes and configuration, feel free to add more to your widget. You can add style and CSS options to your component and expose them as attributes, such as Text Size, Text Color, or Background Color.
See Also
 j
j