Force.com Platform Fundamentals
 j
jNewer Version Available
Try It Out: Create the “Notify Recruiting Manager” Time-Dependent Workflow Task
At this point, we should still be on the Specifying Workflow Actions page for our Assign Position to Recruiter Queue workflow rule. If not, you can return there from Setup by entering Workflow Rules in the Quick Find box, then selecting Workflow Rules, clicking Assign Position to Recruiter, and then clicking Edit in the Workflow Actions area.
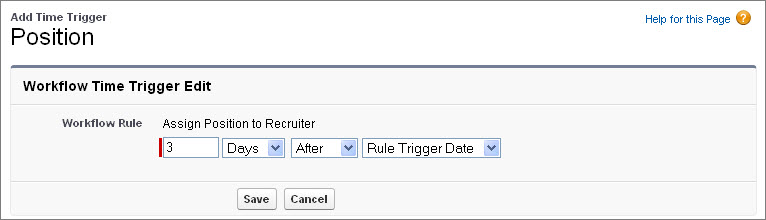
Before we can define a time-dependent workflow task, we first must specify a time trigger. Time triggers define when the time-dependent workflow actions should fire.
- Click Add Time Trigger.
In this case, we want our recruiting manager to be notified three days after a position has been assigned to the Unclaimed Positions queue.
- Use the text box and drop-down lists to specify 3 Days After Rule Trigger Date.
- Click Save.
Our time trigger is now listed in the Time-Dependent Workflow Actions area. The Add Workflow Action drop-down button is now active, and we can define our workflow task as usual.
- In the Time-Dependent Workflow Actions area, click Add Workflow Action and select New Task.
- In the Assigned To field, select the Recruiting Manager role.
- In the Subject field, enter Assign Unclaimed Position Record to Recruiter. When you move your mouse from the Subject field, the Unique Name field should be Assign_Unclaimed_Position_Record_to_Recruiter.
- Set the Due Date field to Rule Trigger Date plus 4 days.
Since this workflow action won't fire until three days after the original Rule Trigger Date, making the Due Date four days after the Rule Trigger Date gives the recruiting manager one additional day to assign the position to a recruiter.
- Set the Status to Not Started.
- Set the Priority to High.
- Select Notify Assignee. (This option is unavailable when user control over task assignment notifications is enabled.)
- Click Save.
- Click Done.
Almost done! At this point, all we need to do is activate our workflow rule. However, if you click the Activate button now, an error message appears saying that the Default Workflow User must be set before activating the rule. What's that?
The default workflow user is the user who should be assigned as the owner of a workflow action if the user who originally triggered the rule is no longer active. If your organization uses time-dependent actions in workflow rules, you must designate a default workflow user. Salesforce displays this username in the Created By field for tasks, the Sending User field for email, and the Last Modified By field for field updates. Salesforce does not display this username for outbound messages. If a problem occurs with a pending action, the default workflow user receives an email notification. To set the default workflow user:
- From Setup, enter Process Automation Settings in the Quick Find box, then select Process Automation Settings.
- Set the Default Workflow User field to any user in your organization. In most cases, it's best to choose a system administrator.
- Click Save.
Now we can activate the workflow rule:
- From Setup, enter Workflow Rules in the Quick Find box, then select Workflow Rules.
- Click Activate next to the Assign Position to Recruiter workflow rule.