


Lightning Communities Developer Guide
 j
jNewer Version Available
Create Custom Content Types for Salesforce CMS
| Available in: Lightning Experience |
| Available in: Enterprise, Performance, Unlimited, and Developer Editions |
| User Permissions Needed | |
|---|---|
| To create workspaces and channels in the Salesforce CMS app: |
|
| To manage content, contributors, and channels within a Salesforce CMS workspace: |
|
| To only manage content within a Salesforce CMS workspace: | Assigned a content manager role in that CMS workspace |
| To create a community: |
|
| To access a community’s Content Management workspace: |
|
| To customize a community: |
|
Create custom content types as XML files using the ManagedContentType type. When you create a custom content type in your org, it appears as a form for adding content in the Salesforce CMS app. A custom content type is organized as groups of attributes that comprise nodes. Each node represents a field in the form.
After content is published to your community through the Salesforce CMS app, fields can be positioned, styled, and sometimes used as an overlay on images.
Let's look at the steps for creating a custom content type.
-
Before you begin, think about the information that your custom content type must
include. Identify the information that you want to be able to manipulate or highlight when
the content is displayed on a community page. Design the form with those items as their
own fields. For example, if you’re creating an events content type, you likely require a
title, a location, a date, and a description field.
-
To identify your custom content, create a node of type NAMEFIELD.
Typically, a title field type is the most useful.
Create the rest of the XML file that represents your plan.
- As you add the other fields, decide which are required (isRequired) and which are optional. Then consider whether they need placeholderText or helpText to guide your content creators about what kind of information is expected or allowed. Also, if working with multilingual sites, decide which fields to localize (isLocalizable).
- To test the form in the Salesforce CMS app, add the content type to your org. Publish and test content created using the new content type in a community to confirm you can achieve the layouts you require.
Example
With these steps in mind, now let's tackle an enhanced blog custom content type.
This content type gives you the same rich text as News, but with extra fields, such as Author Name and Category, that could be used for marketing, by calling out the author as an expert, or visual highlighting a product as "New!".
Let's map out the fields to make sure we cover our needs before creating the XML file.
| Field Name | Field Type | Other attributes | Required? |
|---|---|---|---|
| Blog Title | text |
Designated NAMEFIELD for easy identification in lists placeholder text: Enter an SEO-friendly title... helptext: Title to be shown in the blog post |
Yes |
| Primary Image | image | helptext: Main image that's shown at the top of the blog post | No |
| Main Content | rte | helptext: Blog's main body | Yes |
| Excerpt | text | No | |
| Category | text | helptext: Shown as tag text when a preview is rendered | Yes |
| Author Name | text | No | |
| Date to Show | text | No | |
| Footer Content | rte | helptext | Yes |
| Content Slug | System added | Yes |
The following ManagedContentType example shows the definition of our enhanced blog custom content type.
1<?xml version="1.0" encoding="UTF-8"?>
2<ManagedContentType xmlns="http://soap.sforce.com/2006/04/metadata">
3    <description>Engineering blogs published on salesforce.com/devblog</description>
4    <developerName>engBlog</developerName>
5    <managedContentNodeTypes>
6        <helpText>Title to be shown in the blog post</helpText>
7        <isLocalizable>true</isLocalizable>
8        <isRequired>true</isRequired>
9        <nodeLabel>Blog Title</nodeLabel>
10        <nodeName>title</nodeName>
11        <nodeType>NAMEFIELD</nodeType>
12        <placeholderText>Enter an SEO friendly title...</placeholderText>
13    </managedContentNodeTypes>
14    <managedContentNodeTypes>
15        <helpText>Main image that's shown at the top of the blog post</helpText>
16        <isLocalizable>false</isLocalizable>
17        <isRequired>false</isRequired>
18        <nodeLabel>Primay Image</nodeLabel>
19        <nodeName>primaryImage</nodeName>
20        <nodeType>IMG</nodeType>
21    </managedContentNodeTypes>
22    <managedContentNodeTypes>
23        <helpText>Blog's main body</helpText>
24        <isLocalizable>true</isLocalizable>
25        <isRequired>true</isRequired>
26        <nodeLabel>Main Content</nodeLabel>
27        <nodeName>body</nodeName>
28        <nodeType>RTE</nodeType>
29    </managedContentNodeTypes>
30    <managedContentNodeTypes>
31        <isLocalizable>true</isLocalizable>
32        <isRequired>false</isRequired>
33        <nodeLabel>Excerpt</nodeLabel>
34        <nodeName>excerpt</nodeName>
35        <nodeType>MTEXT</nodeType>
36    </managedContentNodeTypes>
37    <managedContentNodeTypes>
38        <helpText>Shown as a tag text when a preview is rendered</helpText>
39        <isLocalizable>true</isLocalizable>
40        <isRequired>true</isRequired>
41        <nodeLabel>Category</nodeLabel>
42        <nodeName>category</nodeName>
43        <nodeType>TEXT</nodeType>
44    </managedContentNodeTypes>
45    <managedContentNodeTypes>
46        <isLocalizable>true</isLocalizable>
47        <isRequired>false</isRequired>
48        <nodeLabel>Author Name</nodeLabel>
49        <nodeName>authorName</nodeName>
50        <nodeType>TEXT</nodeType>
51    </managedContentNodeTypes>
52    <managedContentNodeTypes>
53        <isLocalizable>true</isLocalizable>
54        <isRequired>false</isRequired>
55        <nodeLabel>Date to Show</nodeLabel>
56        <nodeName>date</nodeName>
57        <nodeType>TEXT</nodeType>
58        <placeholderText>Enter human readable date</placeholderText>
59    </managedContentNodeTypes>
60    <managedContentNodeTypes>
61        <helpText>Blog's footer</helpText>
62        <isLocalizable>true</isLocalizable>
63        <isRequired>true</isRequired>
64        <nodeLabel>Footer content</nodeLabel>
65        <nodeName>footer</nodeName>
66        <nodeType>RTE</nodeType>
67    </managedContentNodeTypes>
68    <masterLabel>Blog</masterLabel>
69</ManagedContentType>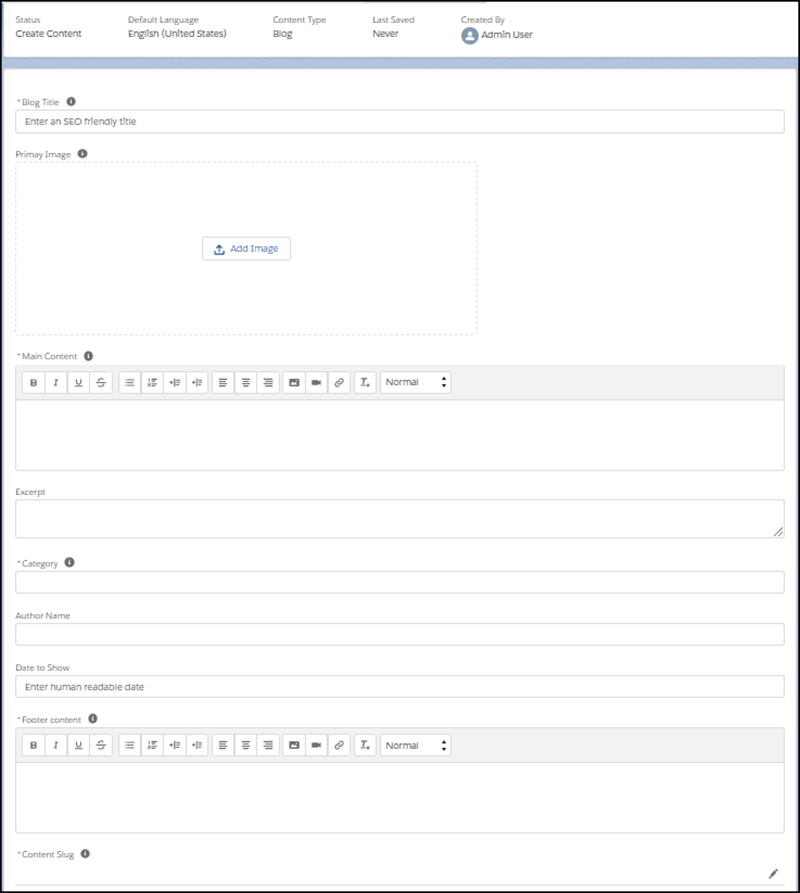
Create a Content detail page for the content type in Experience Builder.