Service Cloud Voice Implementation Guide
 j
jNewer Version Available
Give Customers the Option to Request a Callback
| Ease of Implementation | Medium |
| Estimated Time to Implement | 30 minutes |
The IVR looks at how long the last person in the queue has been waiting. The wait time is five minutes by default. If the wait time is greater than the specified time, the IVR asks if the caller wants to continue waiting or to request a callback.
If the caller opts for the callback, the IVR asks the caller to enter a phone number.
When an agent becomes available, the callback request is pushed to the agent in the Omni-Channel utility. If the agent accepts the callback request, the phone number is automatically dialed.
Prerequisites
If your contact center was created before the Spring ’21 release, download the updated Sample_SCV_Inbound_Flow_With_Transcription contact flow from the Service Cloud Voice repo on Github. Import it into Amazon Connect.
If your contact center was created after the Spring ’21 release, then it already contains the Sample_SCV_Inbound_Flow_With_Transcription, so you can skip the first step.
To implement this use case, you need either the AWS root user or AWS administrator credentials.
Step 1: Import the Contact Flow into Amazon Connect
- Log in to your Amazon Connect instance.
- Hover over Routing, then click Contact flows.
- Click Create contact flow.
- Click the down arrow next to Save in the top-right corner.
- Click Import flow (beta).
- Click Select. In the file browser, select the Sample_SCV_Inbound_Flow_With_Transcription file from your downloads folder.
- Click Import. The contact flow is imported and opens in a window where you can edit it. Next, modify the contact attribute blocks.
Step 2: Modify the Contact Flow Blocks
- Log in to your Amazon Connect instance.
- Hover over Routing, then click Contact flows.
- Select the Sample_SCV_Inbound_Flow_With_Transcription contact flow.
- Optionally modify the following blocks. To modify a block, select the block, edit the
settings, and save your work.
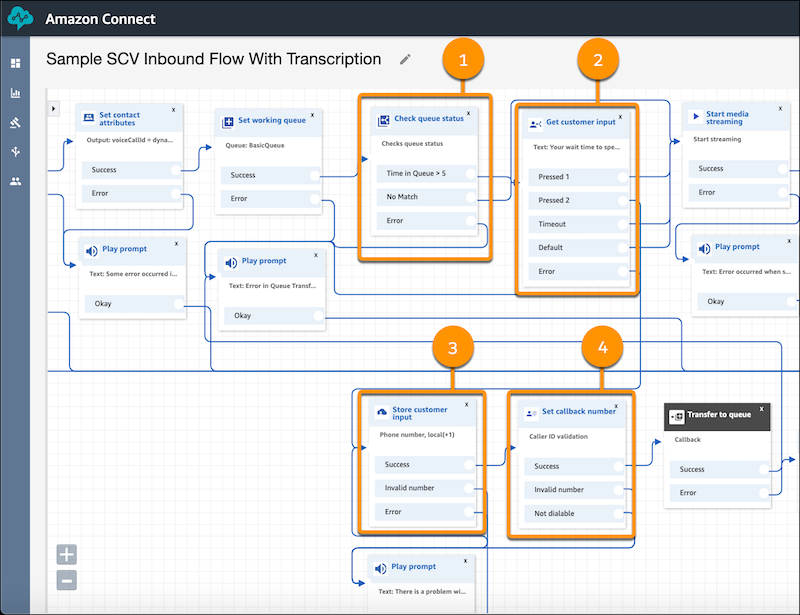
- The Check queue status block tells the system to check how long the last person in the queue has been waiting (item 1 in screenshot). You can modify the time; for example, you can make it shorter or longer.
- The Get customer input block tells the system to play a prompt. The prompt asks the customer to press 1 to remain in the queue, or to press 2 to request a callback (item 2 in screenshot). You can modify the prompt’s wording.
- The Store customer input block asks the customer to enter a phone number for the callback (item 3 in screenshot).
- The Transfer to queue block adds the callback request to the
callback queue so callbacks are pushed to available agents (item 4 in screenshot).
There are three settings that you can customize:
- Initial delay: The initial delay is the minimum amount of time after the first call ends before the system attempts the callback. By default, the delay is 60 seconds.
- Max number of retries: If the customer doesn’t answer when the agent calls back, the callback request goes back in the queue and the system attempts to make another callback.
- Minimum time between attempts: If the customer doesn't answer the phone, this setting is how long the system waits before trying again.
Step 3: Publish the Contact Flow
- To make the contact flow active, click Publish.
Test This Example
To test this example, you need two phones.
- Log in to Salesforce, open the Omni-Channel utility, and log in to Voice.
- Call your contact center with one phone. The call appears in the Call Controls tab in the Omni-Channel utility.
- Don’t accept the call, and make sure that another agent doesn’t accept it. Stay on the line and wait in the queue for at least five minutes, or for however long you specified in the contact attribute block.
- Use the second phone to call your contact center. If the first caller is waiting for at least five minutes, then callback prompt is played for the second caller.
- To select the callback option, press 2 and enter your phone number, and then hang up.
The callback request is pushed to the next available agent. When the agent accepts the call, the outbound call is dialed and your phone rings.