Service Cloud Voice Implementation Guide
 j
jNewer Version Available
Give Customers the Option to Transfer to SMS in the Interactive Voice Response (IVR)
This example builds on the methods created in the “Link New or
Existing Case to Voice Call Record” recipe by adding another IVR option to switch to SMS. When
a customer selects the SMS option, a Voice Call record is created and a flow sends an
automated outbound SMS message.
| Ease of Implementation | Medium |
| Estimated Time to Implement | 1 hour |
Prerequisites
To run through this example:
- You must have at least one Digital Engagement license to enable SMS capabilities.
- You must have a working SMS channel in Salesforce.
- You must complete the previous example: Link New or Existing Case to Voice Call Record.
To learn more about SMS Text Messaging with Salesforce, see Set Up SMS Text Messaging.
Step 1: Create an SMS Messaging Template
- From Setup, enter Messaging Templates in the Quick Find box, then select Messaging Templates.
- Click New.
- Complete the fields as follows.
Field Name Value Template Name IVRTransfer Developer Name IVRTransfer Message Enter your message. For example: Our messaging team is here to help you! Please respond to this message to connect with an agent. - Click Save.

Step 2: Update Your “SCVB - Voice Actions” Flow
- Copy the Developer Name for your Messaging channel. You’ll use
this exact value in the flow that you’re going to update.
- From Setup, enter Messaging Settings in the Quick Find box, then select Messaging Settings.
- Click Edit for your desired SMS channel.
- Record the value in the Developer Name field. For example, Text_US_15551234567. This value is used later for the Messaging Channel Unique Name.
- From Setup, enter Flows in the Quick Find box, then select Flows under Process Automation.
- Open the “SCVB - Voice Actions” flow.
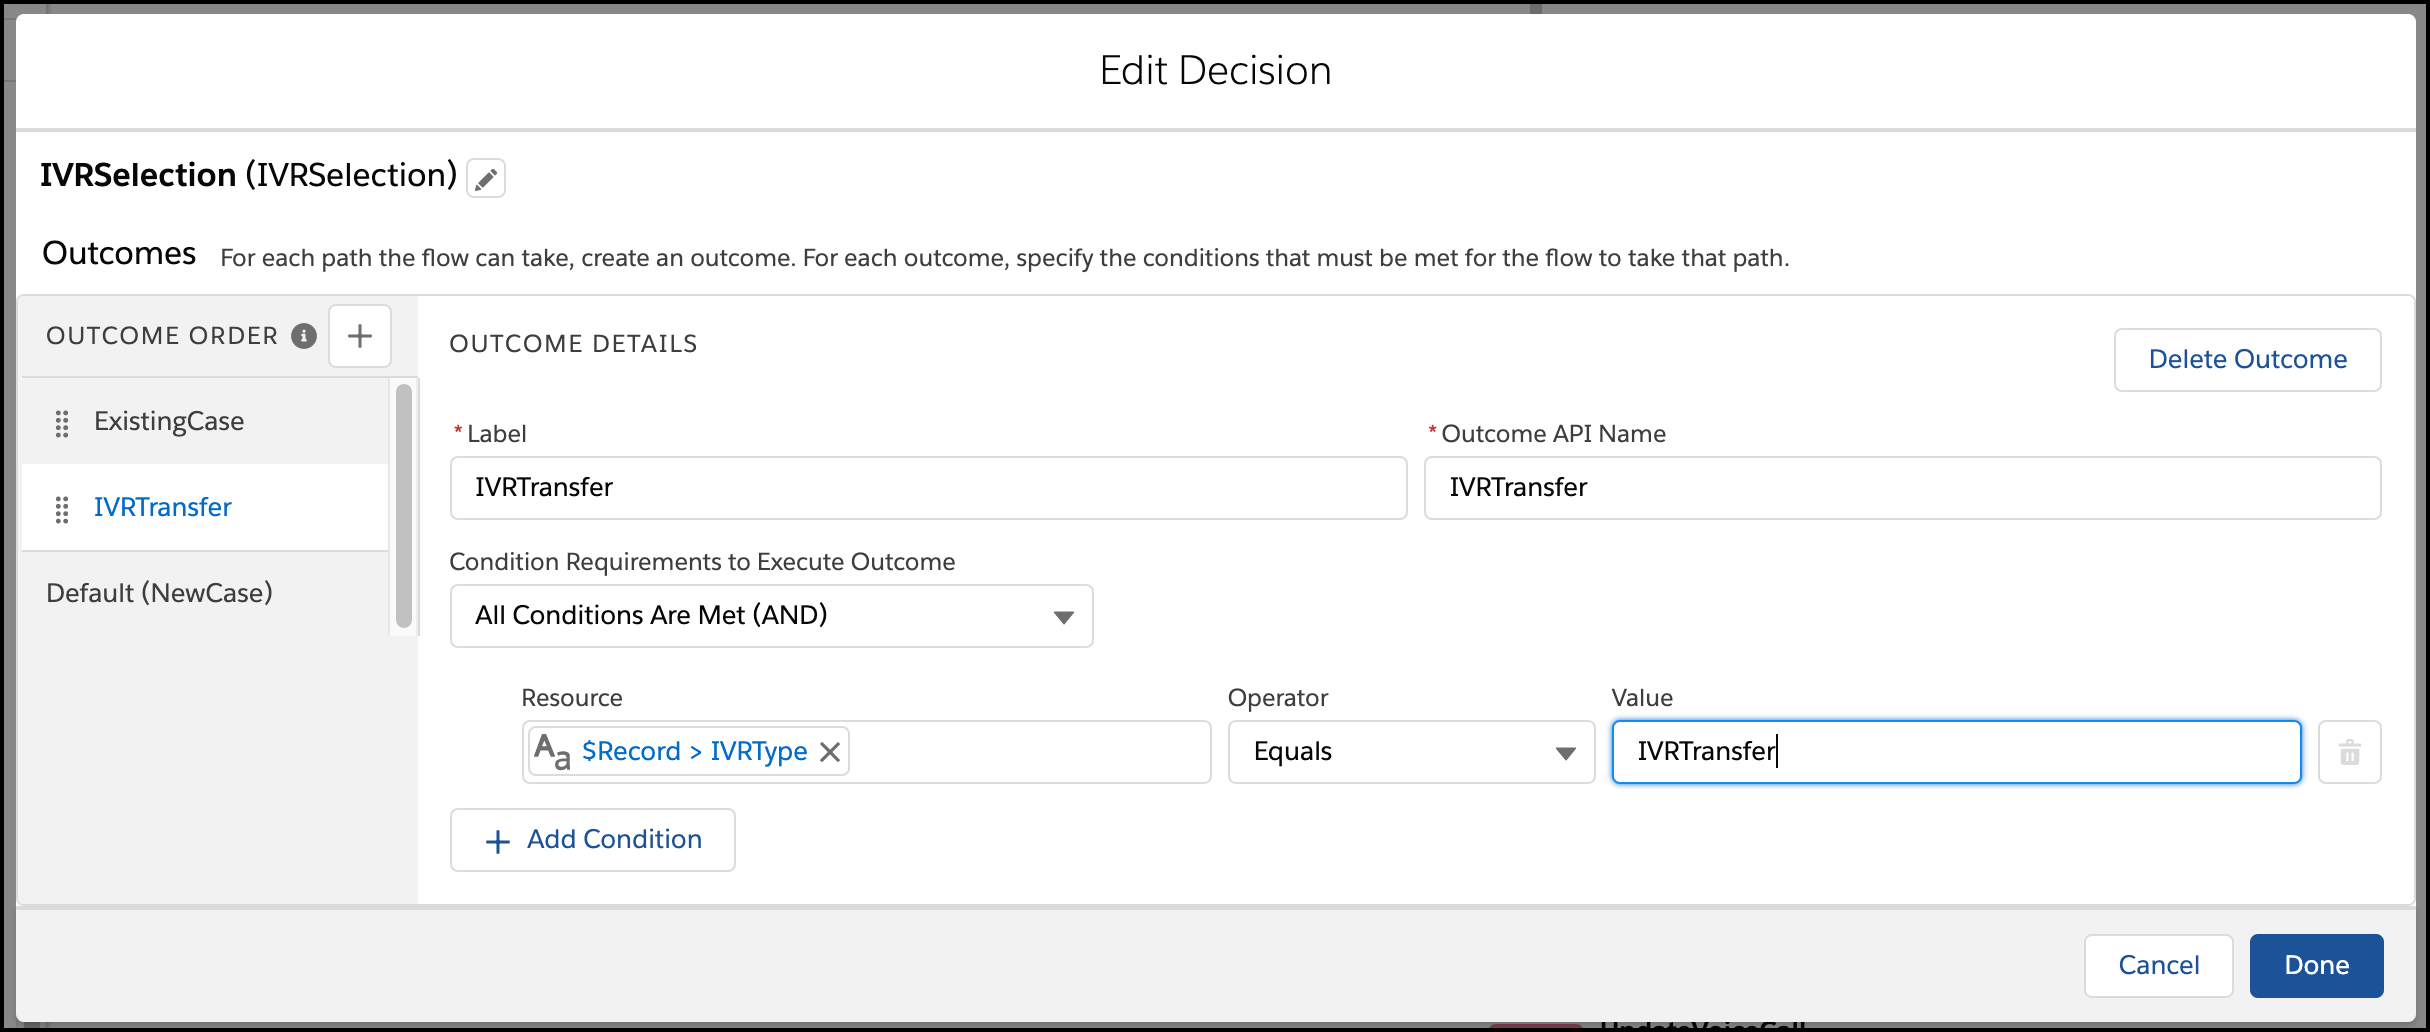
- Add an outcome to the “IVRSelection” decision element.
- Click Edit Element on the decision element.
- Click the + next to Outcome Order.
- Complete the fields as follows.
Field Name Value Label IVRTransfer Condition Requirements to Execute Outcome All Conditions are Are Met (AND) Resource $Record.IVRType__c IVRType__c is a custom field for the VoiceCall Salesforce object.
Operator Equals Value IVRTransfer This value matches the value set in the Contact Flow.
- Click Done to save the new outcome.
- On the “IVRTransfer” branch, click the + to add an element action.
- On the Add Element screen, select Action.
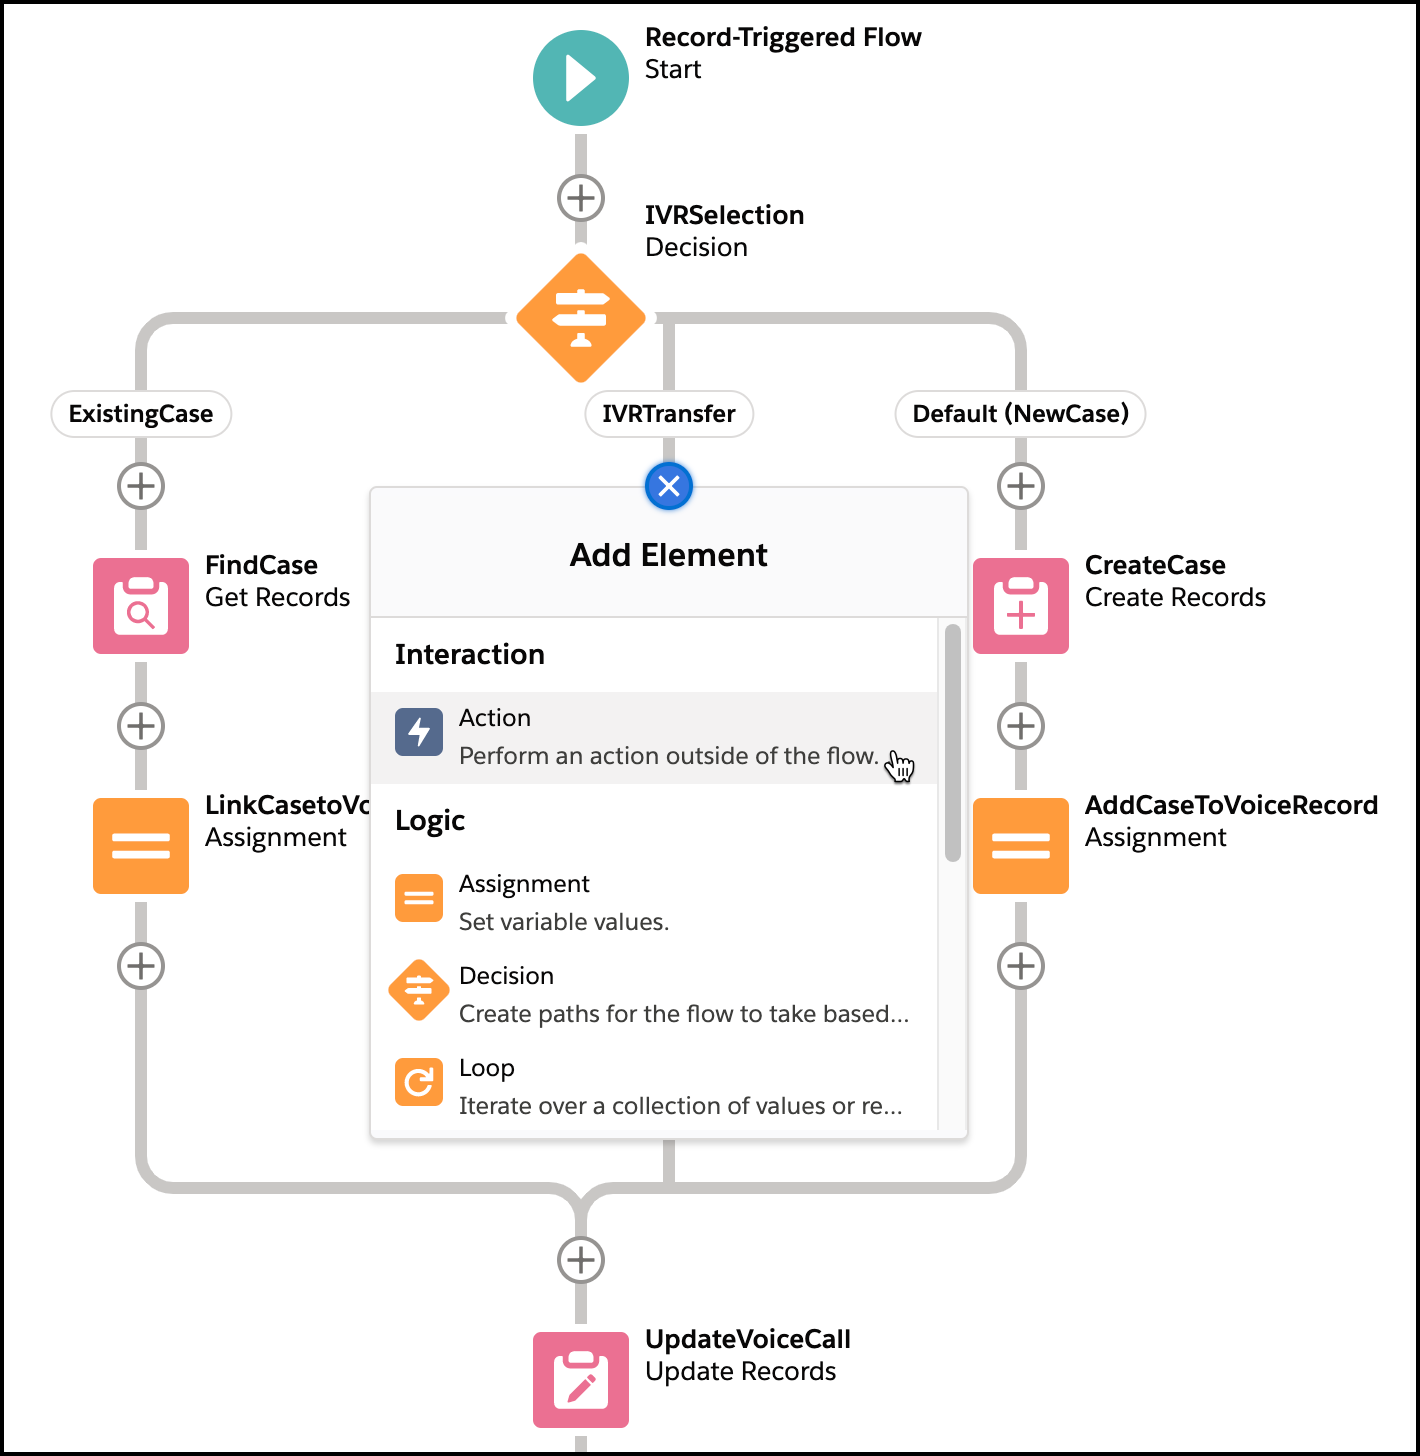
- From the New Action page, search for and select Messaging Notification.
- Complete the fields as follows.
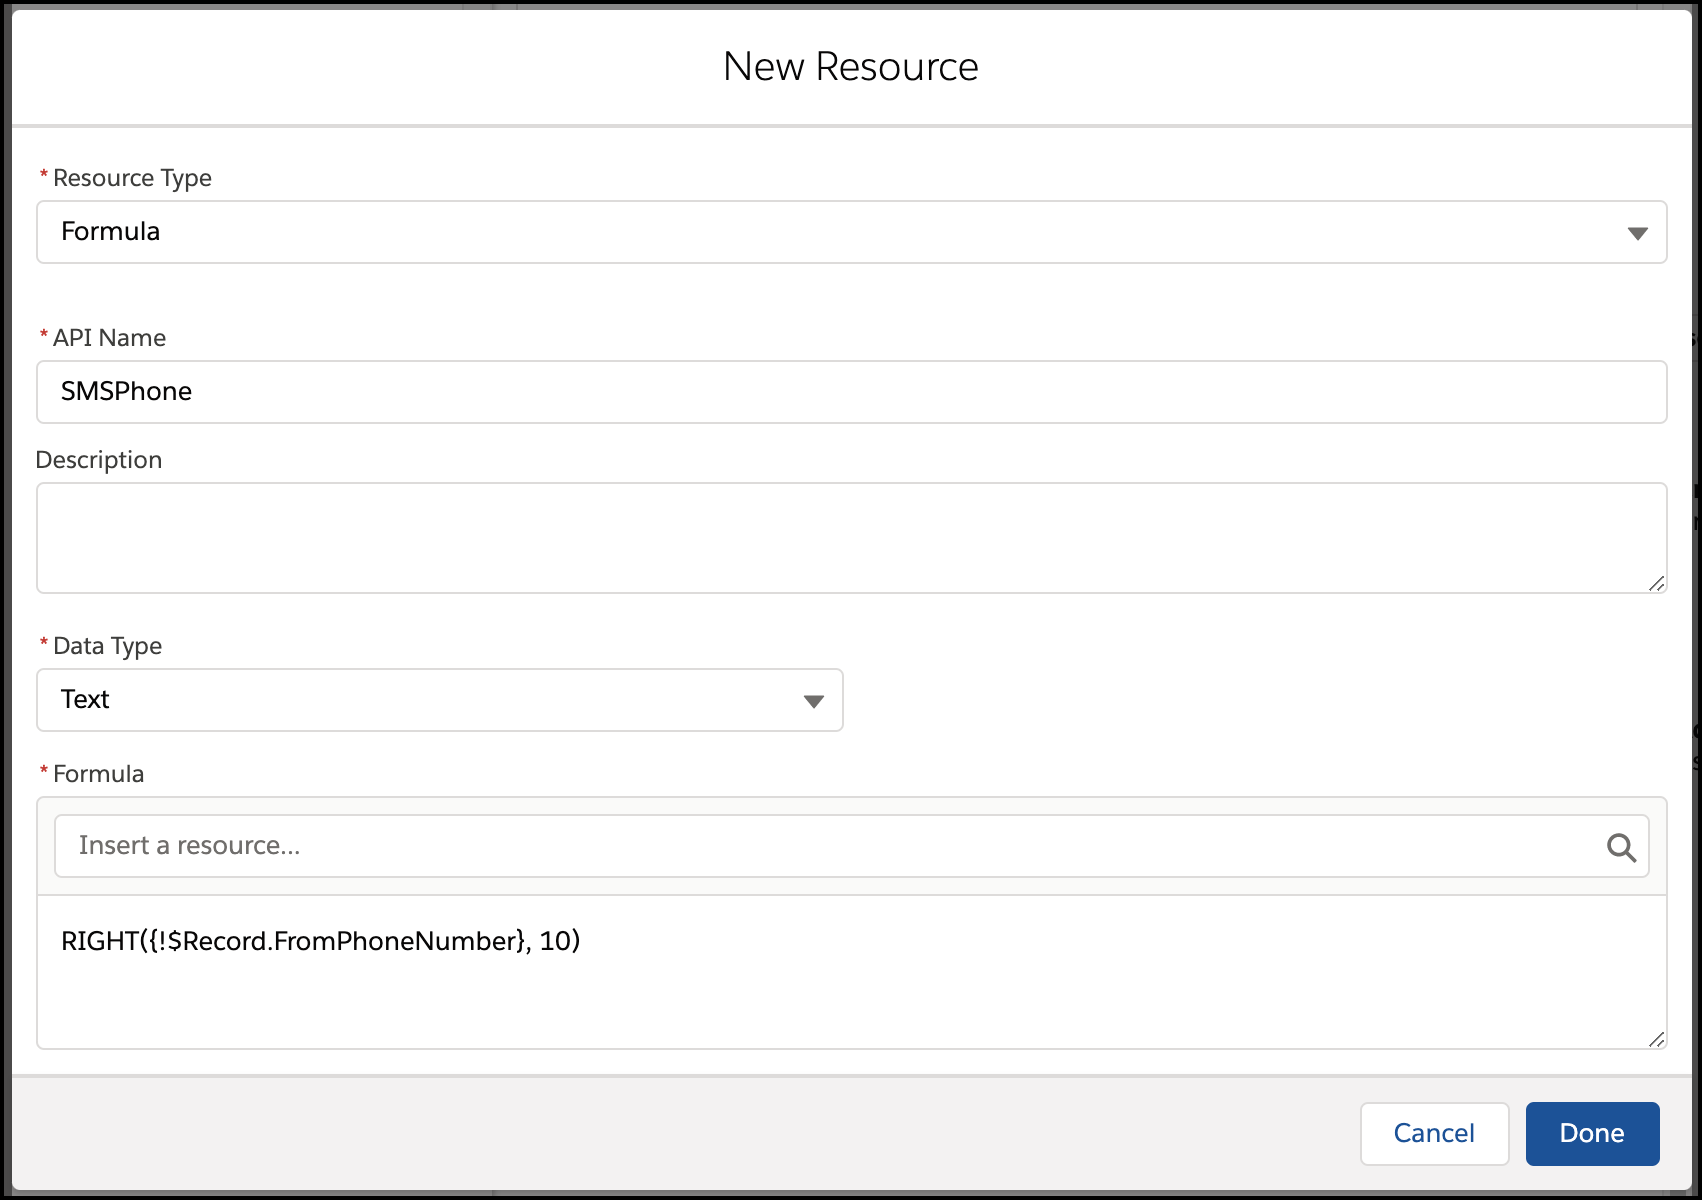
Field Name Value Label SendTransferSMS Messaging Channel Unique Name Enter the Developer Name for your messaging channel that you recorded earlier. For example, Text_US_15551234567. Messaging Template Unique Name Select the template you previously created (IVRTransfer). Context Record ID Change the toggle to “Include” and enter {!$Record.Id}. Recipient Phone Number Change the toggle to “Include” and select New Resource for the field value. Complete the fields as follows, and then click Done. - Resource Type: Formula
- API Name: SMSPhone
- Data Type: Text
- Formula: Enter RIGHT({!$Record.FromPhoneNumber}, 10). In other markets, such as in the UK, if the caller number is already in E164 format, use {!$Record.FromPhoneNumber} to ensure the outbound SMS is sent.
Recipient Record ID Change the toggle to “Include” and enter {!$Record.Id}. - Click Done to save the new action.

- On the Add Element screen, select Action.
- On your flow with the new outcome, click Save As, and then click
Save.

- Click Activate to activate your flow.
Step 3: Import the “SCVCB - SMS Transfer” Contact Flow
When the “SCVCB - SMS Transfer” contact flow is called, it creates a voice call record with
the IVRSelection equal to SMSTransfer.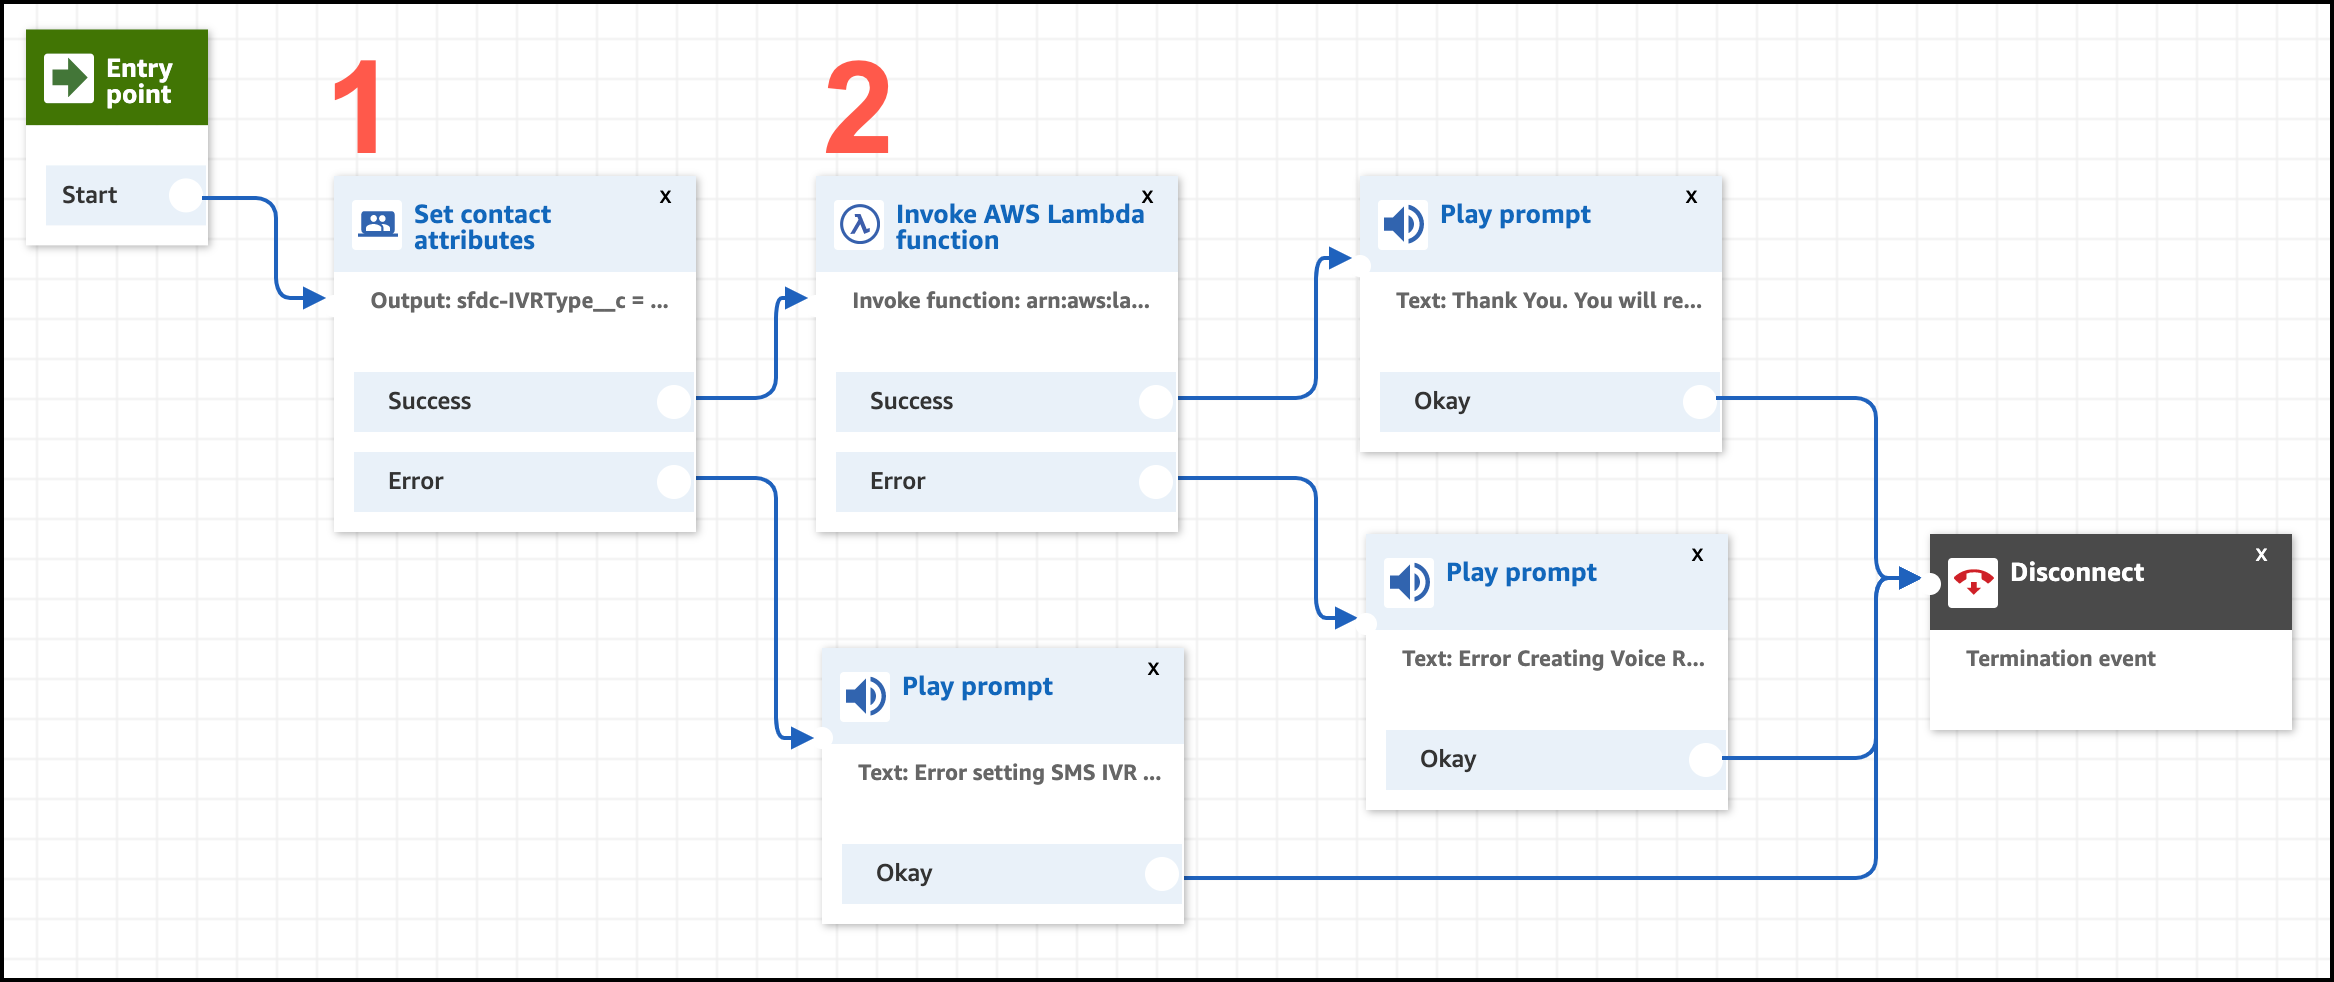
- Download the “SCVCB - SMS Transfer” contact flow from our GitHub repo.
- From Amazon Connect, select .
- Click Create contact flow.
- On the far right of the contact flow page, click the disclosure triangle button and select Import Flow (beta).
- Click Select and browse to the “SCVCB - SMS Transfer” contact flow you downloaded.
- In the “Set contact attributes” block (item 1 in screenshot), ensure that the Destination attribute matches the API name of the IVRSelection field you have on the Voice Call record. For example, sfdc-IVRType__c.
- Update the function in the “Invoke AWS Lambda function” block. Select xxxx-InvokeTelephonyIntegrationApiFunction.
- In the “Invoke AWS Lambda function” block (item 2 in screenshot), click the block to open the options and replace the function with your xxxx-InvokeTelephonyIntegrationApiFunction Lambda function. Click Save.
- Click Publish.
Step 4: Add SMS to the “SCVCB - New Or Existing Case” Contact Flow
Update
the “SCVCB - New Or Existing Case” contact flow from the previous example (Link New or Existing Case to Voice Call Record) to include the SMS option.
- Open the contact flow “SCVCB - New Or Existing Case”.
- Update the “Get customer input” block.
- Click the “Get customer input” block.
- To update the text-to-speech entry to include SMS as option 3, change the text to: Thank you for calling. Press 1 if you are calling about an existing case. Press 2 if you are calling about a new case. Or press 3 to Message with our team.
- Scroll to the bottom of the block and click Add another condition.
- For the new option, enter 3.
- Click Save.
- Add a new “Transfer to flow” block (item 1 in screenshot).
- From the left panel, in the “Terminate/Transfer” section, drag the “Transfer to flow” block onto the contact flow.
- Open the block and select SCVB - SMS Transfer, which is the contact flow you previously created.
- Click Save.
- Connect Option 3 of the “Get customer input” block to the left side of this “Transfer to flow” block.
- Add an error message to the “Transfer to flow” block (item 2 in screenshot).
- From the left panel, in the “Interact” section, drag the “Play prompt” block to the right of the “Transfer to flow” block.
- Open the “Play prompt” block and select Text-to-speech or chat text.
- Enter this text: Error with transfer to SMS flow..
- Click Save.
- Connect the output of the “Play prompt” block to one of the closest “Disconnect” blocks.
- Click Publish.
Test This Example
To test this example, call your number. You should now hear an option 3 for SMS transfer. Press 3 on your phone. The following events should occur:
- A Voice Call record is created with IVRSelection equal to SMSTransfer.
- You receive an SMS on your phone with the message that you configured in your template. Reply to the message to initiate a messaging session. Make sure your agent is logged in with the appropriate Omni-Channel presence status for Messaging.
If you don’t received an SMS, check the Messaging logs.