


Salesforce Voice with Telephony Providers Implementation Guide
 j
jGive Customers the Option to Transfer to SMS in the Interactive Voice Response (IVR)
| Ease of Implementation | Medium |
| Estimated Time to Implement | 1 hour |
Prerequisites
- You must have at least one Digital Engagement license to enable SMS capabilities.
- You must have a working SMS channel in Salesforce.
- You must complete the previous example: Link New or Existing Case to Voice Call Record.
To learn more about SMS Text Messaging with Salesforce, see Set Up SMS Text Messaging.
Step 1: Create an SMS Messaging Template
- From Setup, enter Messaging Templates in the Quick Find box, then select Messaging Templates.
- Click New.
- Complete the fields as follows.
Field Name Value Template Name IVRTransfer Developer Name IVRTransfer Message Enter your message. For example: Our messaging team is here to help you! Please respond to this message to connect with an agent. - Click Save.

Step 2: Update Your “SCVB - Voice Actions” Flow
- Copy the Developer Name for your Messaging channel. You’ll use
this exact value in the flow that you’re going to update.
- From Setup, enter Messaging Settings in the Quick Find box, then select Messaging Settings.
- Click Edit for your desired SMS channel.
- Record the value in the Developer Name field. For example, Text_US_15551234567. This value is used later for the Messaging Channel Unique Name.
- From Setup, enter Flows in the Quick Find box, then select Flows under Process Automation.
- Open the “SCVB - Voice Actions” flow.
- Add an outcome to the “IVRSelection” decision element.
- Click Edit Element on the decision element.
- Click the + next to Outcome Order.
- Complete the fields as follows.
Field Name Value Label IVRTransfer Condition Requirements to Execute Outcome All Conditions are Are Met (AND) Resource $Record.IVRType__c IVRType__c is a custom field for the VoiceCall Salesforce object.
Operator Equals Value IVRTransfer This value matches the value set in the Contact Flow.
- Click Done to save the new outcome.

- On the “IVRTransfer” branch, click the + to add an element action.
- On the Add Element screen, select Action.

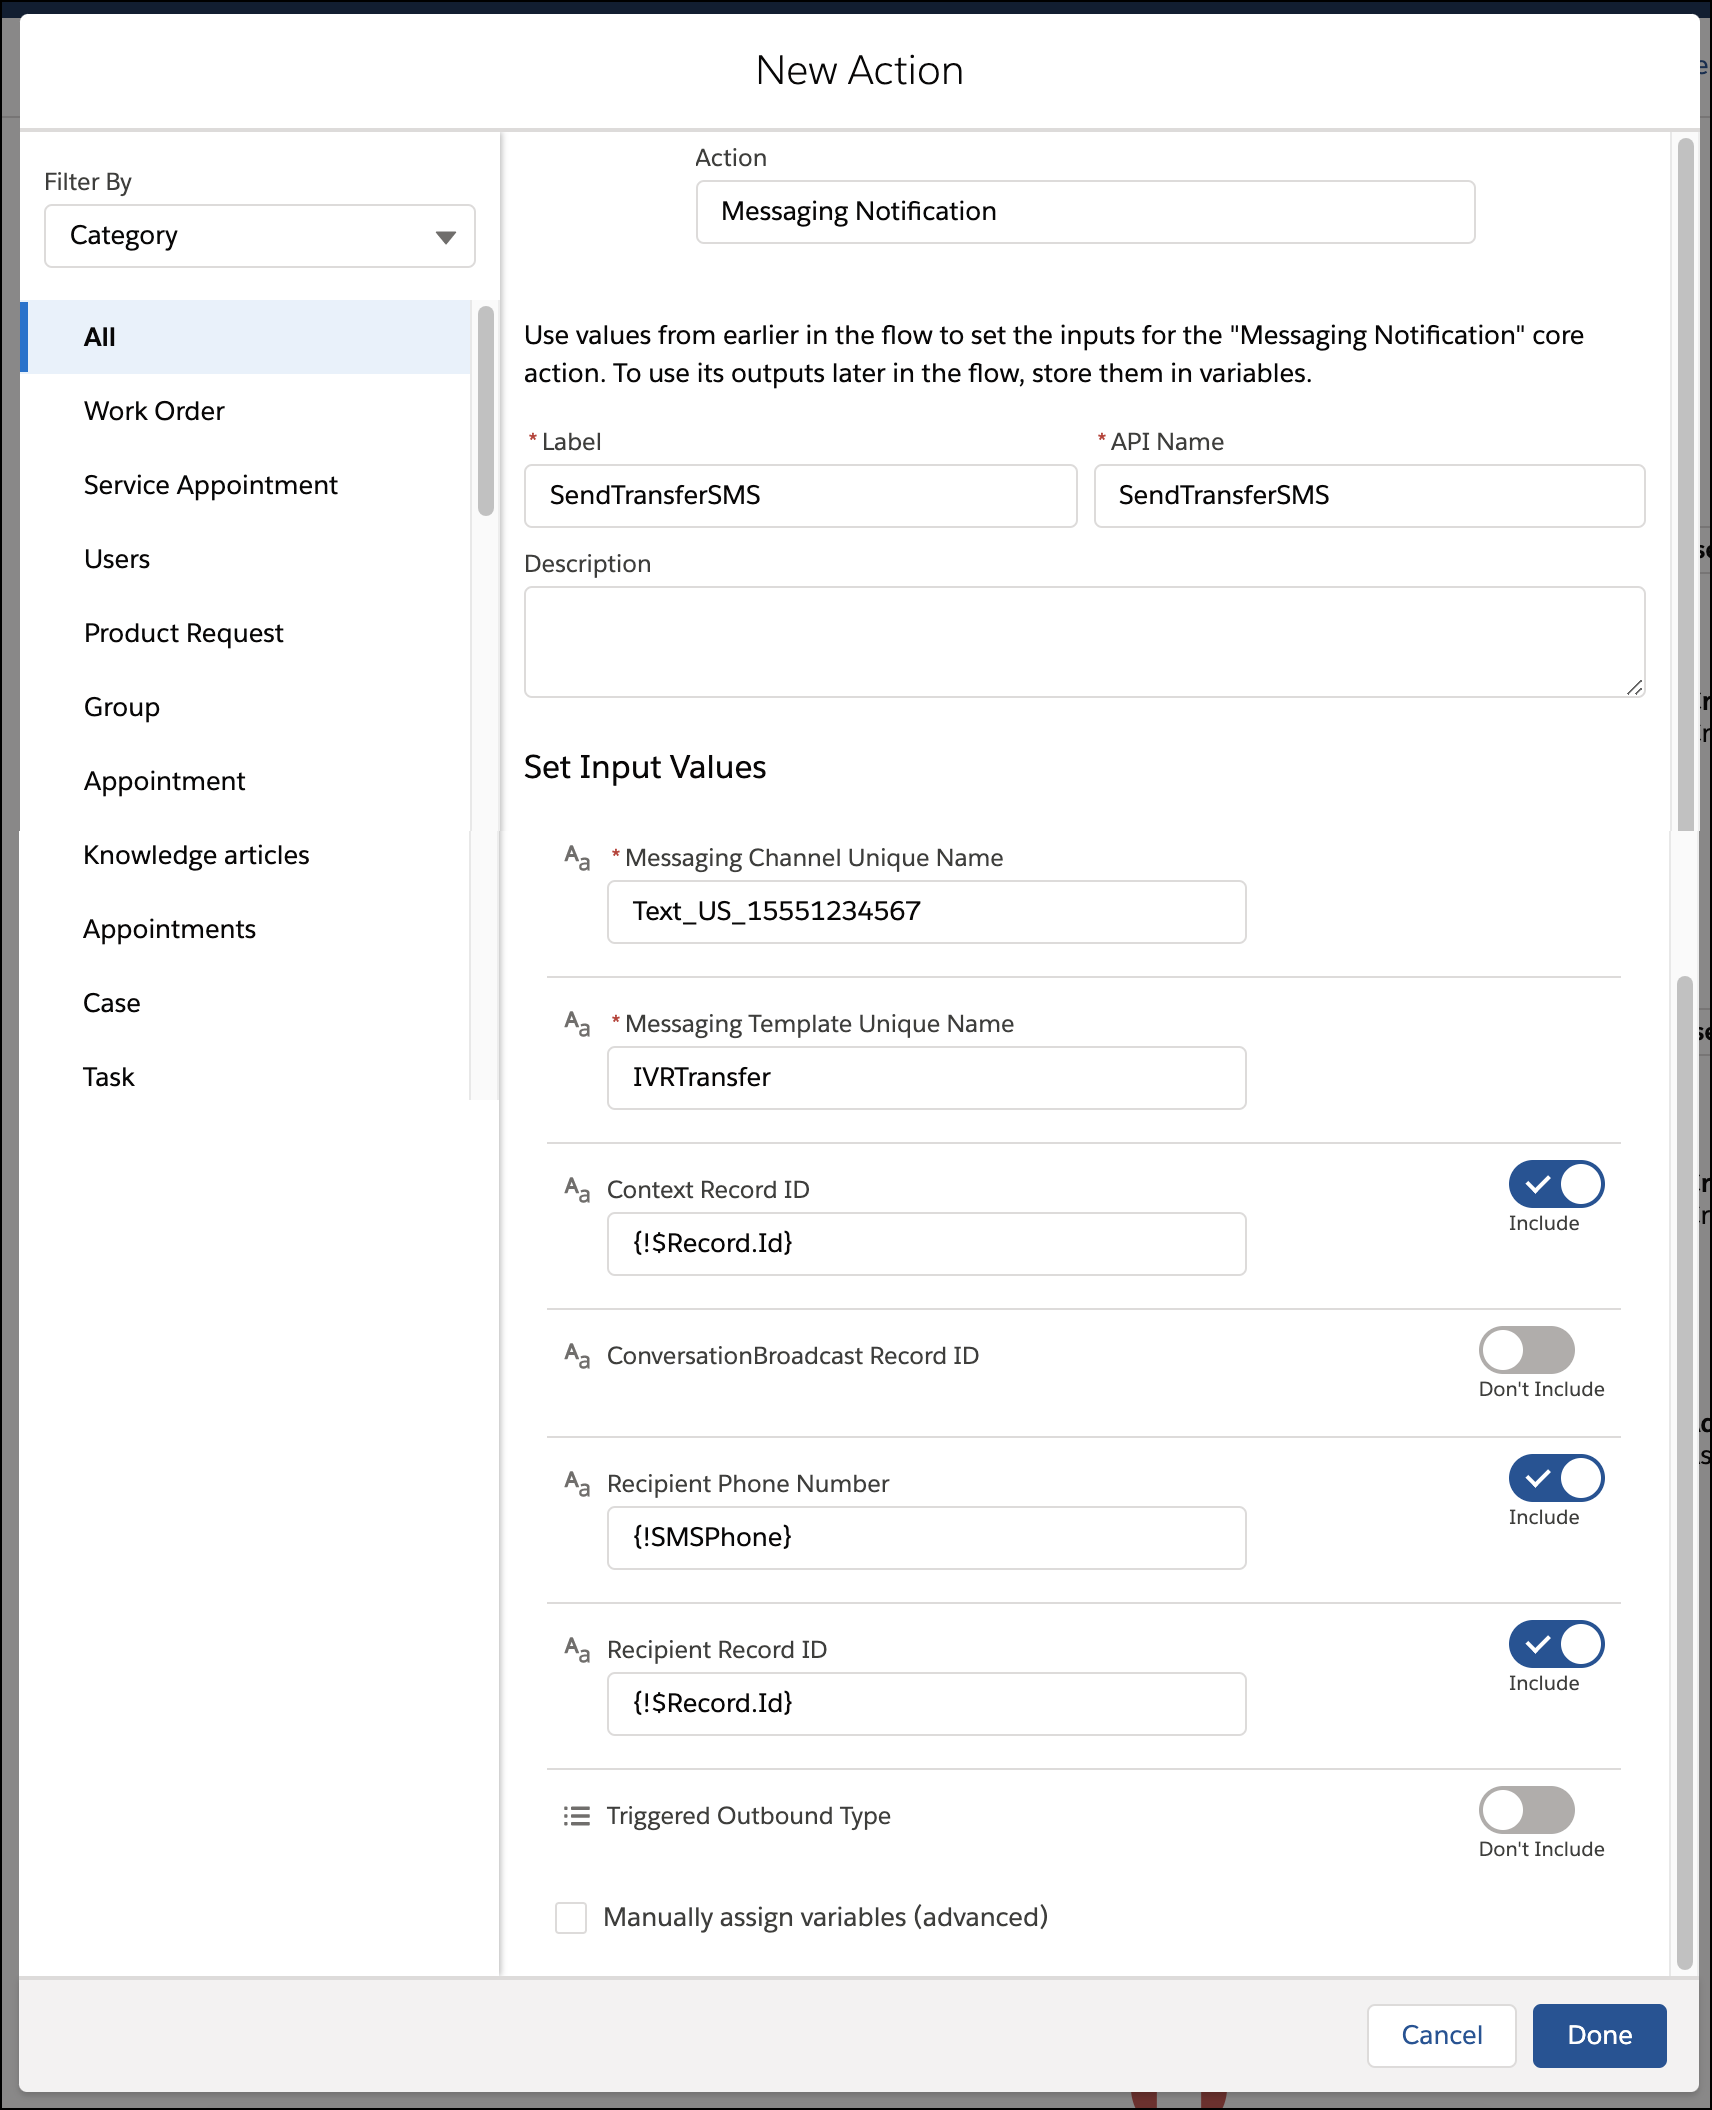
- From the New Action page, search for and select Messaging Notification.
- Complete the fields as follows.
Field Name Value Label SendTransferSMS Messaging Channel Unique Name Enter the Developer Name for your messaging channel that you recorded earlier. For example, Text_US_15551234567. Messaging Template Unique Name Select the template you previously created (IVRTransfer). Context Record ID Change the toggle to “Include” and enter {!$Record.Id}. Recipient Phone Number Change the toggle to “Include” and select New Resource for the field value. Complete the fields as follows, and then click Done. - Resource Type: Formula
- API Name: SMSPhone
- Data Type: Text
- Formula: Enter RIGHT({!$Record.FromPhoneNumber}, 10). In other markets, such as in the UK, if the caller number is already in E164 format, use {!$Record.FromPhoneNumber} to ensure the outbound SMS is sent.
Note: Amazon Connect passes in the caller’s phone number in E164 format. We use a formula to convert the number to the necessary format. (This example assumes US-based phone numbers. For example, +155512234567 is converted to 5551234567.)
See the Recipient Phone Number image below this table.
Recipient Record ID Change the toggle to “Include” and enter {!$Record.Id}. Recipient Phone Number: Add new resource
- Click Done to save the new action.
- On the Add Element screen, select Action.
- On your flow with the new outcome, click Save As, and then click
Save.

- Click Activate to activate your flow.
Step 3: Import the “SCVCB - SMS Transfer” Contact Flow
When the “SCVCB - SMS Transfer” contact flow is called, it creates a voice call record with
the IVRSelection equal to SMSTransfer.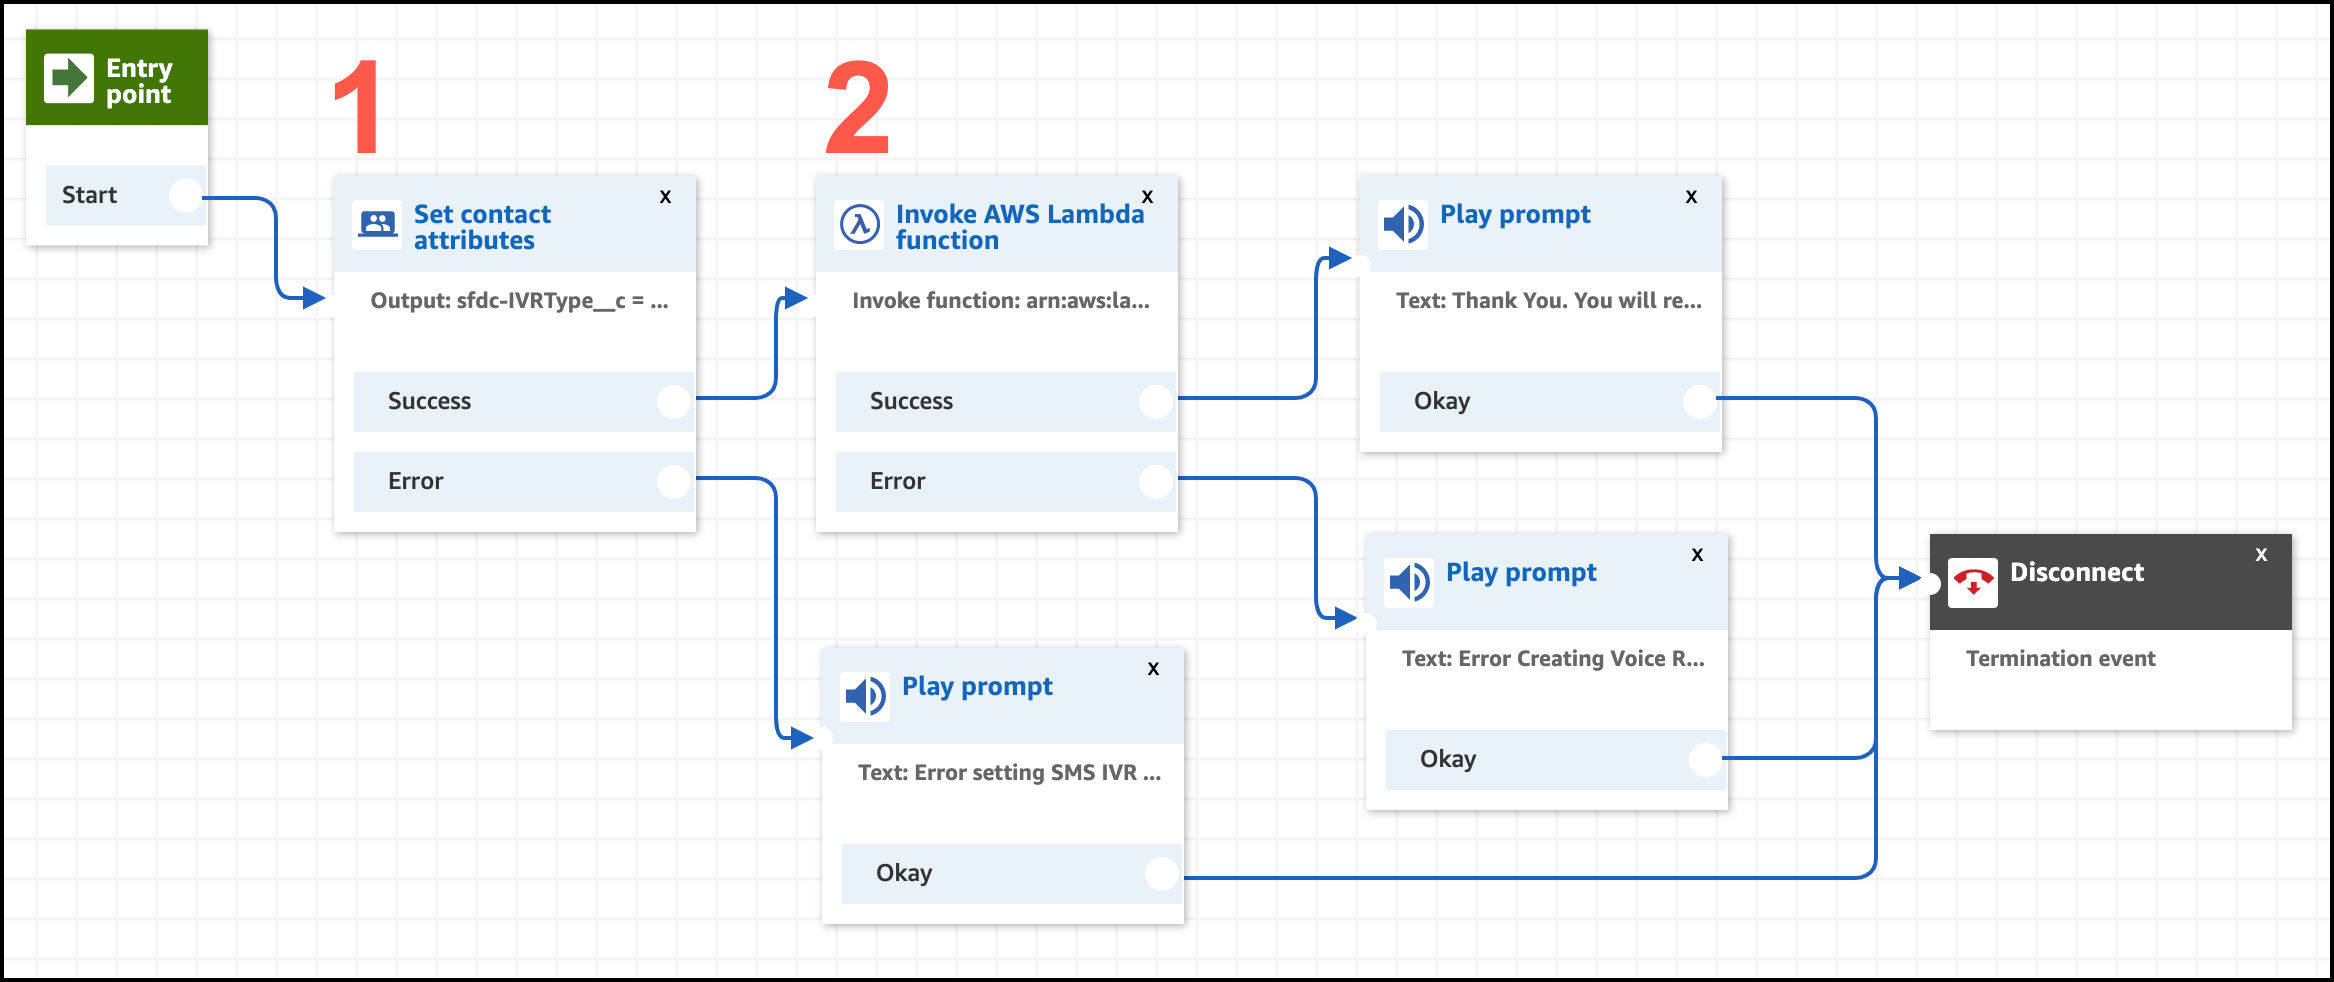
- Download the “SCVCB - SMS Transfer” contact flow from our GitHub repo.
- From Amazon Connect, select .
- Click Create contact flow.
- On the far right of the contact flow page, click the disclosure triangle button and select Import Flow (beta).
- Click Select and browse to the “SCVCB - SMS Transfer” contact flow you downloaded.
- In the “Set contact attributes” block (item 1 in screenshot), ensure that the Destination attribute matches the API name of the IVRSelection field you have on the Voice Call record. For example, sfdc-IVRType__c.
- Update the function in the “Invoke AWS Lambda function” block. Select xxxx-InvokeTelephonyIntegrationApiFunction.
- In the “Invoke AWS Lambda function” block (item 2 in screenshot), click the block to open the options and replace the function with your xxxx-InvokeTelephonyIntegrationApiFunction Lambda function. Click Save.
- Click Publish.
Step 4: Add SMS to the “SCVCB - New Or Existing Case” Contact Flow
- Open the contact flow “SCVCB - New Or Existing Case”.
- Update the “Get customer input” block.
- Click the “Get customer input” block.
- To update the text-to-speech entry to include SMS as option 3, change the text to: Thank you for calling. Press 1 if you are calling about an existing case. Press 2 if you are calling about a new case. Or press 3 to Message with our team.
- Scroll to the bottom of the block and click Add another condition.
- For the new option, enter 3.
- Click Save.
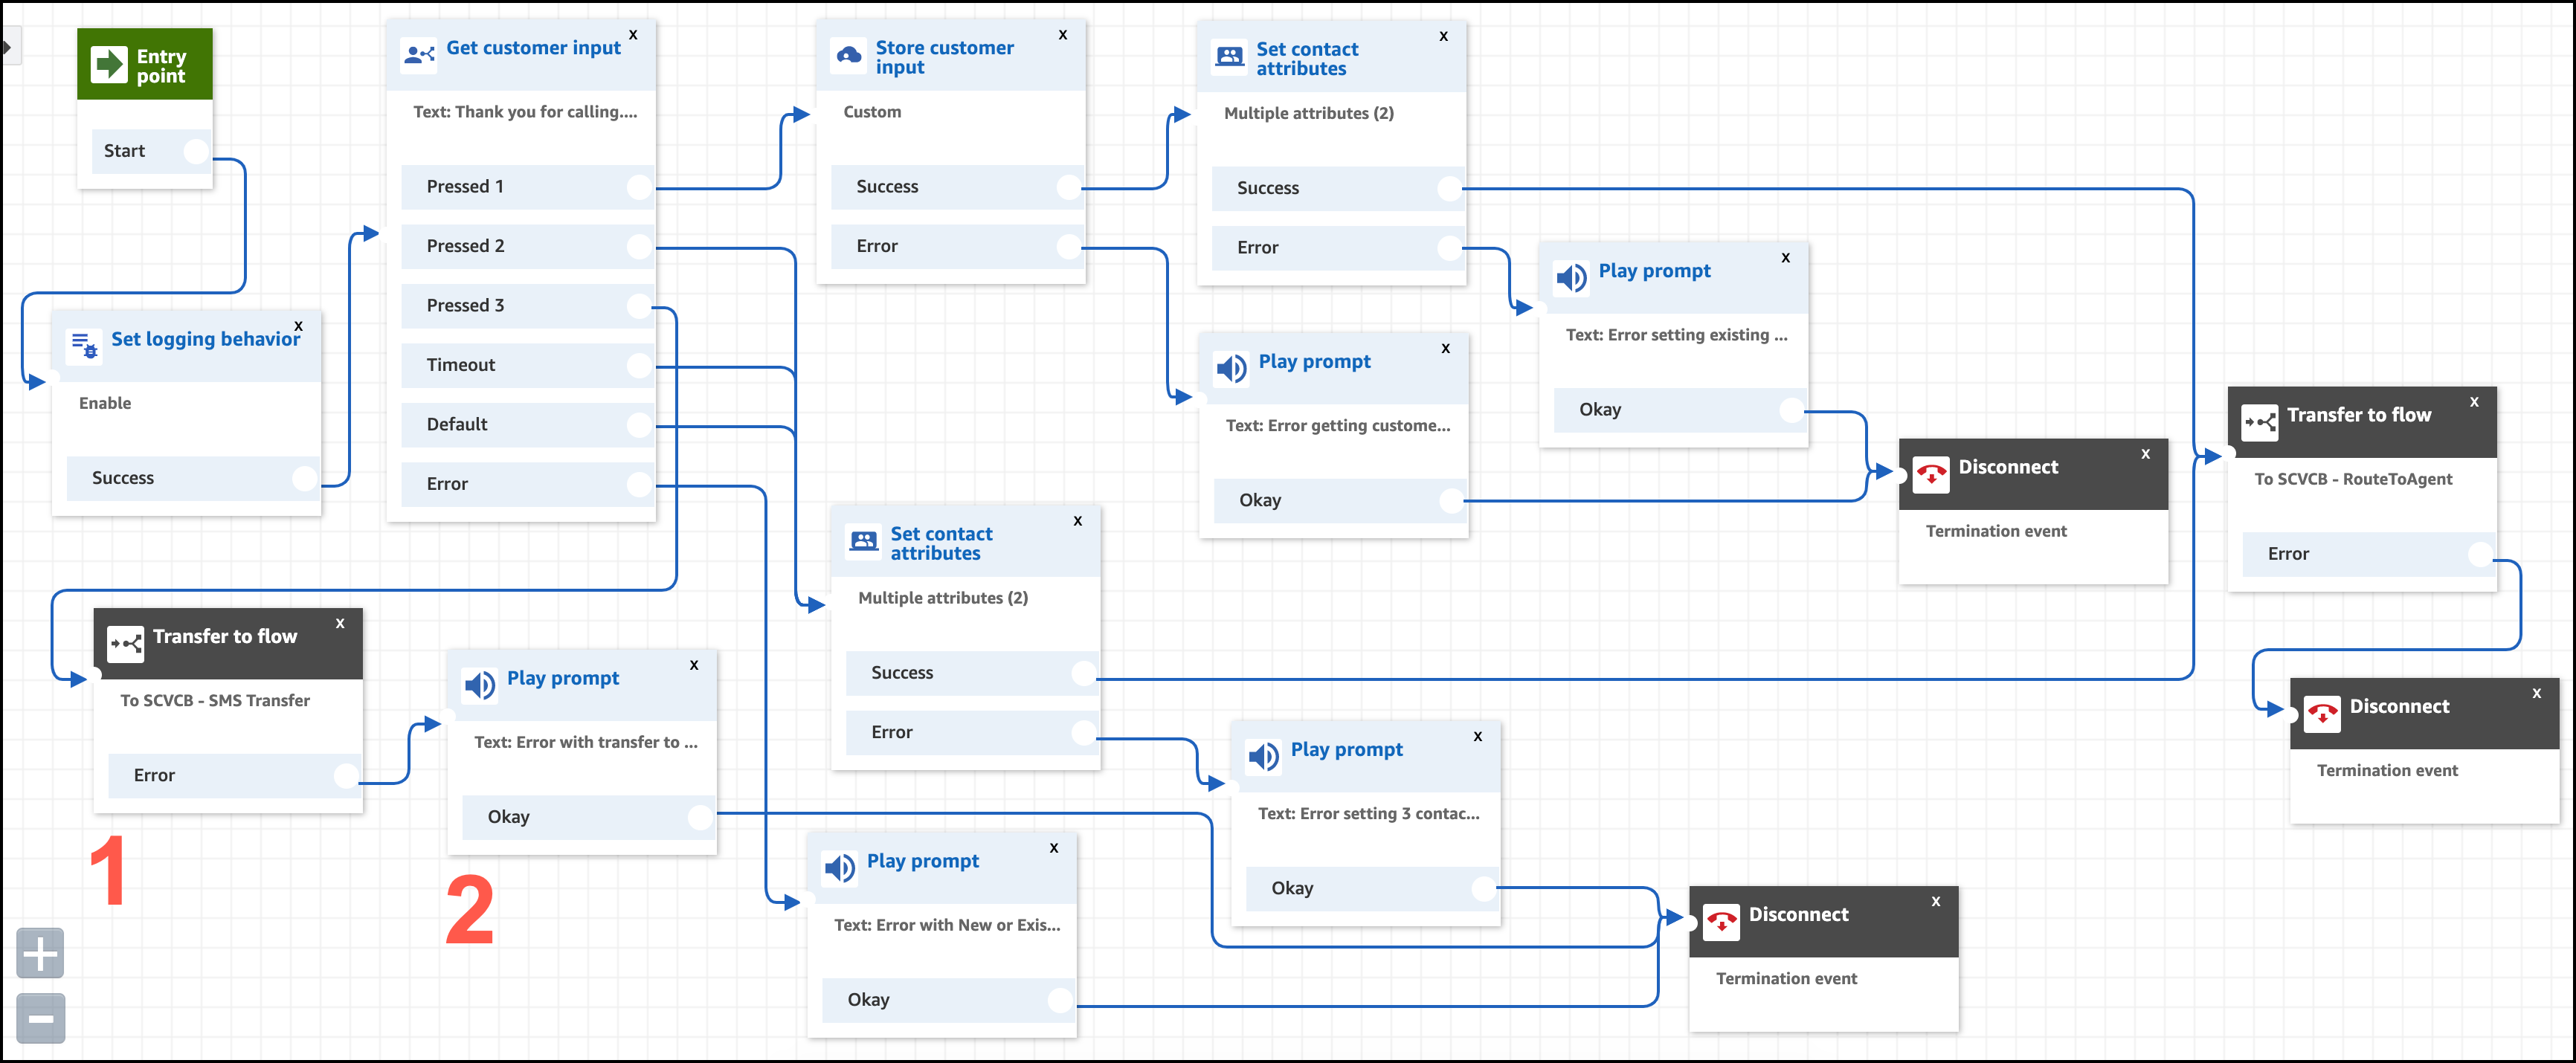
- Add a new “Transfer to flow” block (item 1 in screenshot).
- From the left panel, in the “Terminate/Transfer” section, drag the “Transfer to flow” block onto the contact flow.
- Open the block and select SCVB - SMS Transfer, which is the contact flow you previously created.
- Click Save.
- Connect Option 3 of the “Get customer input” block to the left side of this “Transfer to flow” block.
- Add an error message to the “Transfer to flow” block (item 2 in screenshot).
- From the left panel, in the “Interact” section, drag the “Play prompt” block to the right of the “Transfer to flow” block.
- Open the “Play prompt” block and select Text-to-speech or chat text.
- Enter this text: Error with transfer to SMS flow..
- Click Save.
- Connect the output of the “Play prompt” block to one of the closest “Disconnect” blocks.
- Click Publish.
Test This Example
To test this example, call your number. You should now hear an option 3 for SMS transfer. Press 3 on your phone. The following events should occur:
- A Voice Call record is created with IVRSelection equal to SMSTransfer.
- You receive an SMS on your phone with the message that you configured in your template. Reply to the message to initiate a messaging session. Make sure your rep is logged in with the appropriate Omni-Channel presence status for Messaging.
If you don’t received an SMS, check the Messaging logs.