LWR Sites for Experience Cloud
 j
jCreate Theme Layouts in an LWR Site
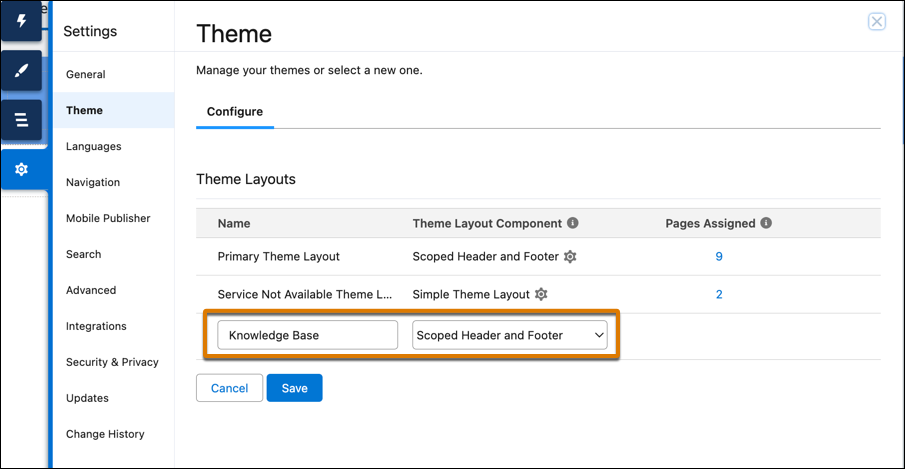
Let’s say that you have a primary theme layout for your site that uses the Scoped Header and Footer theme layout component. The Scoped Header and Footer component includes your logo, a navigation menu, and a user profile menu in the header, and contact links in the footer. Now you want to add a Create Case button to the header on your knowledge base page only. You can create a theme layout called Knowledge Base, apply it to the knowledge base page, and add the button to the header.
- In , click New Theme Layout.
-
Enter the name of the new theme layout, assign your chosen theme layout
component to the new layout, and save the change.
In this example, you add the Scoped Header and Footer theme layout component to your new Knowledge Base theme layout. Because Scoped Header and Footer includes your logo, the navigation menu, and the user profile menu in the page header, the new theme layout also includes those elements.
- From the Pages menu in Experience Builder, select the page where you want to apply the new theme layout. In this example, you choose your site’s knowledge base page.
- In the page settings, select Override the default theme layout for this page, and then select your new theme layout.
-
On the page itself, add your desired component or components to the header or
footer. In this example, you add a Button component to the header.
Now the header with the button appears on your knowledge base page, and the other pages on your site show the header without the button.
On sites created with the Build Your Own (LWR) template, additional layout options are available on pages whose theme layout uses the Scoped Header and Footer theme layout component. In , select
- Fix theme header when you want the entire header region to always remain visible at the top of the page.
- Hide theme footer when you want to hide the footer from view.
- Position theme footer at page bottom when you want the footer region to sit at the bottom of the page. Depending on the page length, site visitors could be required to scroll down to see the footer.
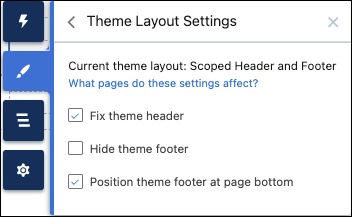
These choices are also available in in the property settings for any theme layout component of the type Scoped Header and Footer.