Salesforce DX Developer Guide
 j
jGet Started by Creating a New DX Project
This tutorial starts completely from scratch and shows you how to create simple artifacts, such as Apex classes and LWC components, and then how to sync them between your org and your local project on your laptop. Another tutorial to help you learn about source-driven development is Get Started by Using a Sample Repo, which is also hands-on but provides a ready-made application that's already in a GitHub repo. Both tutorials are a lot of fun.
Get an Org to Play With and Set It as Your Dev Hub
If you don’t currently have an org in which you can play in, here are some options:
- Sign up for a free Developer Edition org here. Remember your username and password!
- Create a free Trailhead playground (also referred to as a Hands-on Org), which is just a Developer Edition org that’s linked to your Trailhead account. Be sure you follow these instructions to get the username and password of your org.
Then follow these steps.
- Log in to your org from your browser by navigating to login.salesforce.com and enter your username and password.
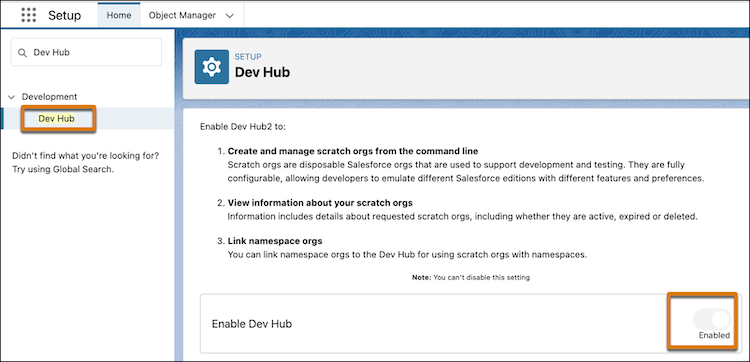
-
In the top-right corner, click the gear icon and then Setup.
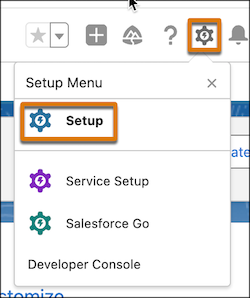
- In the Quick Find box on the left, enter Dev Hub, then click Dev Hub.
-
Click Enable Dev Hub.
Read more about it:
Install the Salesforce Platform Development Tools
-
Install Salesforce CLI on your computer.
Windows:
- Download the .exe file to your computer.
- Open Windows explorer and execute the downloaded *.exe file by double-clicking it and answering all the prompts.
macOS:
- Download the *.pkg file to your computer.
- Open Finder and execute the downloaded *.pkg file file by double-clicking it and answering all the prompts.
-
Open a command prompt (Windows) or terminal (macOS), and then run this CLI command to
make sure Salesforce CLI is installed correctly:
1sf versionYou see something like @salesforce/cli/2.98.6 darwin-arm64 node-v22.17.0. - Install Visual Studio Code on your computer.
- Install the Salesforce Extensions into VS Code.
Create a Salesforce DX Project
-
In your command prompt (Windows) or terminal (macOS), change to a directory on your
computer where you want to create the DX project. For example, on macOS:
1cd /Users/juliet/sfdx -
Create a Salesforce DX project called mydxproject by running this command:
1sf project generate --name mydxproject -
Change to the directory that was created.
1cd mydxproject
- sfdx-project.json: Main configuration file for your Salesforce DX project.
- config/project-scratch-def.json: Definition file for creating scratch orgs.
- .forceignore: File that specifies the source files you want to exclude when synchronizing metadata between your local project and org. If you’re familiar with Git, you can see that the file is very similar to the .gitignore file.
- force-app: Directory that contains source files that represent metadata from your org. The directory doesn’t yet contain any files, but we’ll add some later!
Read more about it:
Authorize Your Dev Hub and Create a Scratch Org
-
From your command prompt or terminal window, run this CLI command:
1sf org login web --set-default-dev-hub --alias DevHubThe --set-default-dev-hub and --alias flags declare this Dev Hub org as your default Dev Hub org and give it an alias. Later you see how specifying these flags now makes other CLI commands easier to use. -
Log in to the org using your username and password in the window that pops up, just
like you log into any Salesforce org.
But wait, didn’t you already log into this org? Yes, you did! But this time you’re logging into it via the org login web CLI command, which authorizes the org to be used by your local DX project. After you’re connected, you don’t have to keep logging into the org when you run subsequent CLI commands.
-
Click Allow in the browser window that opens and asks if you allow access to the org.
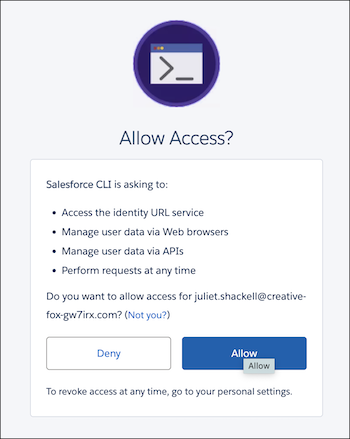
You can close the browser window because you’re all done with it.
Back in your command prompt or terminal, you should see output like this, which confirms that you successfully authorized the org:
Successfully authorized joe@creative-fox-gw7irx.com with org ID 00Daj123457MzBEAU. -
In your command prompt or terminal, run this command to see the org you just
authorized, along with additional information about it, such as its org ID and Connected
status.
1sf org listThe little tree emoji (🌳) to the left indicates that it’s your default Dev Hub org. -
Run this command to create a scratch org using the default definition file that was
created in the Salesforce DX project:
1sf org create scratch --definition-file config/project-scratch-def.json --set-default --alias myscratchBe sure you run the command from your main DX project directory, which in our example is /Users/juliet/sfdx/mydxproject.As the command runs, the output tells you what’s happening in the background as Salesforce creates the scratch org.
Similar to when you authorized the Dev Hub org, the --set-default and --alias flags set the scratch org as your default org and give it an alias. The scratch org creation process requires a Dev Hub, but because you previously set the one you authorized as your default, you don’t need to specify it to the org create scratch command. Otherwise you must use the --target-dev-hub flag.
You see this message when the scratch org creation is finished:
1Your scratch org is ready. -
Run this command again to see the new scratch org listed in the list of authorized
orgs:
1sf org listThe little leaf emoji (🍁) to the left indicates that it’s your default org. Run this command to see details about your new org:1sf org display
Read more about it:
Make a Change in Your Scratch Org And Retrieve It to Your Project
We don’t go into details about how to use VS Code, which can do all kinds of amazing things. Check out this Trailhead module for more information. But we show you a few basics.
-
From your open command prompt or terminal, run this command to open your scratch org
in a browser:
1sf org openHold on, how did the CLI command know which org to open? Easy: when you created the scratch org, you specified that it’s your default org. If you want to open a different org, or be explicit about the default org, you use the --target-org flag and pass it a username or alias. For example:1sf org open --target-org myscratch -
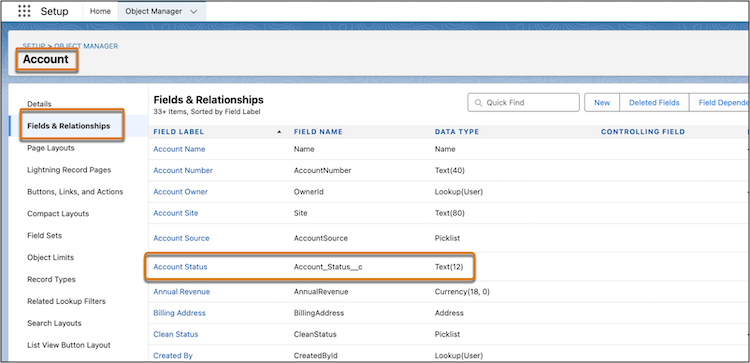
In the browser that opens, use Object Manager to create a custom field with label
Account Status on the Account object. Choose any properties
about the field that you want, it doesn’t matter for the purposes of this exercise.
Never done this task before? Follow this Trailhead Quick Look for details.
When you’re finished, you see something like this:
-
Open VS Code. An easy way is to run this command from your open command prompt or
terminal; the application opens right up:
1code - Click File -> Open Folder ..., navigate to your Salesforce DX project folder (which is /Users/juliet/sfdx/mydxproject in our example), and click Open.
-
On the left, under MYDXPROJECT, click the .forceignore file, which is in the root of your
Salesforce DX project directory. The contents of the file appears in a tab on the right.
You see something like this:
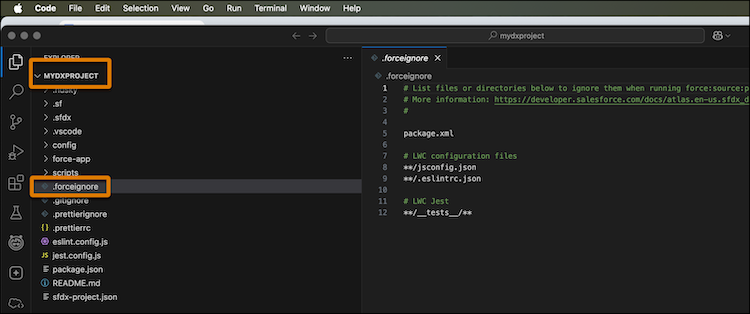
You use the .forceignore file to ignore files or directories when you run the CLI commands to deploy or retrieve source.
-
Click inside the .forceignore tab and add these
two lines at the end of the file after **/__tests__/**:
1# Exclude Profiles
2**/profiles/**
The reason we’re excluding Profiles from the source that’s deployed and retrieved is that they can be finicky and it’s easier for now to just not worry about them. You also get some practice using the .forceignore file! - Click File -> Save.
-
In the VS Code terminal, run this command to retrieve the customization you just
made:
1sf project retrieve startIf you don’t have a terminal window open in VS Code, click View -> Terminal.The retrieve might take a minute or two. But when it’s finished, you see something like this:
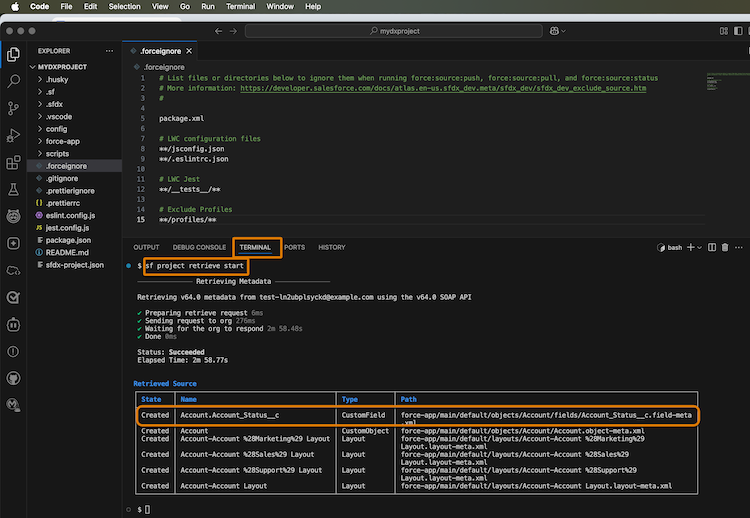
Similar to when you previously opened the scratch org, this CLI command knows to retrieve changed or new metadata from the scratch org because you set it as your default org.
The command output shows the metadata that it retrieved. You should see your new Account Status custom field. You probably also see other retrieved metadata, such as Layouts. That’s normal.
The Path column shows where the new metadata files are located in your project. Take a look at them if you want!
Read more about it:
Create an Apex Class and Deploy it To the Scratch Org
-
From VS Code, click View -> Command Palette and run
SFDX:Create Apex Class.
Enter MyApexClass for the Apex class name and store it in the default local source directory (force-app/main/default/classes).
A new tab opens on the right with initial code for MyApexClass, which is stored in a file called MyApexClass.cls. The command also created another file: MyApexClass.cls-meta.xml.
- (Optional) If you’re familiar with the Apex programming language, add some code to the new class. But you can also leave it empty for now; all we need for this exercise are the metadata files that correspond to the Apex class.
- Click File -> Save to save the new Apex class.
-
From the command palette, run SFDX: Push Source to Default
Org. (Deploying is sometimes also called pushing.)
You should see a notification like this when it’s complete:

Also check your output window (click View -> Output if you don’t see it). You see information about the deploy, including the files that were actually deployed:
1=== Pushed Source 2STATE FULL NAME TYPE PROJECT PATH 3─────── ─────────── ───────── ──────────────────────────────────────────────────────────────────────── 4Created MyApexClass ApexClass ../mydxproject/force-app/main/default/classes/MyApexClass.cls 5Created MyApexClass ApexClass ../mydxproject/force-app/main/default/classes/MyApexClass.cls-meta.xml -
Go back to the browser window that’s open to your scratch org. If you closed the
browser window, you can run this command again from the VS Code terminal:
1sf org open - In the Setup Quick Find box, enter Apex, then click Apex Classes. You should see the MyApexClass Apex class you just created, but now it’s also in your scratch org. Pretty cool, huh!
-
For fun, let’s do one last thing: edit the Apex class in Setup. For example, add this
comment to the top of the file:
1// This is a very exciting Apex class 2Be sure to save! - In VS Code, go to the command palette and run SFDX: Pull Source from Default Org.
- When the retrieve (also sometimes called a pull) finishes, refresh the MyApexClass Apex class in VS Code if necessary; you should see the new comment that you made in Setup.
Read more about it:
Create a Lightning Web Component and Deploy it to the Scratch Org
-
From VS Code, click View -> Command Palette and run
SFDX:Create Lightning Web Component.
Enter helloworld for the filename and store it in the default directory (force-app/main/default/lwc).
A new tab opens on the right with initial code for the new LWC component, which is stored in a file called helloworld.js. The command also creats two other associated files (helloworld.html and helloworld.js-meta.xml) and a test.
- (Optional) If you’re familiar with creating Lightning Web Components, add some code to any of the helloworld files. But you can also leave them empty for now; all we need for this exercise are metadata files associated with the LWC component.
- Click File -> Save to save the new LWC component.
- From the command palette, run SFDX: Push Source to Default Org. Similar to when you deployed the Apex class, you see a notification and information in the Output window.
Read more about it:
Deploy All Customizations To a Sandbox
-
From the command prompt (Windows) or terminal (macOS) that’s open in your Salesforce
DX project, run this command to deploy your changes to your Dev Hub.
1sf project deploy start --source-dir force-app --target-org DevHubThe --source-dir flag specifies exactly what you want to deploy, which is all the metadata that’s in the force-app package directory.
You see something like this:
1─────────────── Deploying Metadata ─────────────── 2 Deploying v64.0 metadata to joe@resilient-fox-4z9oop.com using the v64.0 SOAP API. 3 4 5 ✔ Preparing 205ms 6 ◯ Waiting for the org to respond - Skipped 7 ✔ Deploying Metadata 2.88s 8 ▸ Components: 7/7 (100%) 9 ◯ Running Tests - Skipped 10 ◯ Updating Source Tracking - Skipped 11 ✔ Done 0ms 12 Status: Succeeded 13 Deploy ID: 0Affj0000017DPlCAM 14 Target Org: joe@resilient-fox-4z9oop.com 15 Elapsed Time: 3.09s 16 17 18Deployed Source 19┌─────────┬────────────────────────────────────────┬──────────────────────────┬───────────────────────────────────────────────────────────────────────────────────────┐ 20│ State │ Name │ Type │ Path │ 21├─────────┼────────────────────────────────────────┼──────────────────────────┼───────────────────────────────────────────────────────────────────────────────────────┤ 22│ Created │ MyApexClass │ ApexClass │ force-app/main/default/classes/MyApexClass.cls │ 23│ Created │ MyApexClass │ ApexClass │ force-app/main/default/classes/MyApexClass.cls-meta.xml │ 24│ Created │ Account.Account_Status__c │ CustomField │ force-app/main/default/objects/Account/fields/Account_Status__c.field-meta.xml │ 25│ Changed │ Account-Account %28Marketing%29 Layout │ Layout │ force-app/main/default/layouts/Account-Account %28Marketing%29 Layout.layout-meta.xml │ 26│ Changed │ Account-Account %28Sales%29 Layout │ Layout │ force-app/main/default/layouts/Account-Account %28Sales%29 Layout.layout-meta.xml │ 27│ Changed │ Account-Account %28Support%29 Layout │ Layout │ force-app/main/default/layouts/Account-Account %28Support%29 Layout.layout-meta.xml │ 28│ Changed │ Account-Account Layout │ Layout │ force-app/main/default/layouts/Account-Account Layout.layout-meta.xml │ 29│ Created │ helloworld │ LightningComponentBundle │ force-app/main/default/lwc/helloworld/helloworld.html │ 30│ Created │ helloworld │ LightningComponentBundle │ force-app/main/default/lwc/helloworld/helloworld.js │ 31│ Created │ helloworld │ LightningComponentBundle │ force-app/main/default/lwc/helloworld/helloworld.js-meta.xml │ 32└─────────┴────────────────────────────────────────┴──────────────────────────┴───────────────────────────────────────────────────────────────────────────────────────┘ -
Open the Dev Hub org in a browser window:
1sf org open --target-org DevHubUse Object Manager and Setup to check that the new custom field (Account.Account_Status), Apex class (MyApexClass), and LWC component (helloworld) exist in the org.
Read more about it: