


Mobile SDK Development Guide
 j
jOption 2: Add Mobile SDK Setup Code Manually
The procedure here creates a basic Mobile SDK Swift app that implements an AppDelegate - SceneDelegate flow.
- Configure SalesforceApp as the main class
- Initialize Mobile SDK
- Call Mobile SDK to prompt for customer login and handle user switching
-
Code in Swift (recommended)
or
Objective-C (to support older apps; not described in this procedure)
-
Use AppDelegate for app-level initialization, and SceneDelegate to handle all UI lifecycle events. This path is recommended; it supports multiple windows in iPadOS, clarifies multi-scene handling, and separates app-level and scene-level code.
or
Use AppDelegate alone to handle app initialization and UI lifecycle events. This path is an option only for single-window apps that don’t require multiple window support in iPadOS. If you choose this route, it’s up to you to find places in AppDelegate for all Mobile SDK code that’s added here in SceneDelegate. See the iOS Native Template for examples.
Prerequisites
Add or Edit Info.plist
Mobile SDK uses the project’s main Info.plist file to set the default Salesforce login host. In Xcode 12.4, the app wizard creates the Info.plist file for you. In Xcode 13, the app wizard for the SwiftUI interface doesn’t create the file, but you can copy one from a Mobile SDK template app.
- Xcode 12.4
-
- In the Project Navigator, control-click and select .
- Add the following key-value pair to the top-level dictionary:
1<key>SFDCOAuthLoginHost</key>
2<string>login.salesforce.com</string>
- Xcode 13
-
Copy the Info.plist file to your project from the iOS Native Swift template. When the file is in place, adjust your Project Settings as follows:
- In your Project settings, select Build Phases.
- Under Copy Bundle Resources, select Info.plist, if it’s present, and click Remove Items (-).
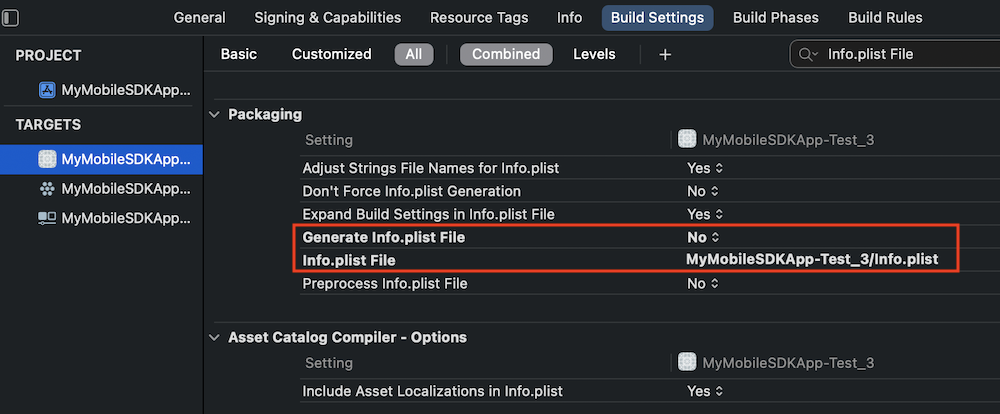
- In Build Settings, search for “Info.plist File”.
- Set Generate Info.plist File to No.
- Set Info.plist File to the file’s path in your project
(for example, “MyMobileSDKApp/Info.plist”.)
Add bootconfig.plist
- In an external text editor, create an empty text file.
- Copy the following text into the new
file:
1<?xml version="1.0" encoding="UTF-8"?> 2<!DOCTYPE plist PUBLIC "-//Apple//DTD PLIST 1.0//EN" 3 "http://www.apple.com/DTDs/PropertyList-1.0.dtd"> 4<plist version="1.0"> 5<dict> 6 <key>remoteAccessConsumerKey</key> 7 <string>3MVG9Iu66FKeHhINkB1l7xt7kR8czFcCTUhgoA8Ol2Ltf1eYHOU4SqQRSEitYFDUpqRWcoQ2.dBv_a1Dyu5xa</string> 8 <key>oauthRedirectURI</key> 9 <string>testsfdc:///mobilesdk/detect/oauth/done</string> 10 <key>oauthScopes</key> 11 <array> 12 <string>web</string> 13 <string>api</string> 14 </array> 15 <key>shouldAuthenticate</key> 16 <true/> 17</dict> 18</plist> - Save the file as bootconfig.plist in your MyMobileSDKApp project's local disk directory.
- In Xcode’s Project Explorer, control-click and select Add Files to “MyMobileSDKApp”.
- Select bootconfig.plist.
- To do now (if your connected app is available) or before you release your app:
- Open bootconfig.plist in the Xcode editor.
- Replace the remoteAccessConsumerKey value with the Consumer Key from your org's connected app.
- Replace the oauthRedirectURI value with the Callback URL from your org’s connected app.
Add a main.swift File
Mobile SDK requires its own UIApplication-based object, SFApplication, to monitor user event notifications. This class must be instantiated when iOS first initializes the main application object. To use this class instead of the default UIApplication class, you add a custom main.swift file to your project. You can then call the UIApplicationMain constructor with custom arguments.
- In your project, control-click and select New File.
- Select Swift File, name it “main.swift”, and then click
Create. Xcode creates a file with one line:
1import Foundation - Import SalesforceSDKCore.
1import Foundation 2import SalesforceSDKCore - Create an instance of UIApplicationMain, passing in
- “SFApplication” for the principalClassName argument
- “AppDelegate” for the delegateClassName argument
1UIApplicationMain(
2    CommandLine.argc,
3    CommandLine.unsafeArgv,
4    NSStringFromClass(SFApplication.self), //principalClassName
5    NSStringFromClass(AppDelegate.self)    //delegateClassName
6)
See UIApplicationMain(_:_:_:_:) in the Apple Developer documentation.
Customize or Create the AppDelegate Class
-
Xcode 12.4: Start with the AppDelegate class
in your project, keeping the three standard lifecycle functions.
Xcode 13:
- In your project's folder, control-click the MyMobileSDKAppApp.swift file and click Delete.
- Click Move to Trash.
- Control-click and select New File.
- Select Swift File, name it “AppDelegate”, and then click
Create. Xcode creates a file with one line:
1import Foundation
- Paste the following boilerplate implementation of the AppDelegate life cycle
methods.
1import Foundation 2 3@main 4class AppDelegate : UIResponder, UIApplicationDelegate { 5 var window: UIWindow? 6 7 // MARK: UISceneSession Lifecycle 8 func application(_ application: UIApplication, configurationForConnecting 9 connectingSceneSession: UISceneSession, 10 options: UIScene.ConnectionOptions) -> UISceneConfiguration { 11 // Called when a new scene session is being created. 12 // Use this method to select a configuration to create the new scene with. 13 return UISceneConfiguration(name: "Default Configuration", 14 sessionRole: connectingSceneSession.role) 15 } 16 17 func application(_ application: UIApplication, didDiscardSceneSessions 18 sceneSessions: Set<UISceneSession>) { 19 // Called when the user discards a scene session. 20 // If any sessions were discarded while the application was not running, 21 // this will be called shortly after 22 // application:didFinishLaunchingWithOptions. 23 // Use this method to release any resources that were specific to the 24 // discarded scenes, as they will not return. 25 } 26 27 // MARK: - App delegate lifecycle 28 func application(_ application: UIApplication, didFinishLaunchingWithOptions 29 launchOptions: [UIApplication.LaunchOptionsKey: Any]?) -> Bool { 30 // If you wish to register for push notifications, uncomment the line below. 31 // Note that, if you want to receive push notifications from Salesforce, 32 // you will also need to implement the 33 // application(application, didRegisterForRemoteNotificationsWithDeviceToken) 34 // method (below). 35 36 // self.registerForRemotePushNotifications() 37 return true 38 } 39} - Remove the @main attribute above the AppDelegate class declaration. The main.swift file has assumed the role of main.
- Import all Mobile SDK modules.
1import Foundation 2import MobileSync - At the top of the class, override the init() method
to initialize Mobile SDK. For example, to initialize all Mobile SDK libraries, call
initializeSDK() on MobileSyncSDKManager:
1override init() {
2    super.init()
3    MobileSyncSDKManager.initializeSDK()
4}
Add an InitialViewController Class
To access Salesforce data, your app’s users must authenticate with a Salesforce org. Salesforce sends a login screen to your app to collect the user’s credentials and then returns OAuth tokens to your app.
- In your project, control-click and select New File.
- Select Swift File, name it “InitialViewController”, and then click Create.
- Add the following body:
1import Foundation
2import UIKit
3
4class InitialViewController: UIViewController {
5}
Customize or Create the SceneDelegate Class
- AuthHelper.loginIfRequired(_:) decides for you whether login is needed
- AuthHelper.registerBlock(forCurrentUserChangeNotifications:) listens for user change events.
In the scene lifecycle, specific junctures are ideal for each of these AuthHelper calls. For example, register the block that handles user changes only one time, when the scene is first initialized. Also, call AuthHelper.loginIfRequired(_:_:) whenever the scene comes to the foreground. If the current user remains logged in, Mobile SDK merely executes your completion block.
At app startup, you set InitialViewController as the first root view controller. This view hosts the Salesforce login screen and, after a successful login, is replaced by your app’s root view controller. At runtime, if the current user logs out, you dismiss the current root view controller and replace it with InitialViewController. In both cases, after a new user logs in, you dismiss InitialViewController and set your app’s first view as the root view controller.
- In your project, control-click and select New File.
- Select Swift File, name it “SceneDelegate”, and then click Create.
- Copy the following implementation into your new
file.
1import UIKit
2import MobileSync
3import SwiftUI
4
5class SceneDelegate: UIResponder, UIWindowSceneDelegate {
6
7    var window: UIWindow?
8
9
10    func scene(_ scene: UIScene, willConnectTo session: UISceneSession,
11        options connectionOptions: UIScene.ConnectionOptions) {
12        // Use this method to optionally configure and attach the
13        // UIWindow `window` to the provided UIWindowScene `scene`.
14        // If using a storyboard, the `window` property will automatically
15        // be initialized and attached to the scene. This delegate does not
16        // imply the connecting scene or session are new
17        // (see `application:configurationForConnectingSceneSession` instead).
18
19        // Create the SwiftUI view that provides the window contents.
20        let contentView = ContentView()
21
22        // Use a UIHostingController as window root view controller.
23        if let windowScene = scene as? UIWindowScene {
24            let window = UIWindow(windowScene: windowScene)
25            window.rootViewController = UIHostingController(rootView: contentView)
26            self.window = window
27            window.makeKeyAndVisible()
28        }
29    }
30
31    func sceneDidDisconnect(_ scene: UIScene) {
32        // Called as the scene is being released by the system.
33        // This occurs shortly after the scene enters the background,
34        // or when its session is discarded.
35        // Release any resources associated with this scene that can be re-created
36        // the next time the scene connects.
37        // The scene may re-connect later, as its session was not necessarily
38        // discarded (see `application:didDiscardSceneSessions` instead).
39    }
40
41    func sceneDidBecomeActive(_ scene: UIScene) {
42        // Called when the scene has moved from an inactive state to an active state.
43        // Use this method to restart any tasks that were paused (or not yet started)
44        // when the scene was inactive.
45    }
46
47    func sceneWillResignActive(_ scene: UIScene) {
48        // Called when the scene will move from an active state to an inactive state.
49        // This may occur due to temporary interruptions (ex. an incoming phone call).
50    }
51
52    func sceneWillEnterForeground(_ scene: UIScene) {
53        // Called as the scene transitions from the background to the foreground.
54        // Use this method to undo the changes made on entering the background.
55    }
56
57    func sceneDidEnterBackground(_ scene: UIScene) {
58        // Called as the scene transitions from the foreground to the background.
59        // Use this method to save data, release shared resources, and store enough
60        // scene-specific state information
61        // to restore the scene back to its current state.
62    }
63}
Xcode 12.4 and Xcode 13:
- At the top of your project’s SceneDelegate class,
be sure that you’ve declared a UIWindow
variable:
1class SceneDelegate: UIResponder, UIWindowSceneDelegate { 2 3 var window: UIWindow? - At the bottom of the SceneDelegate class body, implement a private function named
resetViewState(_:) that takes an escaping closure
as its sole parameter. This function dismisses the current root view controller and then
executes the given
closure:
1func resetViewState(_ postResetBlock: @escaping () -> ()) { 2 if let rootViewController = self.window?.rootViewController { 3 if let _ = rootViewController.presentedViewController { 4 rootViewController.dismiss(animated: false, 5 completion: postResetBlock) 6 return 7 } 8 self.window?.rootViewController = nil 9 } 10 postResetBlock() 11} - Implement a private function named setupRootViewController() that launches your app’s custom views. For this
simple exercise, you can set the root view to the SwiftUI ContentView provided by the Xcode template.
1func setupRootViewController() { 2 self.window?.rootViewController = UIHostingController(rootView: 3 ContentView()) 4} - In the scene(_:willConnectTo:options:) function,
provide code that sets up the window scene. Replace all existing code with the following
lines:
1func scene(_ scene: UIScene, willConnectTo session: UISceneSession, 2 options connectionOptions: UIScene.ConnectionOptions) { 3 4 guard let windowScene = (scene as? UIWindowScene) else { return } 5 self.window = UIWindow(frame: windowScene.coordinateSpace.bounds) 6 self.window?.windowScene = windowScene 7 8 9} - Register a callback block for user change events. Using the private functions you added,
provide a closure that resets the view state and then presents your app’s root view.
1func scene(_ scene: UIScene, willConnectTo session: UISceneSession, 2 options connectionOptions: UIScene.ConnectionOptions) { 3 4 guard let windowScene = (scene as? UIWindowScene) else { return } 5 self.window = UIWindow(frame: windowScene.coordinateSpace.bounds) 6 self.window?.windowScene = windowScene 7 8 // Define a response to user change events 9 AuthHelper.registerBlock(forCurrentUserChangeNotifications: { 10 self.resetViewState { 11 self.setupRootViewController() 12 } 13 }) 14} - Implement a private function named initializeAppViewState() that sets InitialViewController as the root view. Notice that this function first makes
sure that the app is on the main UI thread. If the app is on some other thread, it
switches to the main thread and calls itself recursively.
1func initializeAppViewState() { 2 if (!Thread.isMainThread) { 3 DispatchQueue.main.async { 4 self.initializeAppViewState() 5 } 6 return 7 } 8 9 self.window?.rootViewController = 10 InitialViewController(nibName: nil, bundle: nil) 11 self.window?.makeKeyAndVisible() 12} - In the sceneWillEnterForeground(_:) listener
function:
- To set the root view to InitialViewController, call initializeAppViewState().
- Call AuthHelper.loginIfRequired(_:) with a closure that sets the root view controller to your app’s main view.
1func sceneWillEnterForeground(_ scene: UIScene) {
2    // Called as the scene transitions from the background to the foreground.
3    // Use this method to undo the changes made on entering the background.
4    self.initializeAppViewState()
5    AuthHelper.loginIfRequired {
6        self.setupRootViewController()
7    }
8}
Build Your New Mobile SDK App
- In Xcode, select (⌘R).
- If the Salesforce login screen appears, you’re done!
Add Push Notification Support
- To support Salesforce push notifications, add code to register and handle them. You can
copy boilerplate implementations of the following methods from the AppDelegate class of the Mobile SDK
iOSNativeSwiftTemplate app:
- registerForRemotePushNotifications()
- application(_:didRegisterForRemoteNotificationsWithDeviceToken:)—Be sure to uncomment the one line of implementation code!
- didRegisterForRemoteNotifications(_:)
- application(_:didFailToRegisterForRemoteNotificationsWithError:)
- Salesforce uses encryption on notifications, which requires you to implement a decryption extension and then to request authorization through the UNUserNotificationCenter object. See Code Modifications (iOS).
Add Identity Provider Support
Mobile SDK supports configuration of identity provider (IDP) apps. See Identity Provider Apps. If you’ve implemented IDP functionality, you enable it by customizing AppDelegate and SceneDelegate.
- In your AppDelegate class, add the following
boilerplate functions from the AppDelegate class of
the Mobile SDK
iOSNativeSwiftTemplate app:
- application(_:open:_:)
- enableIDPLoginFlowForURL(_:_:)
- In your SceneDelegate class, add the following
functions.
1func scene(_ scene: UIScene, openURLContexts URLContexts: Set<UIOpenURLContext>) {
2    if let urlContext = URLContexts.first {
3        self.enableIDPLoginFlowForURLContext(urlContext, scene: scene)
4    }
5}
6
7func enableIDPLoginFlowForURLContext(_ urlContext: UIOpenURLContext,
8    scene: UIScene) -> Bool {
9    return UserAccountManager.shared.handleIdentityProviderResponse(
10        from: urlContext.url, with: [UserAccountManager.IDPSceneKey:
11            scene.session.persistentIdentifier])
12}
Customize the Pre-Login Screen
1import Foundation
2import UIKit
3import SalesforceSDKCore.UIColor_SFColors
4
5class InitialViewController: UIViewController {
6
7    override func viewDidLoad() {
8        super.viewDidLoad()
9        self.view.backgroundColor = UIColor.salesforceSystemBackground
10        let label = UILabel()
11        label.translatesAutoresizingMaskIntoConstraints = false
12        guard let info = Bundle.main.infoDictionary,
13            let name = info[kCFBundleNameKey as String] else { return }
14        label.font = UIFont.systemFont(ofSize: 29)
15        label.textColor = UIColor.black
16        label.text = name as? String
17        self.view.addSubview(label)
18        label.centerXAnchor.constraint(equalTo: self.view.centerXAnchor).
19            isActive = true
20        label.centerYAnchor.constraint(equalTo: self.view.centerYAnchor).
21            isActive = true
22        // Do any additional setup after loading the view,
23        // typically from a nib.
24    }
25
26    override func didReceiveMemoryWarning() {
27        super.didReceiveMemoryWarning()
28        // Dispose of any resources that can be recreated.
29    }
30}
Include SmartStore and Mobile Sync Configuration Files
1// Setup store based on config userstore.json
2MobileSyncSDKManager.shared.setupUserStoreFromDefaultConfig()
3// Setup syncs based on config usersyncs.json
4MobileSyncSDKManager.shared.setupUserSyncsFromDefaultConfig()- Salesforce login is required, or
- When a change of users occurs
- In sceneWillEnterForeground(_:), where it’s called in a block that runs after a Salesforce login occurs.
- In scene(_:willConnectTo:options:), where it’s called in a block that handles current user change notifications.