Visualforce 開発者ガイド
 j
jSLDS を使用した Salesforce アプリケーション用の Visualforce ページの作成
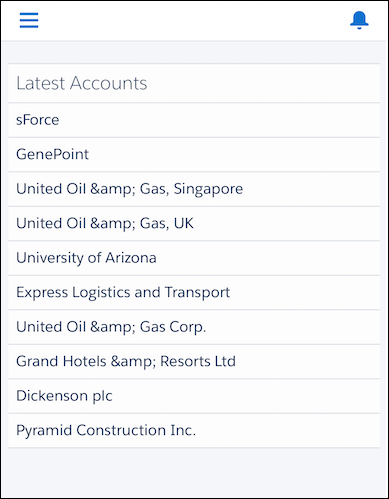
最近アクセスされた取引先を表示する Visualforce ページを作成し、Lightning Design System (SLDS) でスタイル設定して、モバイルナビゲーションメニューに追加しましょう。
- まず、Visualforce ページを作成しましょう。
- 開発者コンソールを開き、 をクリックします。ページ名に「SLDSPage」と入力します。
-
エディタで、任意のマークアップを次のように置き換えます。
1<apex:page showHeader="false" standardStylesheets="false" sidebar="false" applyHtmlTag="false" applyBodyTag="false" docType="html-5.0"> 2 3 <html xmlns="http://www.w3.org/2000/svg" xmlns:xlink="http://www.w3.org/1999/xlink" lang="en"> 4 <head> 5 <meta charset="utf-8" /> 6 <meta http-equiv="x-ua-compatible" content="ie=edge" /> 7 <title>SLDS LatestAccounts Visualforce Page in Salesforce Mobile</title> 8 <meta name="viewport" content="width=device-width, initial-scale=1" /> 9 10 <!-- Import the Design System style sheet --> 11 <apex:slds /> 12 </head> 13 14 <apex:remoteObjects > 15 <apex:remoteObjectModel name="Account" fields="Id,Name,LastModifiedDate"/> 16 </apex:remoteObjects> 17 18 <body> 19 20 <!-- REQUIRED SLDS WRAPPER --> 21 <div class="slds-scope"> 22 23 <!-- PRIMARY CONTENT WRAPPER --> 24 <div class="myapp"> 25 26 <!-- ACCOUNT LIST TABLE --> 27 <div id="account-list" class="slds-p-vertical--medium"></div> 28 <!-- / ACCOUNT LIST TABLE --> 29 30 </div> 31 <!-- / PRIMARY CONTENT WRAPPER --> 32 33 </div> 34 <!-- / REQUIRED SLDS WRAPPER --> 35 36 <!-- JAVASCRIPT --> 37 <script> 38 (function() { 39 var outputDiv = document.getElementById('account-list'); 40 var account = new SObjectModel.Account(); 41 42 var updateOutputDiv = function() { 43 44 account.retrieve( 45 { orderby: [{ LastModifiedDate: 'DESC' }], limit: 10 }, 46 function(error, records) { 47 if (error) { 48 alert(error.message); 49 } else { 50 // create data table 51 var dataTable = document.createElement('table'); 52 dataTable.className = 'slds-table slds-table--bordered slds-text-heading_small'; 53 54 // add header row 55 var tableHeader = dataTable.createTHead(); 56 var tableHeaderRow = tableHeader.insertRow(); 57 58 var tableHeaderRowCell1 = tableHeaderRow.insertCell(0); 59 tableHeaderRowCell1.appendChild(document.createTextNode('Latest Accounts')); 60 tableHeaderRowCell1.setAttribute('scope', 'col'); 61 tableHeaderRowCell1.setAttribute('class', 'slds-text-heading_medium'); 62 63 // build table body 64 var tableBody = dataTable.appendChild(document.createElement('tbody')) 65 66 var dataRow, dataRowCell1, recordName, data_id; 67 records.forEach(function(record) { 68 dataRow = tableBody.insertRow(); 69 dataRowCell1 = dataRow.insertCell(0); 70 recordName = document.createTextNode(record.get('Name')); 71 dataRowCell1.appendChild(recordName); 72 73 }); 74 if (outputDiv.firstChild) { 75 // replace table if it already exists 76 // see later in tutorial 77 outputDiv.replaceChild(dataTable, outputDiv.firstChild); 78 } else { 79 outputDiv.appendChild(dataTable); 80 } 81 } 82 } 83 ); 84 } 85 updateOutputDiv(); 86 })(); 87 </script> 88 <!-- / JAVASCRIPT --> 89 </body> 90 </html> 91</apex:page>- <apex:slds /> タグを使用すると SLDS スタイルシートにアクセスできます。このコンポーネントは、SLDS を静的リソースとしてアップロードして Visualforce ページで使用するための簡単な代替方法です。
- SLDS でスタイル設定したコンテンツは <div class="slds-scope"> ラッパーで囲む必要があります。SLDS スタイルは、この内部に含まれる要素にのみ適用されます。
- このページはモバイルにも対応します。ページを Salesforce モバイルナビゲーションメニューに追加しましょう。
-
モバイルアプリケーション用のページを有効にします。
- [設定] から、[クイック検索] ボックスに「Visualforce ページ」と入力し、[Visualforce ページ] を選択します。
- リストで [SLDSPage] Visualforce ページの横にある [編集] をクリックします。
- [Lightning Experience、Lightning コミュニティ、およびモバイルアプリケーションで利用可能] を選択します。
- [保存] をクリックします
-
Visualforce ページのタブを作成します。
- [設定] から、[クイック検索] ボックスに「タブ」と入力し、[タブ] を選択します。
- [Visualforce タブ] セクションで、[新規] をクリックします。
- [Visualforce ページ] ドロップダウンリストで、「SLDSPage」を選択します。
-
[タブの表示ラベル] 項目に、「SLDS Page」 (SLDS ページ) と入力します。
[タブ名] 項目は自動的に入力されます。
-
[タブスタイル] 項目をクリックして [ダイアモンド] スタイルを選択します。
このスタイルのアイコンは、Salesforce モバイルナビゲーションメニューのページのアイコンとして表示されます。
- [次へ] をクリックし、[次へ] をクリックしてから [保存] をクリックします。
-
タブをモバイルナビゲーションメニューに追加します。
- [設定] から、[クイック検索] ボックスに「モバイルアプリケーション」と入力し、[Salesforce ナビゲーション] を選択します。
-
[SLDS Page (SLDS ページ)] タブを選択し、[追加] をクリックします。
SLDS 項目が [選択済み] リストの最後に追加されます。
- [保存] をクリックします。