Author an Agent with Agentforce DX
Authoring an agent refers to generating and coding its Agent Script file and then publishing it to your development org. You then test the agent in different environments to make sure that it works as you expect. Eventually you deploy it to your production org and activate it so that your customers can use it.
But what’s Agent Script, you ask? It’s the foundation of the next generation of Agentforce agents. Agent Script is a language that combines the flexibility of using natural language to vibe code, with the reliability of programmatic expressions for handling business rules. Agent Script gives you all the advantages of access to a large language model (LLM), while also providing ways to add more deterministic behaviors to your agent.
As with most things Salesforce, an agent’s Agent Script file is part of a metadata component called AiAuthoringBundle, or simply authoring bundle. You can generate the authoring bundle from scratch in your Salesforce DX project. Or you can first create an agent in your org using Agentforce Builder and then retrieve the authoring bundle to your DX project. Inside the authoring bundle is a file with extension .agent, which is the Agent Script file that fully describes the agent and serves as its blueprint. This topic describes both workflows, with links to other topics that contain details about each step.
Have you set up your environment, in particular created a Salesforce DX project and authorized your development org, as required for authoring an agent? See Set Up Your Development Environment for more setup topics.
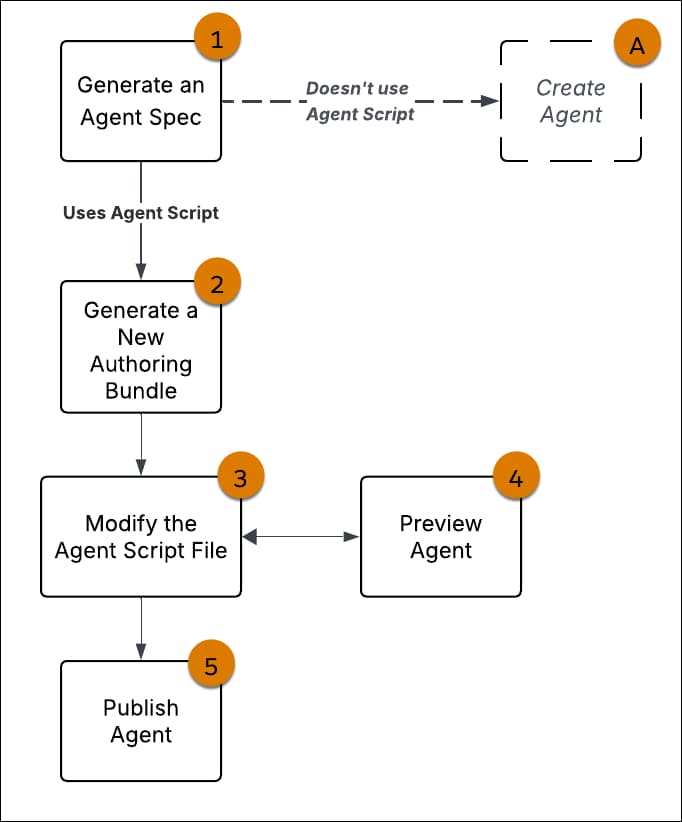
This graphic shows the high-level workflow for authoring a new agent from scratch in your Salesforce DX project, and then publishing it to your org.
Here’s more information about each workflow step.
-
Optionally create an agent spec YAML file by running the
agent generate agent-specCLI command in your Salesforce DX project. The agent spec is a simple YAML file that captures the basic essence of what an agent can do.While this step is optional, we recommend that you do it. When you later generate the authoring bundle that contains the Agent Script file, it is more customized for your specific agent.
-
Generate an authoring bundle based on the agent spec file. If you skip using an agent spec file, then the generated bundle contains a boilerplate Agent Script file. You can use VS Code or the
agent generate authoring-bundleCLI command to generate the authoring bundle.See Generate an Authoring Bundle.
You can also immediately create an agent without using Agent Script as its blueprint; this step is marked with (A) in the workflow graphic. However, we recommend that you don’t follow that path, because Agent script-based agents are more flexible and easier to modify and maintain. This is why the workflow graphic shows the step with a dotted line.
-
In VS Code, code the functionality of your agent by updating its Agent Script file, either directly in the editor or using Agentforce Vibes. Agentforce DX fully supports the Agent Script language with standard code editing features such as syntax highlighting, linting, and internal validation. As you code, validate the Agent Script file to ensure that it compiles.
-
As you code your Agent Script file, periodically preview how the resulting agent behaves and how it responds to your utterances. If you haven’t yet implemented the agent actions, then the responses are simulated (mocked). This interactive testing helps you iterate over the development process. You can also use the Apex Replay Debugger while you preview.
-
After you’re satisfied with how the agent works, publish the authoring bundle to your org. This step automatically creates the underlying agent metadata and syncs the metadata between your DX project and your org. The agent is then ready to test.
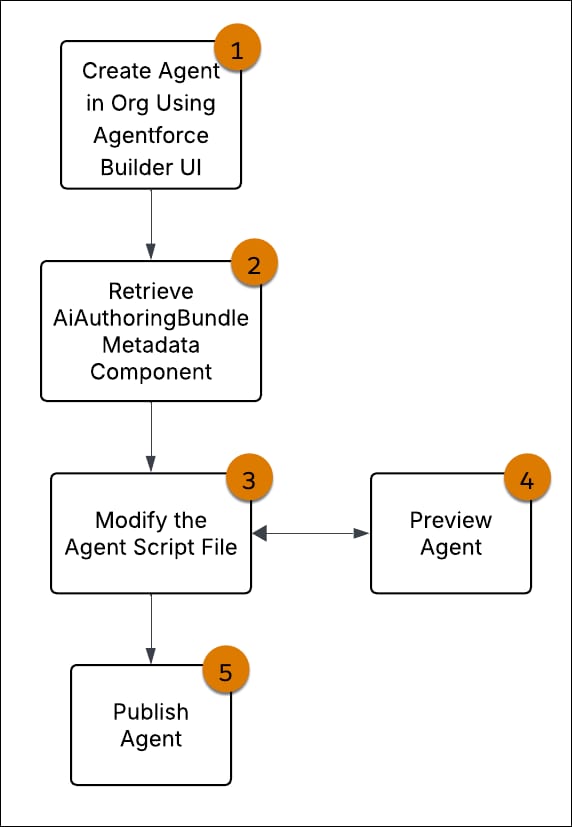
This graphic shows the high-level workflow if you first create an agent in your org using Agentforce Builder, and then want to continue developing it in your Salesforce DX project.
Here’s more information about each workflow step.
-
Create your agent in Agentforce Builder. Be sure that you use the new builder that creates an Agent Script file for the agent, and not the Legacy Agentforce Builder.
See Create an Agent.
-
Using the VS Code integrated terminal, retrieve all authoring bundles to your Salesforce DX project by running this CLI command from your DX project:
The authoring bundles are retrieved to the
aiAuthoringbundlesdirectory in your DX project package directory. If you know the API name of a specific authoring bundle, you can retrieve it and all its version by specifying--metadata "AiAuthoringBundle:Local_Info_Agent*".See Agent Metadata: A Shallow Dive and Synchronize Your Development Org with Your DX Project.
-
In VS Code, code the functionality of your agent by updating its Agent Script file, either directly in the editor or using Agentforce Vibes. Agentforce DX fully supports the Agent Script language with standard code editing features such as syntax highlighting, linting, and internal validation. As you code, validate the Agent Script file to ensure that it compiles.
-
As you code your Agent Script file, periodically preview how the resulting agent behaves and how it responds to your utterances. If you haven’t yet implemented the agent actions, then the responses are simulated (mocked). This interactive testing helps you iterate over the development process. You can also use the Apex Replay Debugger while you preview.
-
After you’re satisfied with how the agent works, publish the authoring bundle to your org. This step automatically creates the underlying agent metadata and syncs the metadata between your DX project and your org. The agent is then ready to test.