Lightning Components Developer’s Guide
 j
jNewer Version Available
Step 5: Enable Input for New Expenses
The following flowchart shows the flow of data in your app when you create a new expense.
The data is captured when you click the Submit button in the component
form.cmp, processed by your JavaScript code
and sent to the server-side controller to be saved as a record. Data from the
records is displayed in the nested component you created in the previous step.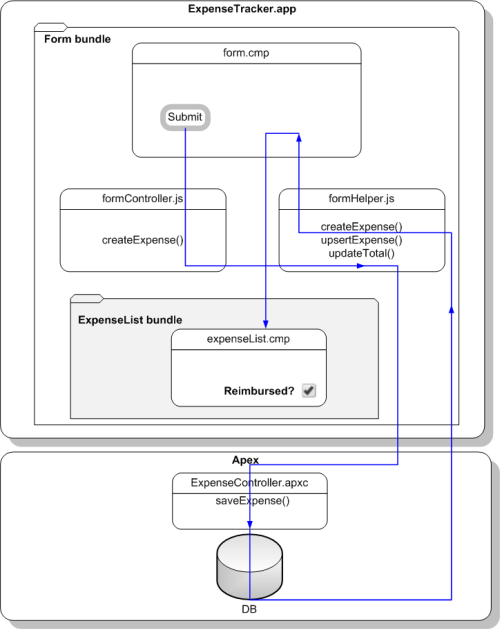
-
In the ExpenseController class, enter this code below the
getExpenses() method.
1swfobject.registerObject("clippy.codeblock-0", "9");
2
3
4
5
6
7
8
9
10
11
12
13
14
15
16
17@AuraEnabled
18public static Expense__c saveExpense(Expense__c expense) {
19
20    // Perform isUpdateable() check here
21    upsert expense;
22    return expense;
23}
The saveExpenses() method enables you to insert or update an expense record using the upsert operation. -
Create the controller-side actions to create a new expense record when the
Submit button is pressed. In
formController.js, add this code after the doInit action.
1swfobject.registerObject("clippy.codeblock-1", "9");
2
3
4
5
6
7
8
9
10
11
12
13
14
15
16
17createExpense : function(component, event, helper) {
18    var amtField = component.find("amount");
19    var amt = amtField.get("v.value");
20    if (isNaN(amt)||amt==''){
21        amtField.setValid("v.value", false);
22        amtField.addErrors("v.value", [{message:"Enter an expense amount."}]);
23    }
24    else {
25        amtField.setValid("v.value", true);
26        var newExpense = component.get("v.newExpense");
27        helper.createExpense(component, newExpense);
28        }
29},//Delimiter for future code
createExpense validates the amount field using default error handling, which appends an error message represented by ui:inputDefaultError. The controller invalidates the input value using setValid(false) and clears any errors using setValid(true). For more information on field validation, see Validating Fields.
Notice that you’re passing in the arguments to a helper function helper.createExpense(), which then triggers the Apex class saveExpense. -
Create the helper function to handle the record creation. In
formHelper.js, add these helper functions after the
updateTotal function.
1swfobject.registerObject("clippy.codeblock-2", "9");
2
3
4
5
6
7
8
9
10
11
12
13
14
15
16
17createExpense: function(component, expense) {
18      this.upsertExpense(component, expense, function(a) {
19        var expenses = component.get("v.expenses");
20        expenses.push(a.getReturnValue());
21        component.set("v.expenses", expenses);
22        this.updateTotal(component);
23      });
24},
25  upsertExpense : function(component, expense, callback) {
26      var action = component.get("c.saveExpense");
27      action.setParams({
28          "expense": expense
29      });
30      if (callback) {
31          action.setCallback(this, callback);
32      }
33      $A.enqueueAction(action);
34    }
35
createExpense calls upsertExpense, which defines an instance of the saveExpense server-side action and sets the expense object as a parameter. The callback is executed after the server-side action returns, which updates the records, view, and counters. $A.enqueueAction(action) adds the server-side action to the queue of actions to be executed.
-
Save your changes and reload your browser. Test your app by entering Breakfast, 10, ABC Co., Apr 30, 2014 9:00:00
AM. For the date field, you can also use the date picker to set a date
and time value. Click the Submit button. The record is added to both your
component view and records, and the counters are updated.