Lightning Components Developer’s Guide
 j
jNewer Version Available
Step 1: Create A Static Mockup
Create a static mockup in a.app file,
which is the entry point for your app. It can contain other components
and HTML markup.
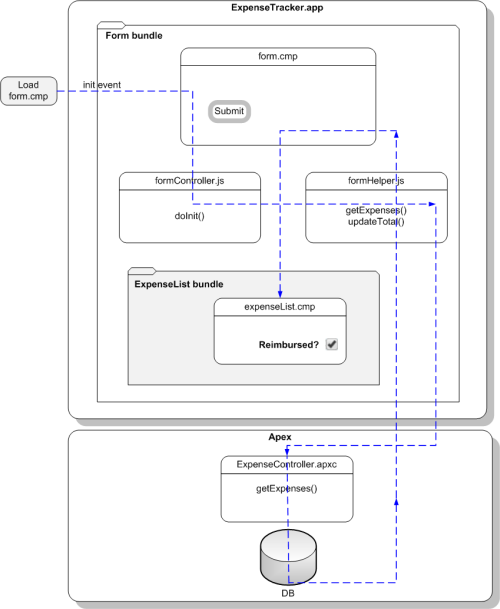
The following flowchart summarizes the data flow in the app. The app retrieves data from the records through a combination of client-side controller and helper functions, and an Apex controller, which you’ll create later in this quick start.
- Click to open the Developer Console.
- In the Developer Console, click .
- Enter expenseTracker for the Name field in the New Lightning Bundle popup window. This creates a new app, expenseTracker.app.
-
In the source code editor, enter this code.An application is a top-level component and the main entry point to your components. It can include components and HTML markup, such as <div> and <header> tags.
1swfobject.registerObject("clippy.codeblock-0", "9"); 2 3 4 5 6 7 8 9 10 11 12 13 14 15 16 17<aura:application> 18 <ltng:require styles="/resource/bootstrap"/> 19 <div class="bootstrap-sf1"> 20 <div class="navbar navbar-inverse"> 21 <div class="navbar-header"> 22 <a href="#" class="navbar-brand">My Expenses</a> 23 </div> 24 </div> 25 </div> 26</aura:application> -
Download the Salesforce1 styled theme available at http://developer.salesforcefoundation.org/bootstrap-sf1/ and upload
the bootstrap-namespaced.min.css file as a static resource.
This file is located in the/dist/css directory. This CSS
resource includes the .bootstrap-sf1
selector, which prevents styling conflict with other namespaces.
- From Setup, click . Click New.
- Enter bootstrap in the Name field. Click the Choose File button and select the bootstrap-namespaced.min.css file. We’ll not be uploading the other files to simplify this tutorial.
- Click Save.
- Save your changes and click Preview in the sidebar to preview your app. Alternatively, navigate to https://<mySalesforceInstance>.lightning.force.com/<namespace>/expenseTracker.app, where <mySalesforceInstance> is the name of the instance hosting your org; for example, na1. If you’re not using a namespace, your app is available at /c/expenseTracker.app.