Lightning Components Developer's Guide
 j
jNewer Version Available
Step 6: Make the App Interactive With Events
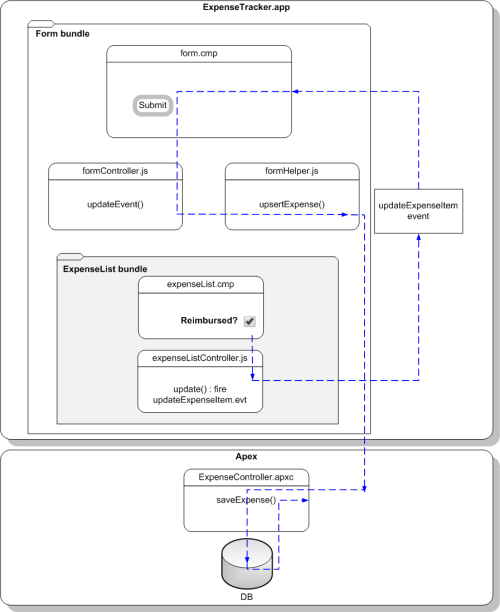
Let’s start by creating the event and its handler before firing it and handling the event in the parent component.
- Click .
- Enter updateExpenseItem in the New Event window. This creates a new event, updateExpenseItem.evt.
-
In updateExpenseItem.evt, enter this code.
The attribute you’re defining in the event is passed from the firing component to the handlers.
1<aura:event type="COMPONENT">
2    <!-- If you’re using a namespace, use myNamespace.Expense__c instead. -->
3    <aura:attribute name="expense" type="Expense__c"/>
4</aura:event>
The framework has two types of events: component events and application events.We’ll use a component event. Recall that expenseList.cmp contains the Reimbursed? checkbox.
-
Update expenseList.cmp to register that it fires the
event. Add this tag after the <aura:attribute> tag.
1<aura:registerEvent name="updateExpense" type="c:updateExpenseItem"/>The Reimbursed? checkbox is wired up to a client-side controller action, denoted by change="{!c.update}". You’ll set up the update action next.
-
In the expenseList sidebar, click
CONTROLLER. This creates a new resource,
expenseListController.js. Enter this code.
1({
2    update: function(component, evt, helper) {
3      var expense = component.get("v.expense");
4      // Note that updateExpense matches the name attribute in <aura:registerEvent>
5      var updateEvent = component.getEvent("updateExpense");
6      updateEvent.setParams({ "expense": expense }).fire();
7    }
8})
When the checkbox is checked or unchecked, the update action runs, setting the reimbursed parameter value to true or false. The updateExpenseItem.evt event is fired with the updated expense object .
-
In the handler component, form.cmp, add this handler code
before the <aura:attribute> tags.
1<aura:handler name="updateExpense" event="c:updateExpenseItem" action="{!c.updateEvent}" />This event handler runs the updateEvent action when the component event you created is fired. The <aura:handler> tag uses the same value of the name attribute, updateExpense, from the <aura:registerEvent> tag in c:expenseList
-
Wire up the updateEvent action to handle
the event. In formController.js, enter this code after the
createExpense controller action.
1updateEvent : function(component, event, helper) {
2    helper.upsertExpense(component, event.getParam("expense"));
3}
This action calls a helper function and passes in event.getParam("expense"), which contains the expense object with its parameters and values in this format: { Name : "Lunch" , Client__c : "ABC Co." , Reimbursed__c : true , CreatedDate : "2014-08-12T20:53:09.000Z" , Amount__c : 20}.
- Save your changes and reload your browser.
-
Click the Reimbursed? checkbox for one of the records.
Note that the background color for the record changes. When you change the reimbursed status on the view, the update event is fired, handled by the parent component, which then updates the expense record by running the server-side controller action saveExpense.
Beyond the Basics
The framework fires several events during the rendering lifecycle, such as the init event you used in this tutorial. For example, you can also customize the app behavior during the waiting event when the client is waiting for a server response and when the doneWaiting event is fired to signal that the response has been received. This example shows how you can add text in the app during the waiting event, and remove it when the doneWaiting event is fired.
1<!-- form.cmp markup -->
2<aura:handler event="aura:waiting" action="{!c.waiting}"/>
3<aura:handler event="aura:doneWaiting" action="{!c.doneWaiting}"/>
4<aura:attribute name="wait" type="String"/>
5
6<div class="wait">
7    {!v.wait}
8</div>1/** formController.js **/
2waiting : function(component, event, helper) {
3 component.set("v.wait", "updating...");
4},
5doneWaiting : function(component, event, helper) {
6 component.set("v.wait", "");
7}The app displays this text when you click the Submit button to create a new record or when you click the checkbox on an expense item. For more information, see Events Fired During the Rendering Lifecycle.