Headless Login Overview
You configure headless login via the Authorization Code and Credentials Flow, which is built on the OAuth 2.0 Authorization Code grant type. At the end of this flow, a user is logged in and can access Salesforce data. Here’s a high-level overview of how the flow works with a single-page app.
| Required Editions |
|---|
| Available in: both Salesforce Classic (not available in all orgs) and Lightning Experience |
| Available in: Enterprise, Unlimited, and Developer Editions |
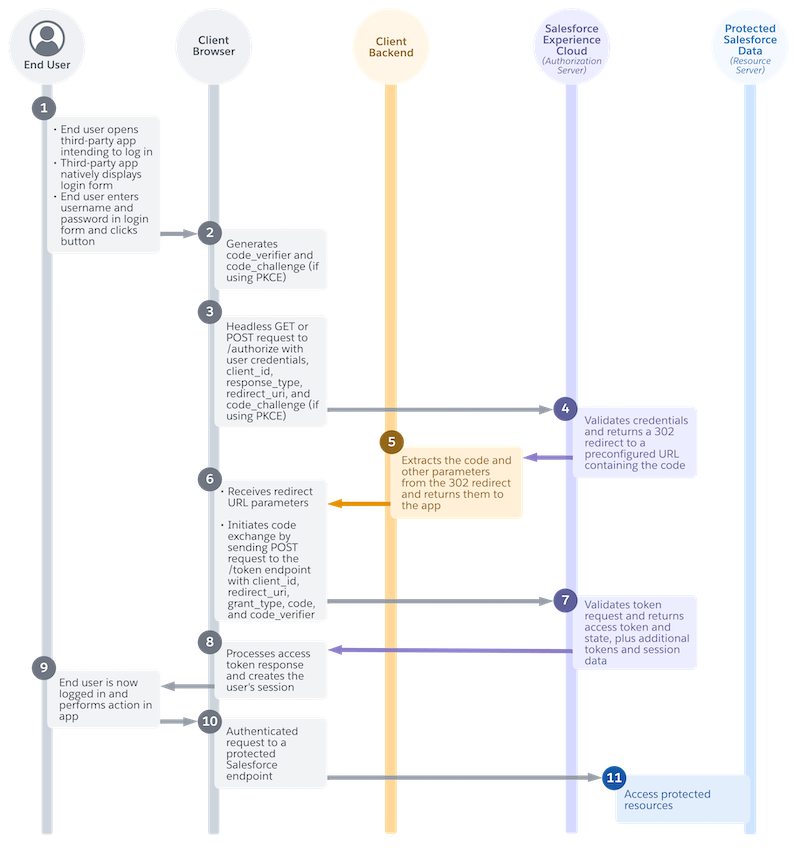
- Your user goes to your custom app, where your login form is natively displayed, and enters their username and password (1).
- If you’re using the Proof Key for Code Exchange (PKCE) extension, the app generates values to verify the authorization code. If you’re not using PKCE, your flow skips this step. We strongly recommend that you always use PKCE when implementing this flow for single-page apps (2).
- From the browser, your custom app—via JavaScript—sends a headless authorization request to the Salesforce Headless Login API authorization endpoint on your Experience Cloud site (3).
- Salesforce returns a 302 redirect to a preconfigured URL containing the authorization code. If the flow is executed in the browser, the 302 redirect is processed and the response is delivered headlessly to your callback endpoint. For single-page apps, you can use the OAuth 2.0 echo endpoint, which is designed to make development for this use case easier (4).
- The callback endpoint extracts the authorization code from the 302 redirect and returns it to the app (5).
- The client-side JavaScript receives the redirect URL parameters and initiates the code exchange with a POST request to the token endpoint (6).
- Salesforce Headless Login API validates the request and returns an access token response to the app (7).
- Client-side JavaScript on the app processes the access token and creates the user’s session (8).
- The user is now logged in, and they perform an action in your custom app that initiates a request for Salesforce data. For example, they click a button to access their travel booking history, which is stored in the Salesforce Experience Cloud site (9).
- Your custom app makes an authenticated request to a protected Salesforce endpoint, such as a Salesforce API (10).
- The user can now access their protected data in your custom app. For example, they can see their travel booking history (11).
Here are a few key concepts to keep in mind for this flow.
- Your app initiates headless login with an authorization request to Headless Login API.
- You use a callback endpoint to extract the authorization code. To make this process easier, instead of building your own endpoint, use the Salesforce OAuth 2.0 echo endpoint.
- Your app exchanges the code for an access token with a request to the token endpoint.


 j
j