


 j
jAbout This Guide
Headless Login Overview
Headless Registration Overview
Headless Forgot Password Overview
Building Native Single Sign-On Experiences
Previous Versions
You can configure the OAuth 2.0 web-server and user-agent flows to create a native single sign-on (SSO) experience in your app. Use this feature to add SSO to your Headless Identity implementation.
| Required Editions |
|---|
| Available in: both Salesforce Classic (not available in all orgs) and Lightning Experience |
| Available in: Enterprise, Unlimited, and Developer Editions |
To create a native single sign-on experience in your app, you configure SSO with an authentication provider or SAML identity provider. You add this provider as a login option from your Experience Cloud settings. Then you configure the OAuth 2.0 web server flow or user-agent flow with your app. You pass in a parameter that specifies the name of the SSO provider you configured. On your app, you also build a button to display the option to log in with the SSO provider.
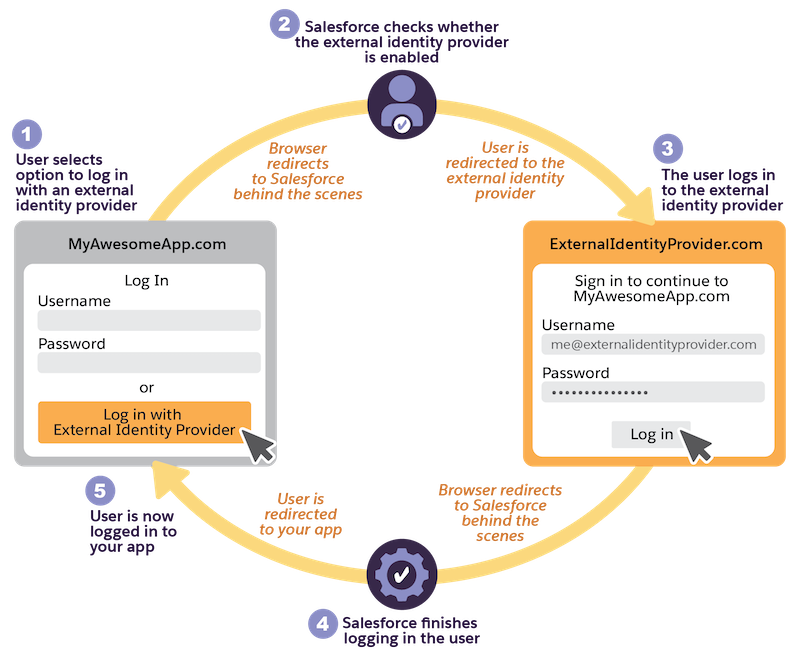
During the flow, when the user clicks the option to log in with the provider, the browser is redirected to your Experience Cloud site. Here, Salesforce checks for the SSO provider parameter specified in the authorization flow. The browser is then automatically redirected to the SSO provider. The user enters their credentials and the flow briefly redirects to your Experience Cloud site again before the user is redirected back to your app. These redirects happen automatically, giving the user the impression that your app is natively integrated with the external SSO provider—they don’t see or interact with your Experience Cloud site.
For example, you want to set up SSO between your app and Google, and you want it to feel like your app is natively integrated with Google. Here’s a simplified overview of the flow works when it’s configured.
j