


Integrate the Mobile App Messaging SDK Extension for iOS
The Mobile App Messaging SDK supports Push Delivery events and a Carousel template. To use these features, add the Service Extensions and Content Extensions targets in your app. Next, integrate the iOS Extension SDK MCExtensionSDK with your app.
Prerequisites
To integrate the Mobile App Messaging SDK Extension for iOS, you need:
- Service and Content Extension targets in your main app.
- The Mobile App Messaging SDK integration for iOS.
Configure the Service Extension
This section shows how to set up and configure the Notification Service Extension for use with the iOS Extension SDK.
Add a Service Extension Target
The notification service app extension is a separate bundle within the main app. To add a service extension target, perform these steps.
-
In Xcode, go to File > New > Target.
-
In the iOS > Application Extension section, select Notification Service Extension.
-
Click Next.
-
Configure the app extension and click Finish.
-
In your project target’s General settings, verify that the new extension is listed under Frameworks, Libraries, and Embedded Content. If it’s not there, add it.

Use the same Xcode-managed profile for the extension targets as the main project. Match the service extension version to the main app version whenever possible, and prefix the service extension bundle ID with the main app’s bundle ID. For example, if the main app’s bundle ID is
com.salesforce.MyAwesomeApp, the service extension bundle ID can becom.salesforce.MyAwesomeApp.MyServiceExtension.Important
Integrate the Extension SDK with the Service Extension
To integrate the Mobile App Messaging SDK Extension for iOS with the Service Extension, choose a method based on your project setup and preference.
- Integrate the SDK with CocoaPods
- Integrate the SDK with Swift Package Manager (SPM)
- Integrate the SDK Manually
Integrate the SDK with CocoaPods
To add the SDK as a dependency in your app’s Podfile, follow the instructions for Adding pods to an Xcode project on the CocoaPods documentation site.
After the installation process, open the .xcworkspace file created by CocoaPods using Xcode.
Avoid opening .xcodeproj directly. Opening a project file instead of a workspace can lead to errors.
Important
Integrate the SDK with SPM
To integrate the Mobile App Messaging SDK iOS Extension using SPM, follow these steps.
- In Xcode, open your project and select Project Settings.
- Go to the Package Dependencies tab, and click + to add a new package.
- Enter the repository URL and add these packages required for your implementation:
- Review the package details and confirm to complete the installation.
Integrate the SDK Manually
To integrate the extension SDK manually:
-
Download these SDKs:
-
Copy the relevant
.xcframeworkdirectories from your downloads folder into your project folder. -
In Xcode, open your project and select the appropriate target. Add the required
.xcframeworkfiles to Frameworks, Libraries, and Embedded Content in the target’s General settings. -
Add
MarketingCloudSDK.bundleto Copy Bundle Resources under Build Phases. -
In Build Settings, add
-ObjCto Other Linker Flags.
Inherit from SFMCNotificationService
Remove all autogenerated code and inherit the main class of the Service Extension from the SFMCNotificationService class.
Swift Example
1import UserNotifications
2import MCExtensionSDK
3
4class NotificationService: SFMCNotificationService { }
Objective-C Example
1#import <UserNotifications/UserNotifications.h>
2#import <MCExtensionSDK/MCExtensionSDK.h>
3
4@interface NotificationService : SFMCNotificationService
5
6@end1#import "NotificationService.h"
2
3@implementation NotificationService
4
5@endMake sure that you don’t implement any UNNotificationServiceExtension methods, such as func didReceive(_ request: UNNotificationRequest, withContentHandler contentHandler: @escaping (UNNotificationContent) → Void) and open func serviceExtensionTimeWillExpire()
Warning
Additional Configuration Options
The MCExtensionSDK manages the UNNotificationServiceExtension lifecycle methods. However, you may need to customize behavior, such as:
- Enabling or disabling logging and configuring log levels
- Downloading and attaching images or videos to push notifications
- Adding custom key-value pairs to the notification’s
userInfo - Performing other necessary operations
Configure Logging
To enable or disable logging and configure log levels, override the sfmcProvideConfig() method: override func sfmcProvideConfig() → SFNotificationServiceConfig
Configure Thumbnail
To show the first image of the Carousel template as a thumbnail, override the sfmcProvideConfig() method. Then, set the value of shouldShowCarouselThumbnail to false. This code example shows how to make these changes in Swift.
1override func sfmcProvideConfig() -> SFNotificationServiceConfig {
2    return SFNotificationServiceConfig(logLevel: .debug, shouldShowCarouselThumbnail: false)
3}
Use this code example to make these changes in Objective-C.
1- (SFMCNotificationServiceConfig *)sfmcProvideConfig {
2 return [[SFMCNotificationServiceConfig alloc] initWithLogLevel:SFMCExtensionSdkLogLevelDebug shouldShowCarouselThumbnail:NO];
3}
Execute Custom Code
To execute custom code, override func sfmcDidReceive(_ request: UNNotificationRequest, mutableContent: UNMutableNotificationContent, withContentHandler contentHandler: @escaping ([AnyHashable : Any]?) → Void) to process notifications, such as downloading media or adding custom key-value pairs.
This code example depicts a Swift-based implementation where SFMCNotificationService is extended to configure logging through sfmcProvideConfig() and customize push notification handling in sfmcDidReceive(_:mutableContent:withContentHandler:), allowing for operations like adding custom key-value pairs.
1import UserNotifications
2import MCExtensionSDK
3
4class NotificationService: SFMCNotificationService {
5
6    // Please use this method to enable logging, change logging levels etc, if required
7    override func sfmcProvideConfig() -> SFNotificationServiceConfig {
8        var logLevel: LogLevel = .none
9#if DEBUG
10        logLevel = .debug
11#endif
12        return SFNotificationServiceConfig(logLevel: logLevel)
13    }
14
15    // Please use this method if and only if you need to do any custom processing e.g. image, video download, inserting custom keys in notification userInfo etc
16    // Please don’t modify  `mutableContent.request.content.userInfo` directly as doing so may result in exception
17    // If you need to add any custom key in notification userInfo, then please return a dictionary in the completion handler
18
19
20    // Please note that like the `UNNotificationServiceExtension` method - func didReceive(_ request: UNNotificationRequest, withContentHandler contentHandler: @escaping (UNNotificationContent) → Void),
21    // you will only get limited time from system to perform your processing operation
22    override func sfmcDidReceive(_ request: UNNotificationRequest, mutableContent: UNMutableNotificationContent, withContentHandler contentHandler: @escaping ([AnyHashable : Any]?) -> Void) {
23        // Your custom code here
24        //...
25
26        // In case you need to add any custom key/value pair(s) in notifications userInfo object then
27        var customUserInfo: [AnyHashable : Any] = [:]
28        customUserInfo["MyCustomKey"] = "MyCustomValue"
29
30        // Finally call content handler to signal end of your processing operation
31        //
32        contentHandler(customUserInfo)
33    }
34}
Here’s an example of an Objective-C-based implementation where SFMCNotificationService is extended to configure logging using sfmcProvideConfig and handle custom push notification processing using sfmcDidReceiveRequest:mutableContent:withContentHandler:, enabling actions such as adding custom key-value pairs to the notification payload.
1#import "NotificationService.h"
2
3@implementation NotificationService
4
5// Please use this method to enable logging, change logging levels etc, if required
6- (SFMCNotificationServiceConfig *)sfmcProvideConfig {
7    SFMCExtensionSdkLogLevel logLevel = SFMCExtensionSdkLogLevelNone;
8#if DEBUG
9    logLevel = SFMCExtensionSdkLogLevelDebug;
10#endif
11    return [[SFMCNotificationServiceConfig alloc] initWithLogLevel: logLevel];
12}
13
14// Please use this method if and only if you need to do any custom processing e.g. image, video download, inserting custom keys in notification userInfo etc
15// Please don’t modify  `mutableContent.request.content.userInfo` directly as doing so may result in exception
16// If you need to add any custom key in notification userInfo, then please return a dictionary in the completion handler
17
18// Please note that like the `UNNotificationServiceExtension` method: - (void) didReceiveNotificationRequest:(UNNotificationRequest *) request
19// withContentHandler:(void (^)(UNNotificationContent * contentToDeliver)) contentHandler,
20// you will only get limited time from system to perform your processing operation
21- (void)sfmcDidReceiveRequest:(UNNotificationRequest *)request
22               mutableContent:(UNMutableNotificationContent *)mutableContent
23           withContentHandler:(void (^)(NSDictionary * __nullable))contentHandler {
24    // Your custom code here
25    //...
26
27    // In case you need to add any custom key/value pair(s) in notifications userInfo object then
28    NSDictionary *customUserInfo = @{@"MyCustomKey": @"MyCustomValue"};
29
30    // Finally call content handler to signal end of your processing operation
31    contentHandler(customUserInfo);
32}
33
34@end
While customizing the func sfmcDidReceive(_ request: mutableContent: withContentHandler:), don’t modify mutableContent.request.content.userInfo directly, as this can cause an exception. Instead, use contentHandler to add custom key-value pairs, as shown in the examples. Since the content extension has a limited runtime, minimize the custom processing time. Additionally, make sure that the completion handler is invoked along every possible return path.
Warning
Configure the Content Extension
To display rich media notifications, you must add and configure a Content Extension to your project.
Add a Content Extension Target
Notification Content Extensions run as separate processes within your app, providing isolation and enhancing security. Follow these steps to add a content extension target.
- In Xcode, go to File > New > Target.
- From the iOS > Application Extension section, select Notification Content Extension.
- Click Next.
- Provide a name and configure your extension settings.
- Click Finish.
- In the general settings for your target, verify that the Frameworks, Libraries, and Embedded Content section lists the new extension. If it isn’t present, add it.
Integrate the Extension SDK with Your Content Extension
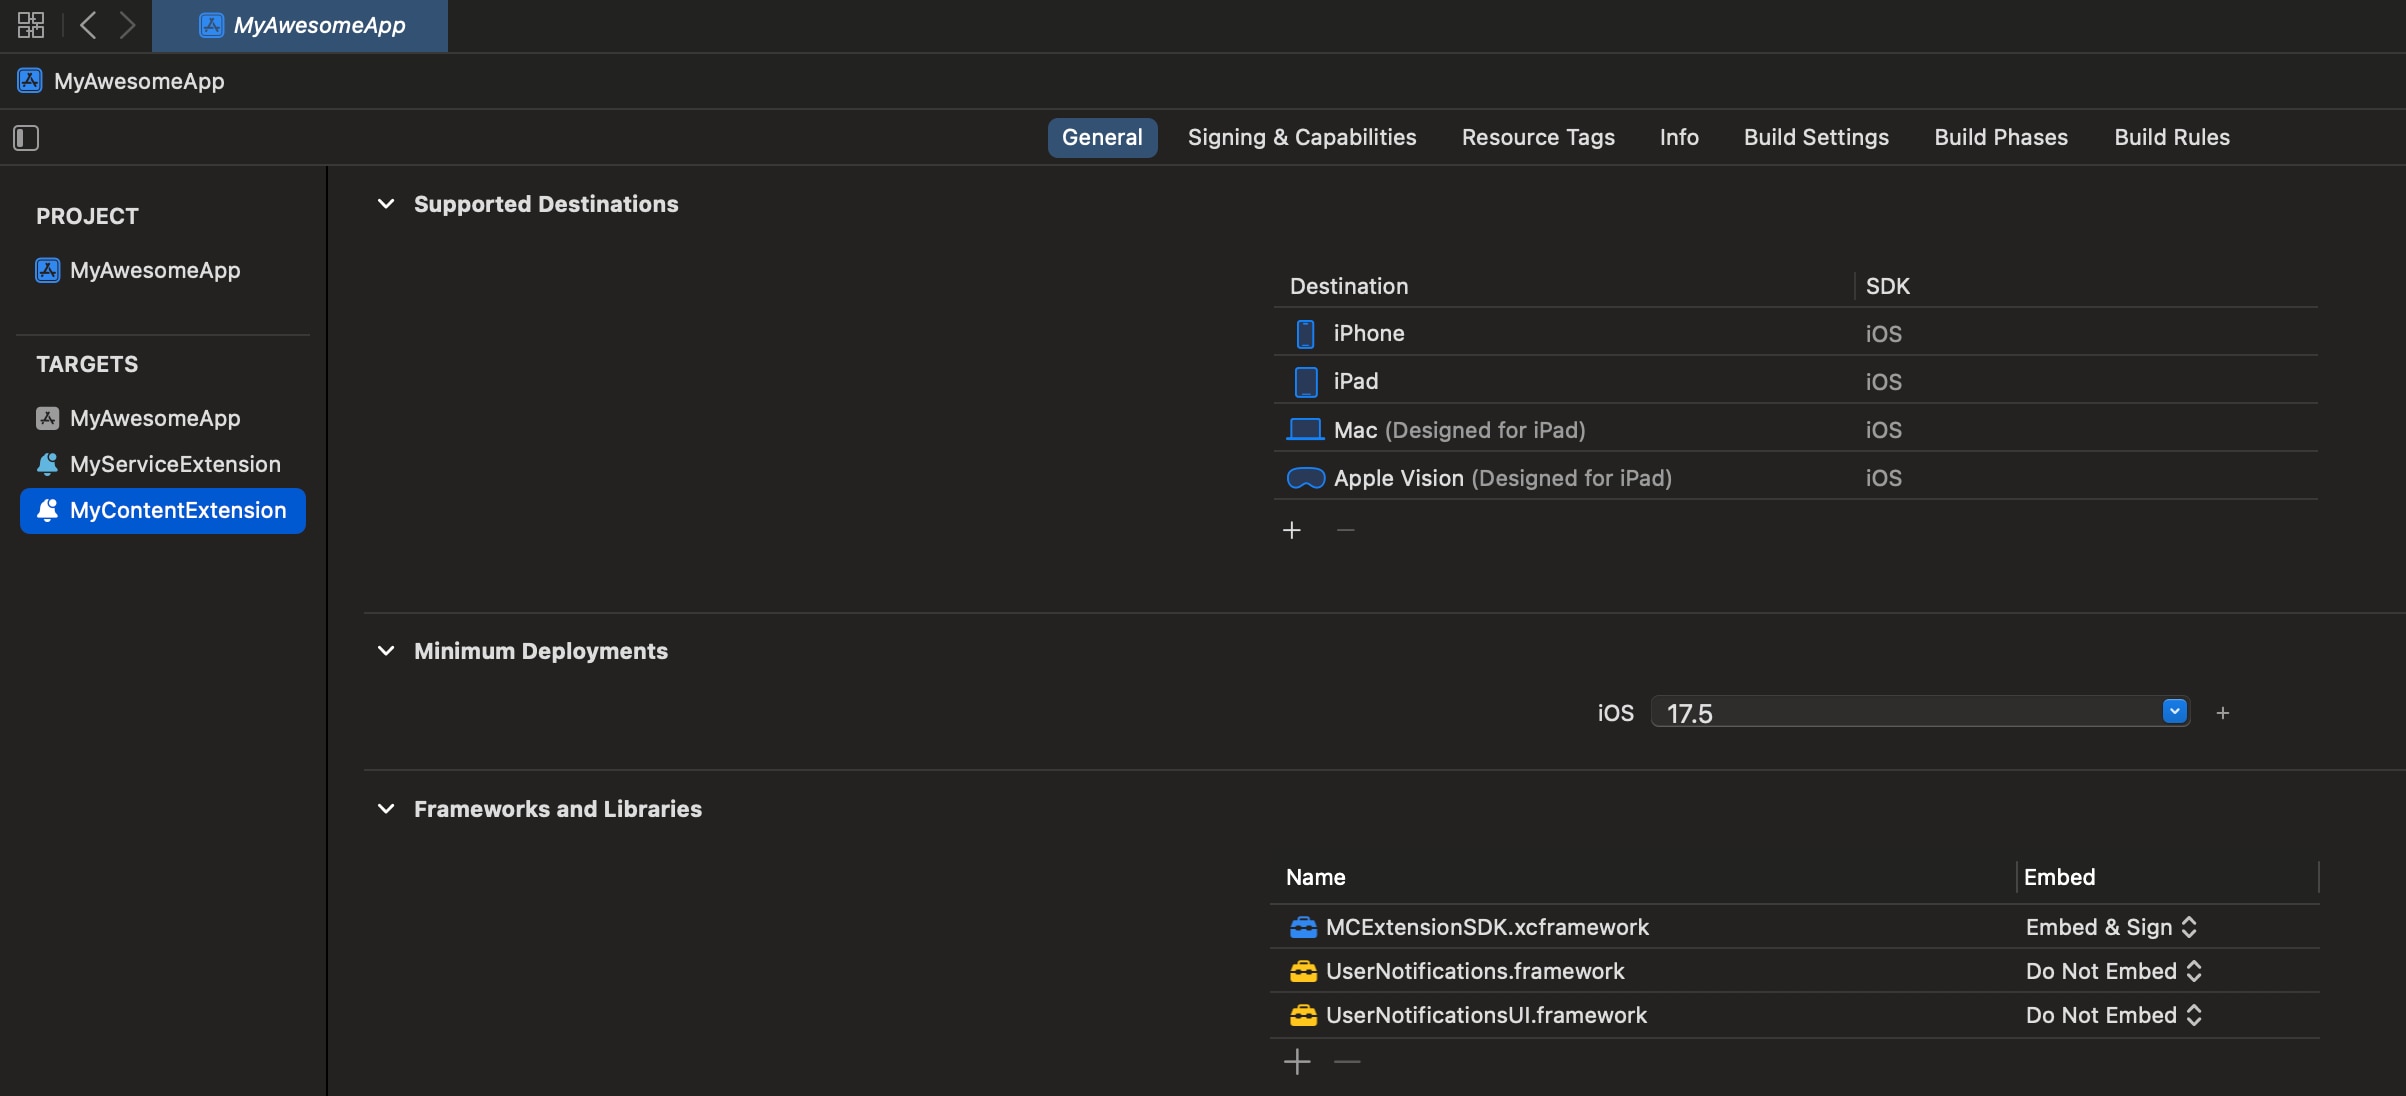
The process for integrating the MCExtensionSDK into your Content Extension follows the same process as the one for integrating the Service Extension. For detailed instructions, see Integrate the Extension SDK with the Service Extension.
After you complete the integration steps, verify that your Content Extension’s target settings lists the library in the Frameworks, Libraries, and Embedded Content section, as shown in this image.
Inherit from SFMCNotificationViewController
Remove all Apple-generated boilerplate code and inherit the main class of the Content Extension from SFMCNotificationViewController, as shown in these examples.
1import UIKit
2import UserNotifications
3import UserNotificationsUI
4import MCExtensionSDK
5
6class NotificationViewController: SFMCNotificationViewController { }
SFMCNotificationViewController fully manages UI rendering. Don’t implement or override any UIViewController methods in the principal class of the content extension, as doing so can interfere with UI rendering.
Note
1#import <UIKit/UIKit.h>
2#import <MCExtensionSDK/MCExtensionSDK.h>
3
4@interface NotificationViewController : SFMCNotificationViewController
5
6@end1#import "NotificationViewController.h"
2
3@implementation NotificationViewController
4
5@endProject and Info.plist Configuration
Configure your project and content extension’s Info.plist file to register the correct notification category, build the rich push notification UI in code using the Extension SDK, and enable user interaction. These steps ensure the content extension is correctly triggered and displays the intended rich UI.
Set Up the Extension Category
To set up and synchronize the notification category between your content extension’s Info.plist file and Marketing Cloud, perform these steps.
- Work with your Marketing Admin to obtain the correct category name for the Rich UI template.
- In your content extension’s
Info.plistfile, replace the value forUNNotificationExtensionCategoryunderNSExtension > NSExtensionAttributes.
Build the UI Programmatically
Unlike Apple’s autogenerated content extension template, MCExtensionSDK builds the notification UI programmatically instead of using an Interface Builder file. Follow these steps to modify the project to build the rich push notification UI using the MCExtensionSDK, rather than using a storyboard.
-
Remove the storyboard reference by deleting the
NSExtensionMainStoryboarditem fromInfo.plist > NSExtension. -
Add the
NSExtensionPrincipalClasskey toInfo.plist > NSExtension- Value type:
String - Value:
$(PRODUCT_MODULE_NAME).<MainClassName>
For Objective-C projects, specify the class name directly.
Note
- Value type:
-
Remove
MainInterface.storyboardfrom your project.
Enable User Interaction
Add this key to your content extension’s Info.plist file.
- Key:
UNNotificationExtensionUserInteractionEnabled - Value type: Boolean
- Value:
YES
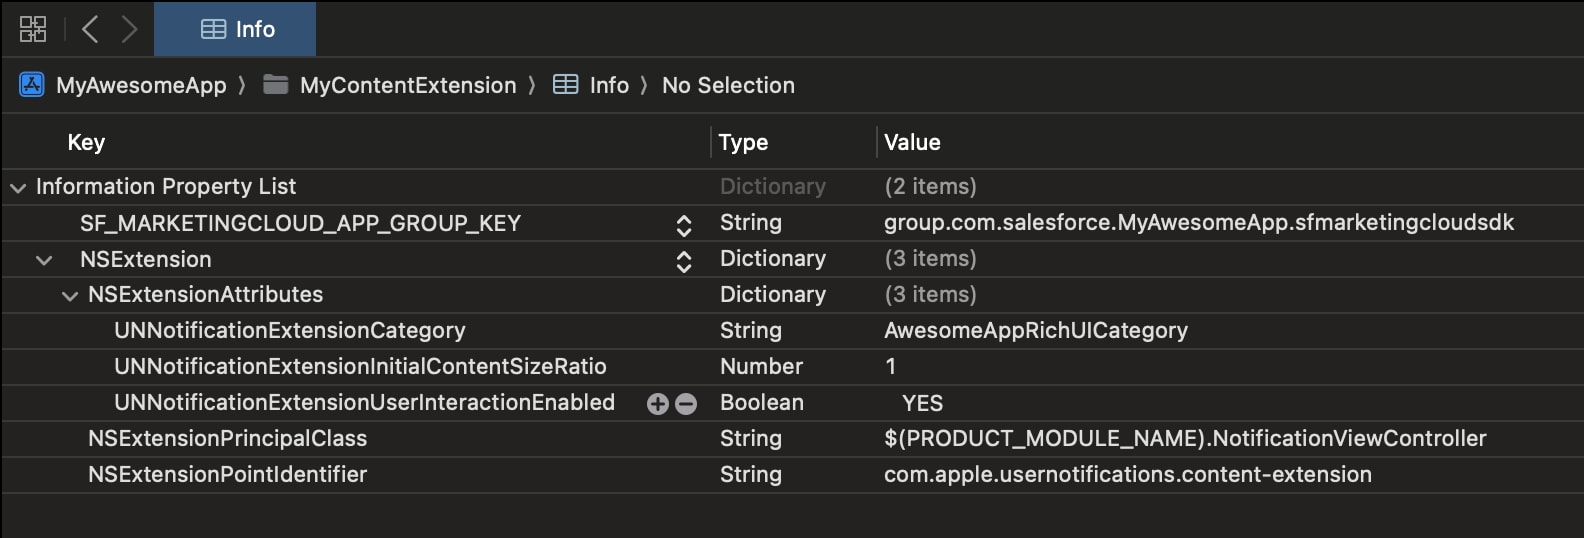
This screenshot illustrates an Info.plist file in a Swift-based implementation with configured NSExtensionAttributes and NSExtensionPrincipalClass.
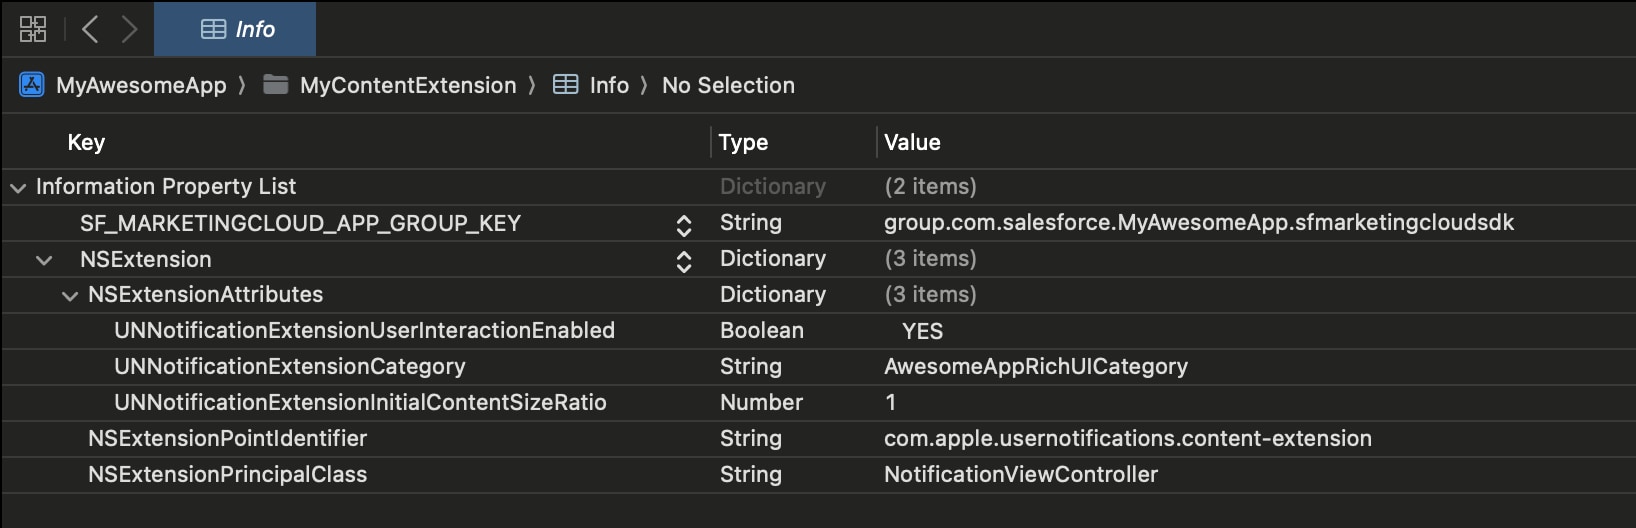
This screenshot illustrates an Info.plist file in an Objective-C-based implementation with configured NSExtensionAttributes and NSExtensionPrincipalClass.
Additional Configuration
You can further customize extension behavior by:
- Configuring logging
- Adjusting the HTTP request timeout
For Swift-based implementations, implement the sfmcProvideConfig() method to define custom log levels and HTTP timeout settings for the extension.
1import UIKit
2import UserNotifications
3import UserNotificationsUI
4import MCExtensionSDK
5
6class NotificationViewController: SFMCNotificationViewController {
7
8  override func sfmcProvideConfig() -> SFContentExtensionConfig {
9    var logLevel: LogLevel = .none
10  #if DEBUG
11    logLevel = .debug
12  #endif
13
14    return SFContentExtensionConfig(logLevel: logLevel, timeoutIntervalForRequest: 30.0)
15  }
16}
In Objective-C, use the sfmcProvideConfig method to configure logging behavior and HTTP request timeout values for the extension.
1#import "NotificationViewController.h"
2
3@implementation NotificationViewController
4
5- (SFMCContentExtensionConfig *)sfmcProvideConfig {
6    SFMCExtensionSdkLogLevel logLevel = SFMCExtensionSdkLogLevelNone;
7#if DEBUG
8    logLevel = SFMCExtensionSdkLogLevelDebug;
9#endif
10    return [[SFMCContentExtensionConfig alloc] initWithLogLevel:logLevel timeoutIntervalForRequest:30.0];
11}
The default timeout for network requests is 15 seconds. Additionally, iOS blocks insecure (non-HTTPS) URLs by default. To allow loading Carousel images from HTTP URLs, configure an exception.
Note
Enable App Groups Capability
The Main App, Service Extension, and Content Extension run in three separate processes. iOS limits inter-process communication (IPC) between the extensions and the main app. To ensure that Push Delivery events and the Carousel template work as intended, the Mobile App Messaging SDK for iOS and the iOS SDK Extension rely on the App Groups capability.
Configure App Groups for the Main App Target
-
Select your main app target and navigate to the Signing & Capabilities tab.
-
Add the App Groups capability.
-
Add a new app group container or use an existing one. Note down this container name. If you’re creating a new container, we recommend using a name in this format:
group.<bundle-id>.sfmarketingcloudsdk -
Add the container name to a new
Info.plistkey with these details:Info.plistkey name:SF_MARKETINGCLOUD_APP_GROUP_KEYInfo.plistvalue type: StringInfo.plistvalue: The app group container name (for example,group.com.salesforce.MyAwesomeApp.sfmarketingcloudsdk)
Configure App Groups for the Extension Targets
Repeat the steps listed in the previous section to add app groups for your Service Extension and Content Extension targets. When adding app groups, make sure you use the same container name as prescribed in the previous step. Additionally, update each extension’s Info.plist with the same SF_MARKETINGCLOUD_APP_GROUP_KEY key and value used in the main app.
Make sure that SF_MARKETINGCLOUD_APP_GROUP_KEY value is identical in all three Info.plist files: Main App, Service extension, and Content Extension.
Important
Handle Carousel Click Actions
If a Carousel image has an associated URL action, tapping the image triggers the URL handling delegate. For instructions on configuring URL handling, see Customize Push Notification Functionality for iOS Apps.
 j
j