


Automate How Agents Accept and Decline Shift Assignments
Create an approval process and link it to a flow so that agents can acknowledge shift assignments. When a planner tentatively assigns a shift, the agent can accept or reject the shift assignment in Agent Home.
| Required Editions |
|---|
| Workforce Engagement is available in Lightning Experience |
| Available in: Enterprise, Performance, and Unlimited Editions |
Set up an approval process for Shift records that’s triggered by a flow. When a planner assigns or creates a shift, the flow starts an approval process that lets the agent approve or decline the shift assignment.
After you create and activate them, the flow triggers the approval process when these conditions are true.
- The shift status is Tentative.
- The shift is assigned to an agent’s service resource.
- The owner of the shift record is the assigned service resource.
The flow also triggers the approval process when planners create and assign themselves to a shift.
You can extend the approval process and flow examples provided here, or use them as is. For example, if you customize shift status values, you can use a custom value instead of Tentative. If you want to turn off the ability for agents to approve shifts, be sure to deactivate both the approval process and flow.
Because there are many steps, we break them into sections.
- Create an Approval Process for Shift Records
- Create a Flow to Trigger the Approval Process
- Test Your Approval Process and Flow
Create an Approval Process for Shift Records
An approval process automates how records are approved in Salesforce. When you create the flow, you specify the approval process as the action that the flow takes.
From Setup, in the Quick Find box, enter Approval Processes, and select Approval Processes. Under Manage Approval Process For, select Shift as the record type. Under Create New Approval Process, select Use Standard Setup Wizard. The wizard walks you through steps to create the approval process.
Create an Approval Process with the Standard Setup Wizard
-
For Step 1: Enter Name and Description, enter a name, a unique name, and an optional description for the approval process. You specify the unique name, such as
Let_Agents_Accept_and_Reject_Shifts, when you create your flow, so remember it. Click Next.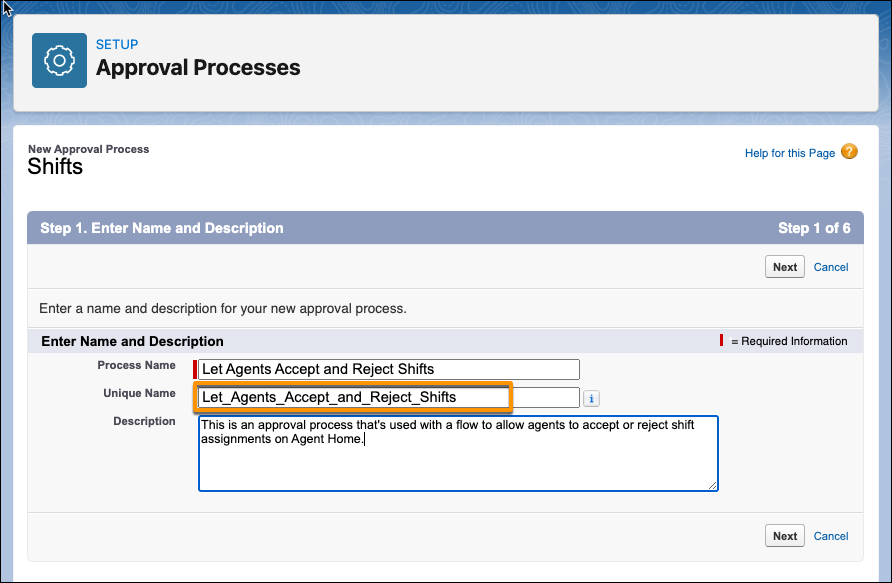
-
Click Next to skip Step 2: Specify Entry Criteria.
-
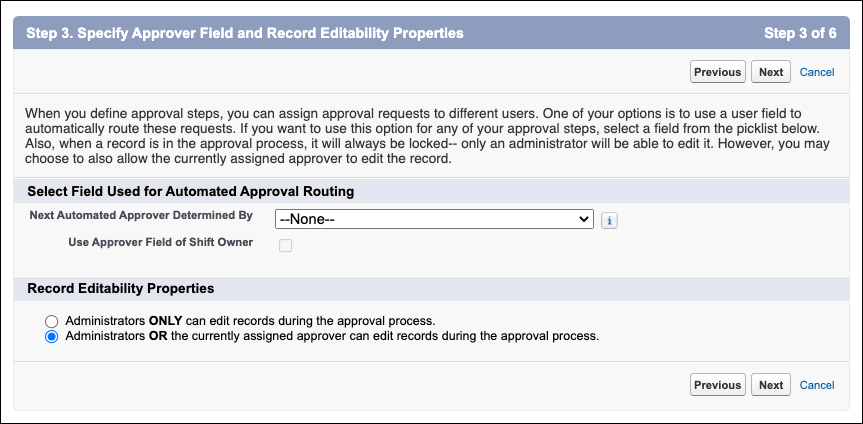
For Step 3: Specify Approver Field and Record Editability Properties, select Administrators OR the currently assigned approver can edit records during the approval process. Click Next.
-
Click Next to skip Step 4: Select Notification Templates.
-
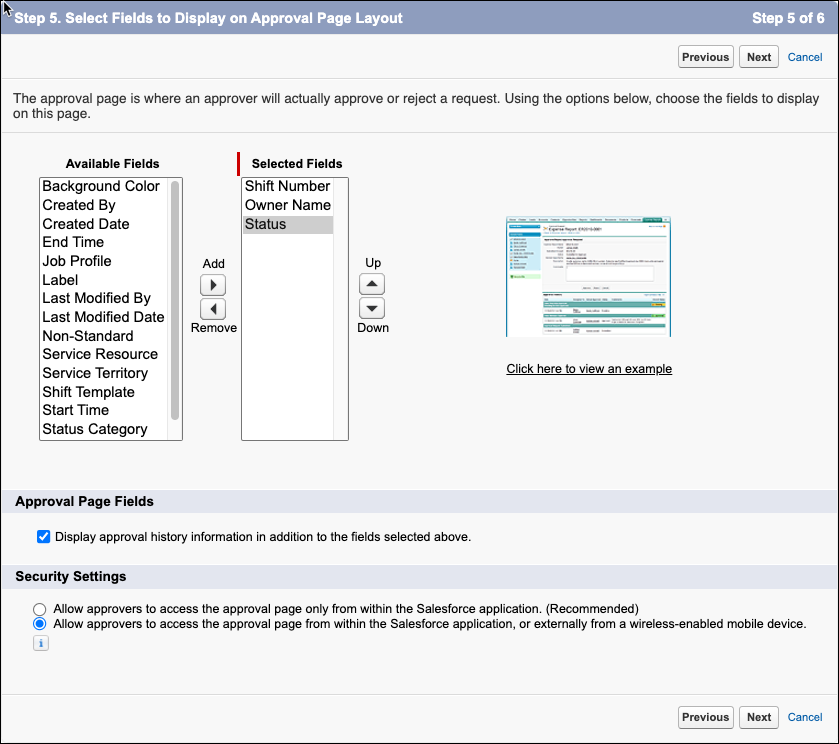
For Step 5: Select Fields to Display on Approval Page Layout, make these changes.
-
Add Shift Number, Owner Name, and Status to the selected fields.
-
Under Approval Page Fields, select Display approval history information in addition to the fields selected above.
-
Under Security Settings, select Allow approvers to access the approval page from within the Salesforce application, or externally from a wireless-enabled mobile device.
-
Click Next.
-
-
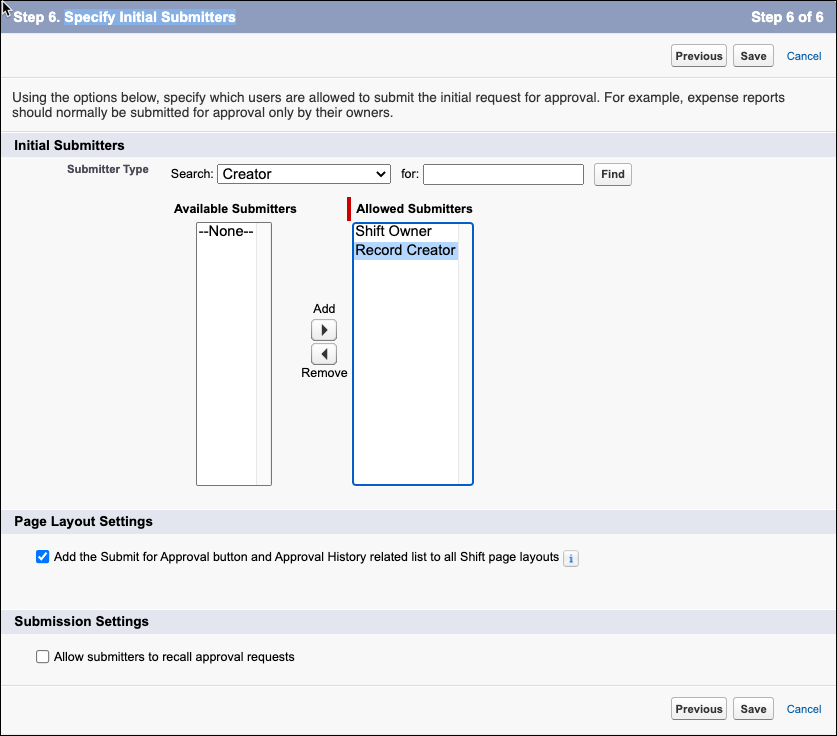
For Step 6: Specify Initial Submitters, make these changes.
-
Under Submitter Type, in Search, select Creator.
-
Add Record Creator and Shift Owner as allowed submitters. Record Creator allows planners who create shifts to approve or reject shifts that are assigned to them.
-
Select Add the Submit for Approval button and Approval History related list to all Shift page layouts.
-
Save your approval process.
-
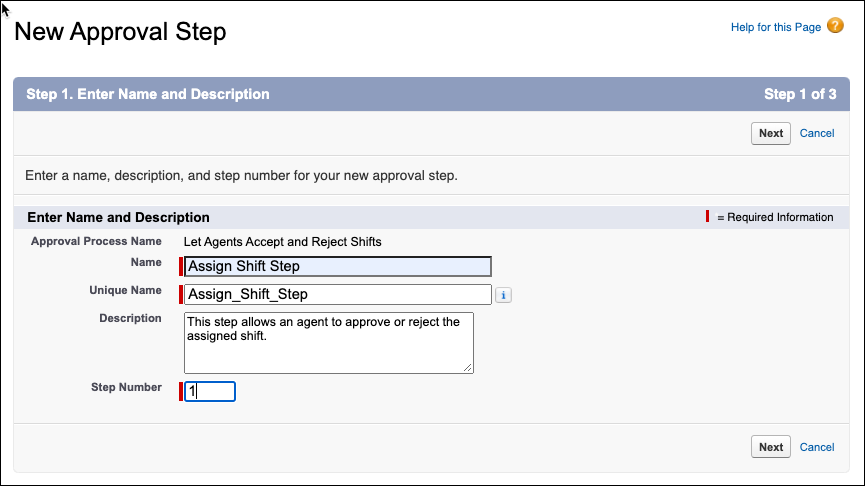
Create an Approval Step
Create an approval step in your process. Select Yes, I’d like to create an approval step now, and click Go.
-
For Step 1: Enter Name and Description, enter a name, a unique name, a step number, and an optional description for the approval step. Click Next.
-
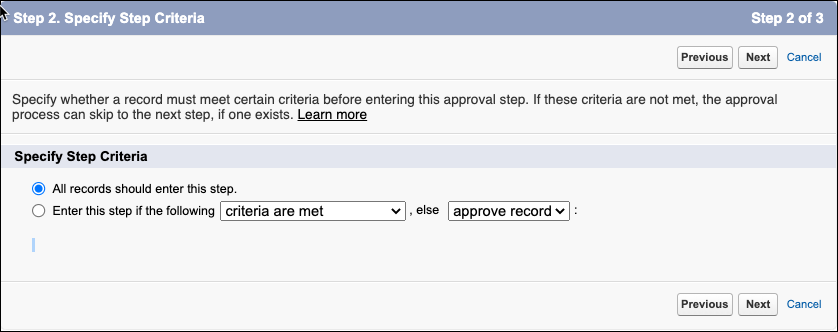
For Step 2: Specify Step Criteria, select All records should enter this step, and click Next.
-
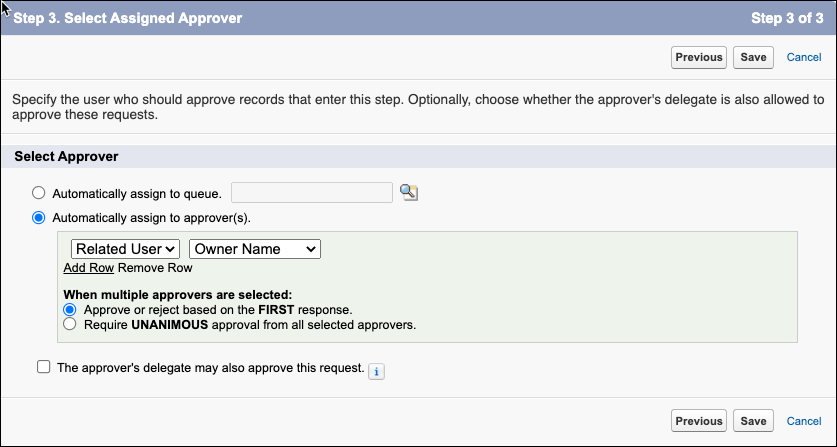
For Step 3: Select Assigned Approver, under Select Approver, select Automatically assign to approver(s). For the approver, select Related user and Owner Name. Save your work.
-
You created an approval step, but you can skip specifying workflow actions right now. Select No, I will do this later. Take me to the approval process detail page to review what I’ve just created and click Go.
Create an Approval Action
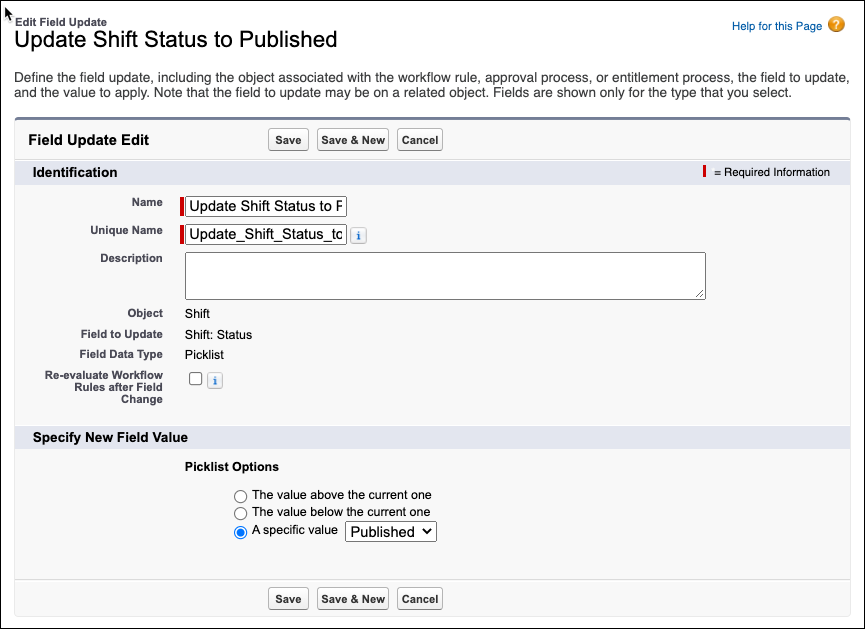
Create an approval action that updates the shift status to Published when the agent approves their shift assignment in Agent Home.
-
Click the name of your approval process to open it.
-
In the Approval Steps section, click Show Actions.
-
Under Approval Actions, click Add New and select Field Update.
-
Under Identification, enter a name, unique name, and optional description. For example, name the action
Update Status to Published. For the Shift object, select Status as the Field to Update. -
Under Specify New Field Value and Picklist Options, select A specific value. Select Published as that value.
-
Save your approval action. You can skip defining a rejection action. If the agent rejects the shift assignment, the shift status remains set to Tentative.
-
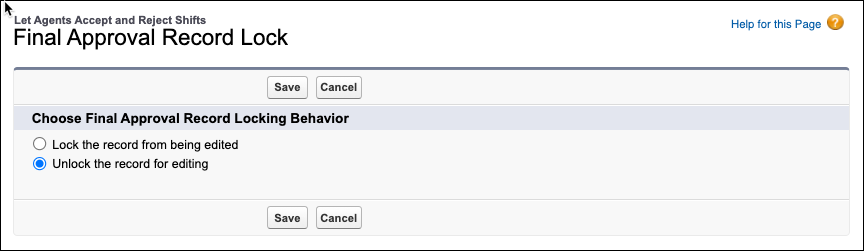
In the Final Approval Actions section of your approval process, click Edit for the Record Lock type. Select Unlock the record for editing.
Unlocking the Shift record is necessary so that the approval process can update shift status. Otherwise an error occurs when the agent tries to approve the shift assignment.
-
Save your settings.
-
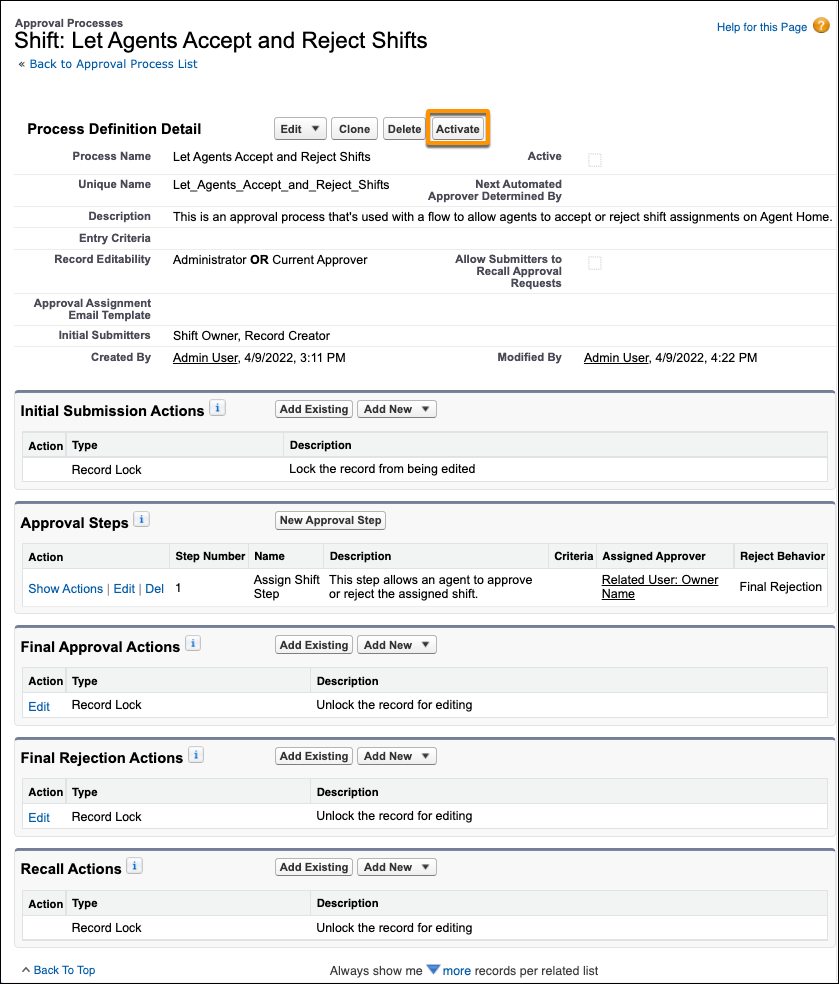
Review your approval process. If it looks OK, activate it.
Create a Flow to Trigger the Approval Process
To trigger the approval process, you define outcomes in your flow that check for these conditions when a Shift record is updated.
- The shift status is changed to Tentative.
- A service resource is assigned the shift.
- The owner of the shift record is changed to the assigned service resource.
If any two conditions are true, the flow starts when the third condition becomes true. A fourth outcome covers the scenario when a planner creates a shift and self-assigns it.
-
From Setup, in the Quick Find box, enter
Flows, and select Flows. -
Click New Flow to get started creating your flow. Select Record-Triggered Flow as the flow type and click Create.
-
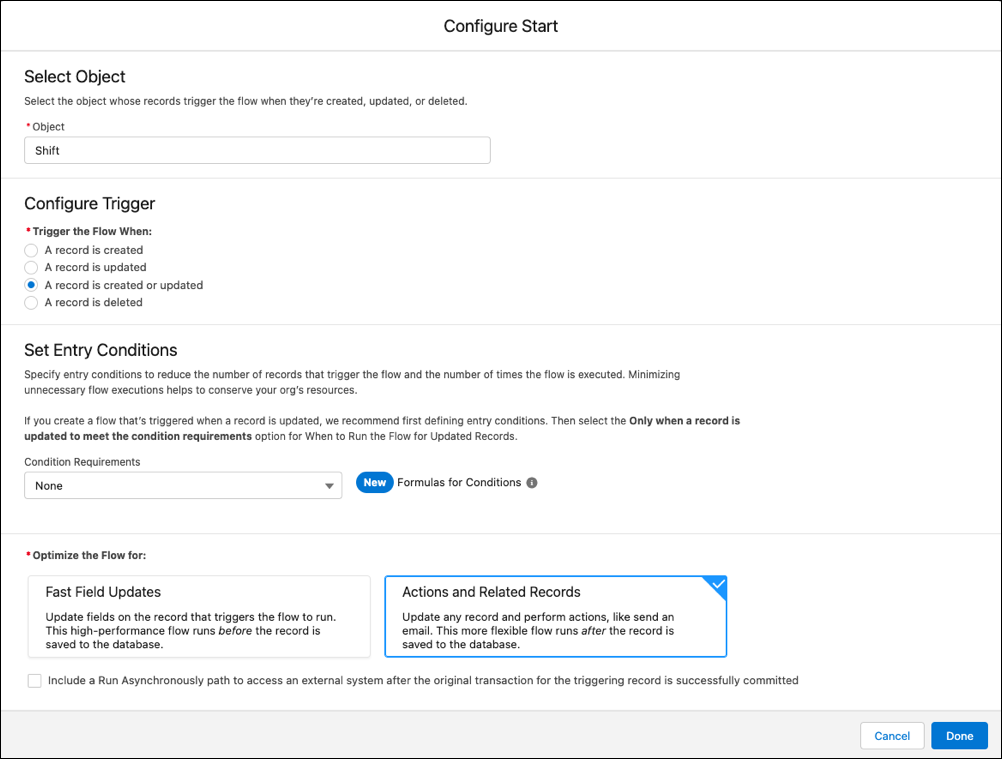
Configure when the flow starts.
- Select the Shift object as the object whose records trigger the flow.
- Select A record is created or updated as the trigger.
- Select Action and Related Records, and click Done.
-
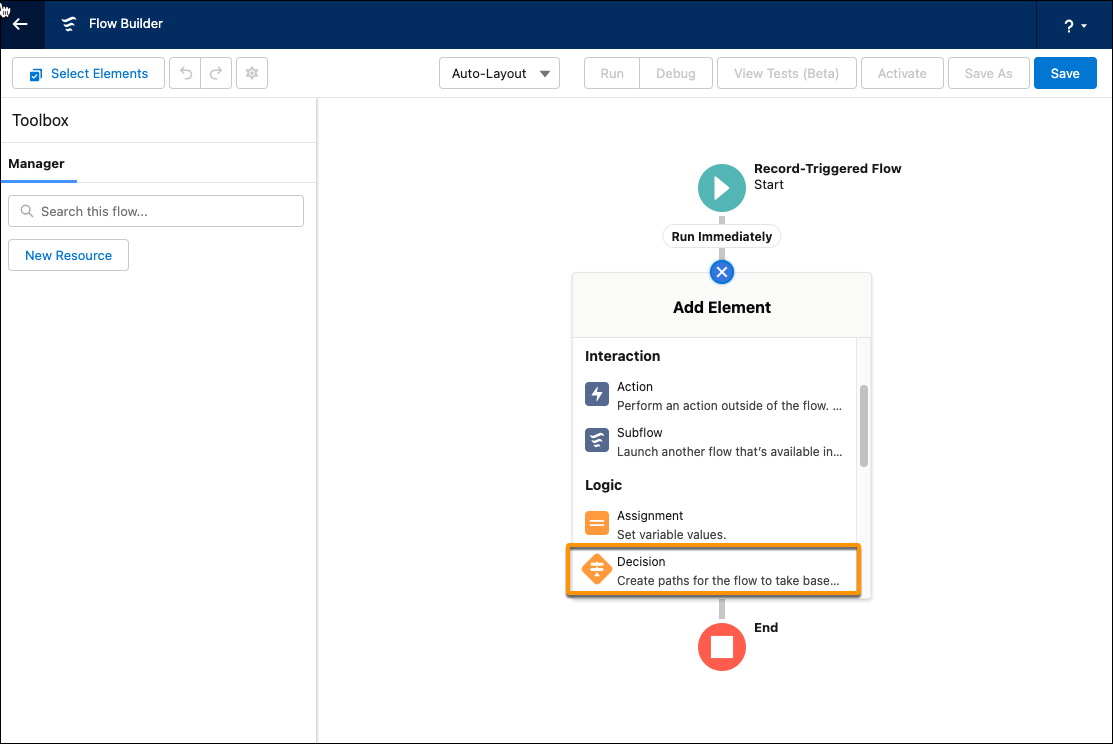
Click + on the Flow Builder and add a decision element to the flow.
-
Enter a label, API name, and optional description for your flow. For example, enter
Trigger Accept or Reject Shift Assignmentas the name. -
Add the first outcome and the conditions that must be met. This outcome starts the flow when the shift status is changed to Tentative and the other conditions are met.
-
Enter a label and an outcome API name. For example,
Status is Changed to Tentative. -
Select All Conditions are Met(AND).
-
Specify resource, operator, and value fields to define each condition. For example, set
{!$Record.Status}as the resource,is Changedas the operator, and{!$GlobalConstant.True}as the value. After it’s defined, the condition appears as $Record > Status Is Changed True. Set these conditions for the first outcome.- {
!$Record.Status} is Changed {!$GlobalConstant.True} {!$Record.Status} Equals Tentative{!$Record.OwnerId} Equals {!$Record.ServiceResource.RelatedRecordId}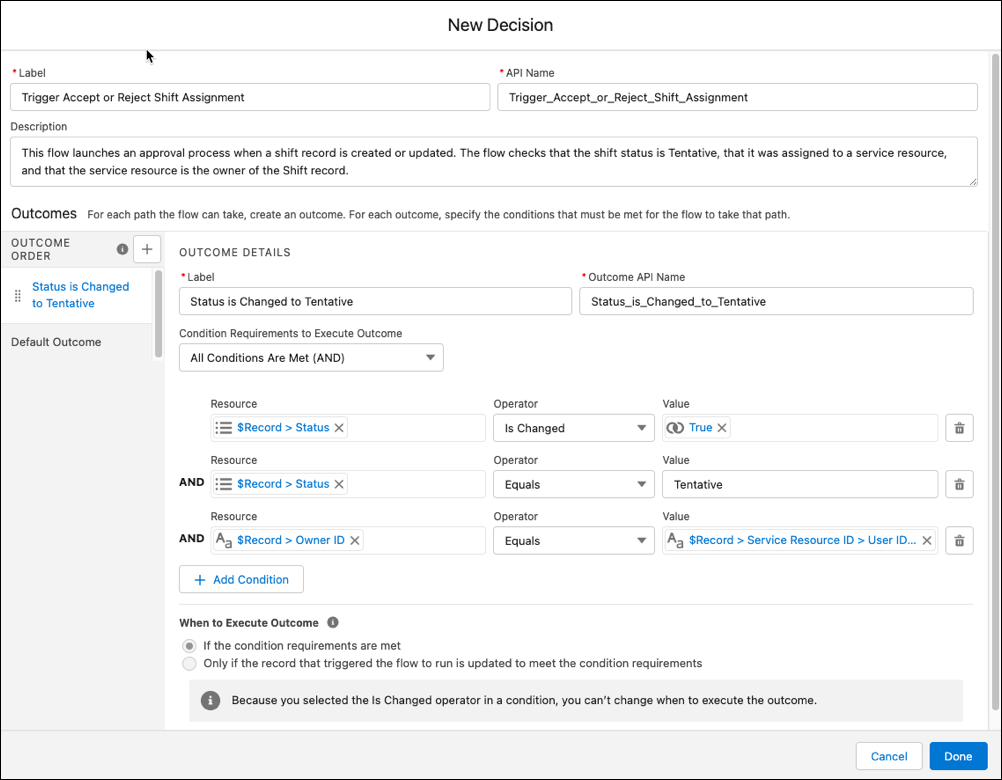
- {
-
-
Next to Outcome Order, click + to add the second outcome and the conditions that must be met. This outcome starts the flow when the shift owner is changed to the agent and the other conditions are met.
- Enter a label and an outcome API name. For example,
Owner is Changed to Agent. - Select All Conditions are Met(AND).
- Set these conditions. -
{!$Record.OwnerId} is Changed {!$GlobalConstant.True}-{!$Record.OwnerId} Equals {!$Record.ServiceResource.RelatedRecordId}-{!$Record.Status} Equals Tentative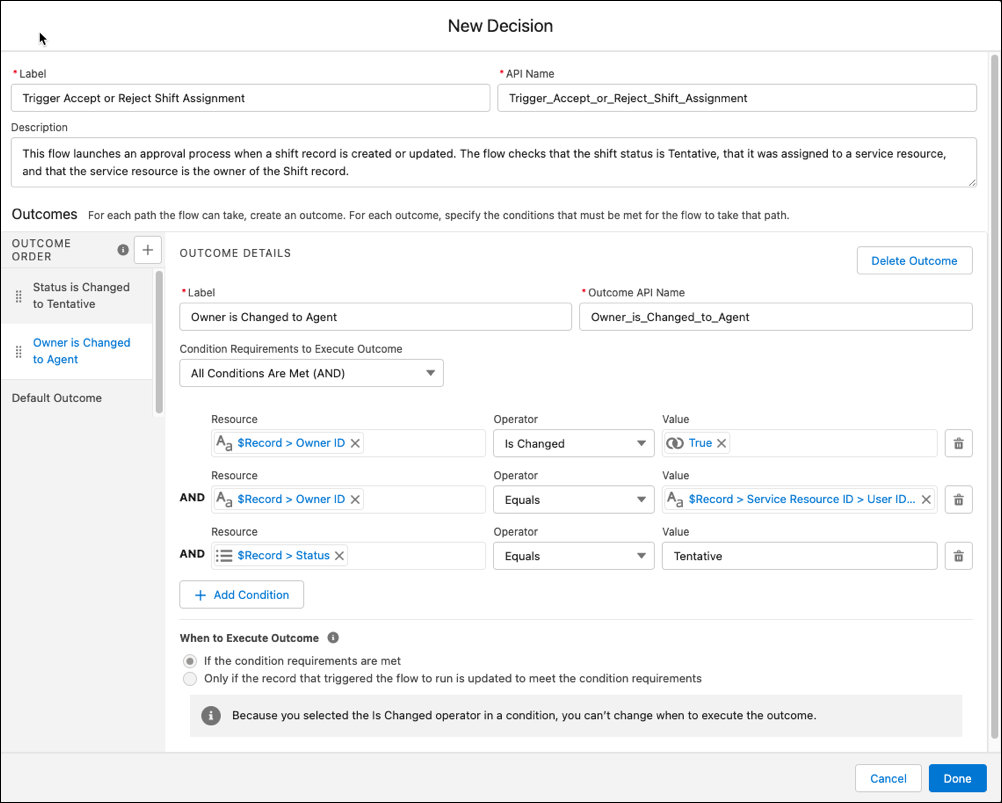
- Enter a label and an outcome API name. For example,
-
Next to Outcome Order, click + to add the third outcome. This outcome starts the flow when the shift is assigned to a service resource and the other conditions are met.
- Enter a label and an outcome API name. For example,
Service Resource is Changed to Agent. - Select All Conditions are Met(AND).
- Set these conditions. -
{!$Record.ServiceResourceId} is Changed {!$GlobalConstant.True}-{!$Record.OwnerId} Equals {!$Record.ServiceResource.RelatedRecordId}-{!$Record.Status} Equals Tentative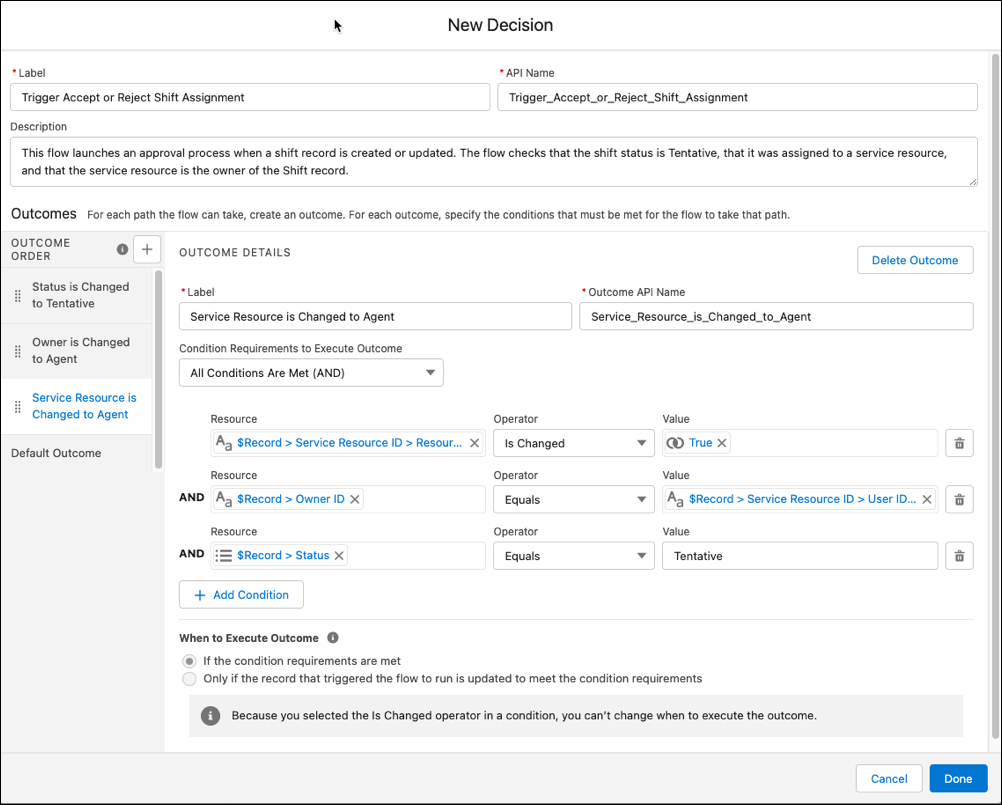
- Enter a label and an outcome API name. For example,
-
Next to Outcome Order, click + to add the fourth outcome. This outcome starts the flow when planners create and assign themselves a shift and the other conditions are met.
- Enter a label and an outcome API name. For example,
Shift is Created and Assigned to Creator. - Select All Conditions are Met(AND).
- Set these conditions. -
{!$Record.OwnerId} Equals {!$Record.CreatedBy.Id}-{!$Record.OwnerId} Equals {!$Record.ServiceResource.RelatedRecordId}-{!$Record.Status} Equals Tentative-{!$Record__Prior} is Null {!$GlobalConstant.True}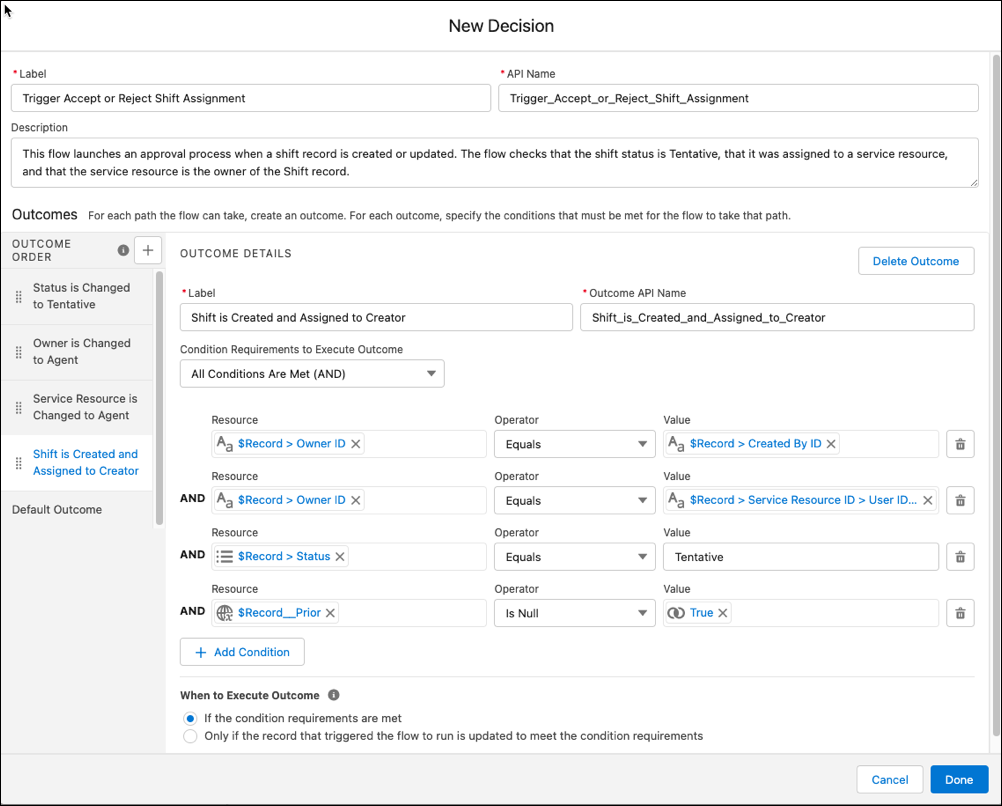
- Enter a label and an outcome API name. For example,
-
Under Outcome Order, click Default Outcome. Enter
No Actionas the label of the default outcome.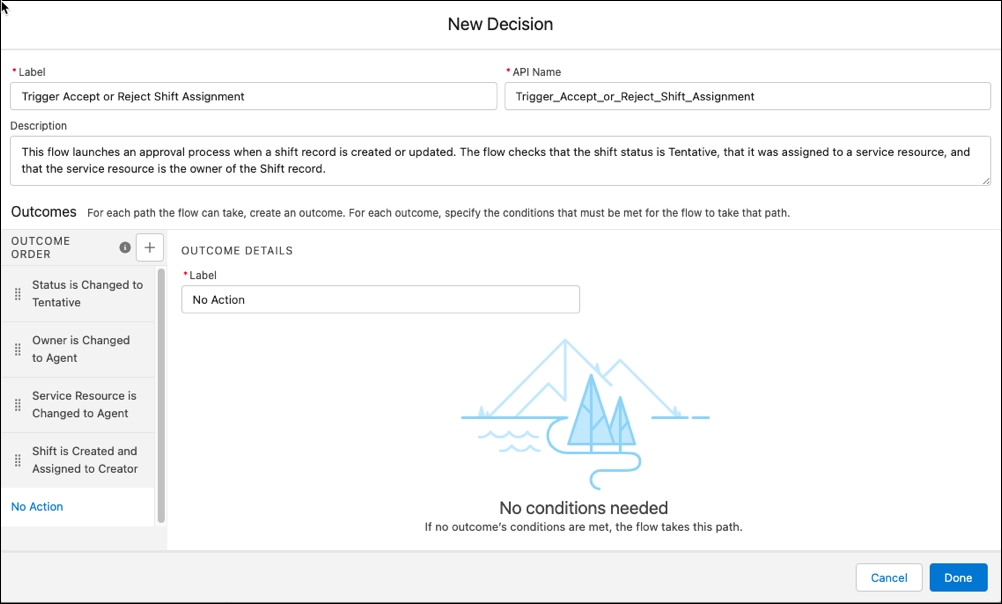
-
In the Flow Builder, click + above the End element and add an action element.
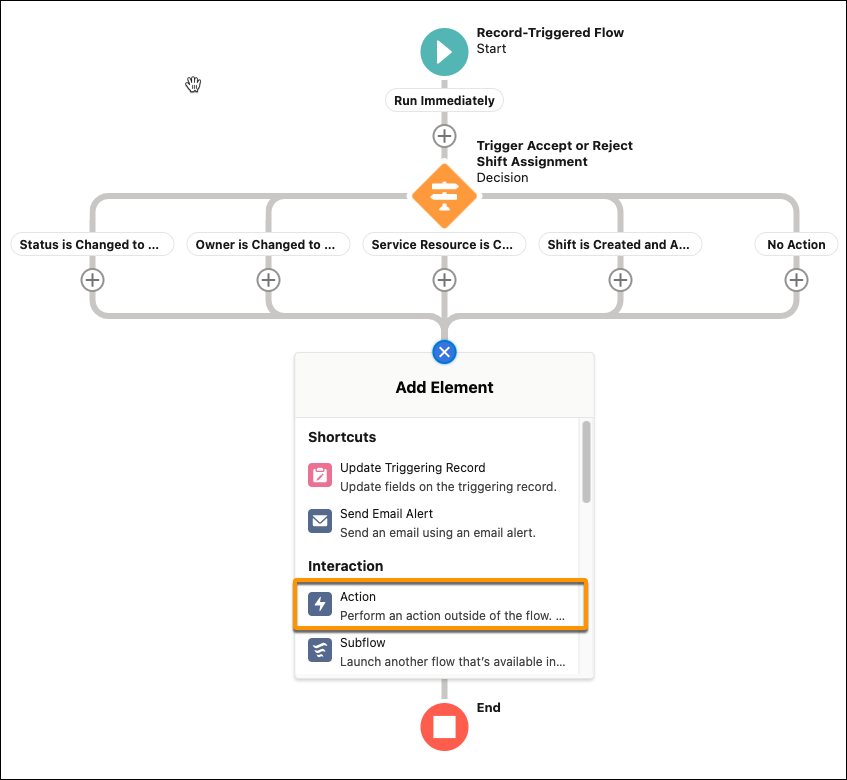
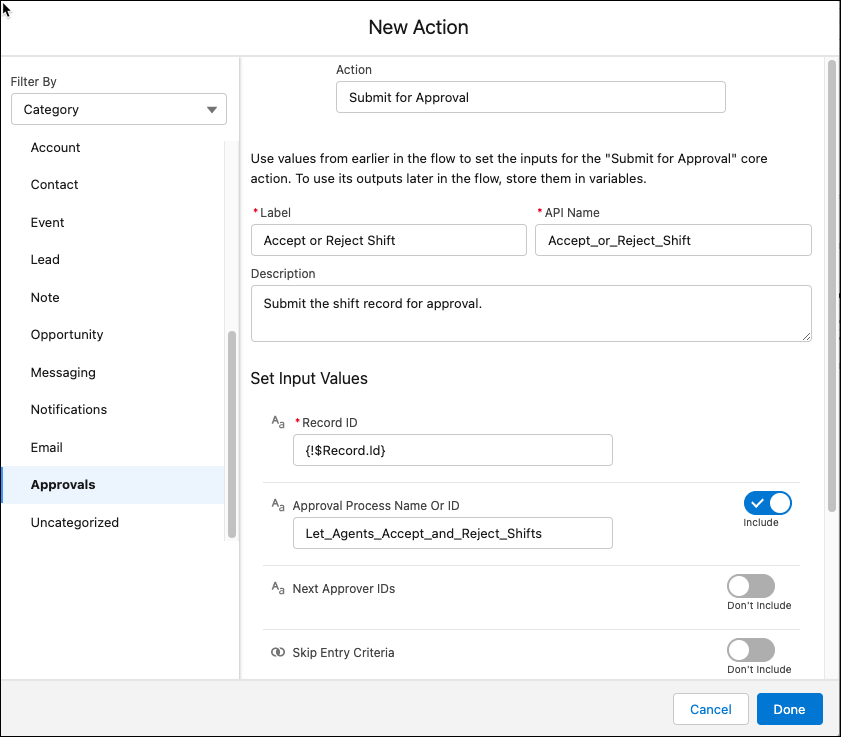
- Select the Submit for Approval action. To make it easy to find this action, select Approvals as the filter category.
- Enter a label, API name, and optional description for the action. For example, enter
Accept or Reject Shiftas the name. - Set the input value for the record ID to the shift record ID
{!$Record.Id}. - Turn on the toggle to Include the approval process name.
- Specify the exact API name of the approval process that you created earlier. For example,
Let_Agents_Accept_and_Reject_Shifts. - Click Done.
-
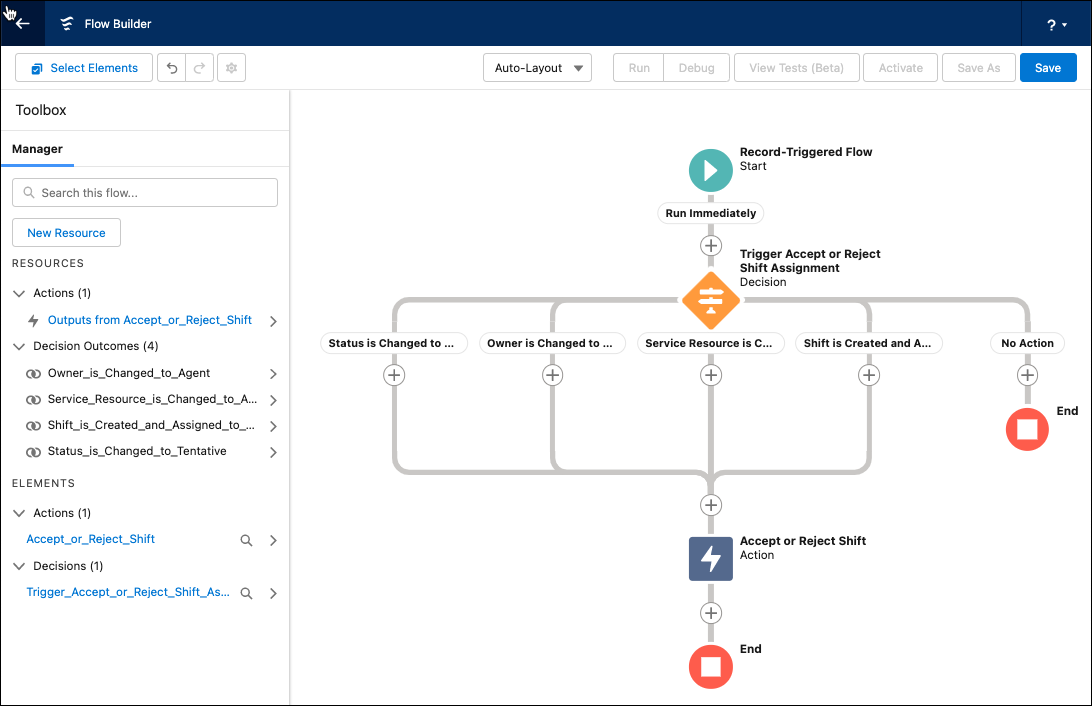
In the Flow Builder, link these outcomes to the Accept or Reject Shift action.
- Status is Changed to Tentative
- Owner is Changed to Agent
- Service Resource is Changed to Agent
- Shift is Created and Assigned to Creator
-
In the Flow Builder, link the No Action outcome to the End element.
-
Save and name your flow, for example,
Trigger Shift Approval. -
Activate your flow.
Test Your Approval Process and Flow
Now you’re ready to see the results of your work.
- As a planner, create or select a shift. Set the shift status to Tentative.
- Assign it to a service resource.
- Change the shift owner to the service resource.
- In Agent Home for that service resource, the agent can then accept or reject the shift.
If the agent approves the shift, its status changes to Published. If the agent rejects the shift, the shift’s status remains as Tentative. When the agent refreshes Agent Home, the shift no longer appears on the agent’s schedule.
If a planner assigns a shift to the wrong agent, the planner must terminate the approval process in the shift’s Approval History related list. Otherwise, the agent can reject the erroneously assigned shift. The planner can then reassign the shift to the right agent.
See Also
- Salesforce Help: Approvals
- Salesforce Help: Flows
- Salesforce Help: Email Notifications for Intraday Management
 j
j