Building with Agentforce rarely involves a single task. An AI agent can span a data model, actions (flows or Apex), agent definition, and permissions. Each piece has its own setup screens, so you have to spend time clicking to wire it all together. With Salesforce Headless 360, the platform now exposes every one of those capabilities as an application programming interface (API), a Model Context Protocol (MCP) tool, or a command-line interface (CLI) command. Because the whole platform can be accessed by coding agents, they can take your intent and handle much of that work — which opens a new, agentic way to build.
Many Salesforce Developers want a repeatable, design-first lifecycle for agent development. The Headless 360 approach pairs a coding agent like Claude Code, Codex, or Agentforce Vibes with Agent Skills, so you can design, build, deploy, test, and debug from a single plain-language conversation. You stay the designer; the coding agent does the development.
In this post, we’ll look at how to set up Salesforce Agent Skills, scaffold a project and connect an org, design before you build, generate your metadata, validate and test, and debug with traces. Everything we’ll discuss here works today through the open-source Salesforce Skills Library and the Salesforce CLI.
Teach your coding agent Salesforce with Agent Skills
Agent Skills are how your coding assistant learns Salesforce. A skill is a small bundle of instructions and commands that teaches the assistant a specific task, such as building an Apex class or a Lightning web component (LWC), building a flow, or developing Agentforce agents. Without skills, the assistant guesses. With them, it runs the right steps and necessary CLI commands or MCP tools and follows conventions.
You should install these skills either globally or within your project directory for any coding agents besides Agentforce Vibes, as the latter includes them by default. The Salesforce Skills Library ships dozens of skills covering Apex, LWC, Agentforce, Data 360, and metadata deployment.
Three skills drive the agent lifecycle specifically:
Three skills drive the agent lifecycle specifically:
developing-agentforce: Design, build, deploy, debug (see docs)testing-agentforce: Test specs and batch runs (see docs)observing-agentforce: Inspect production traces from Data 360 (see docs)
Once installed, in most coding agents you should be able to type ‘/’ in your assistant to browse them. You’ll see a skill load by name as the assistant works, for example, developing-agentforce activates the moment you ask for an agent scaffold.
You’ll also need a few common tools on your machine first: Node.js and the Salesforce CLI. And here’s the best part — if something is missing, use your assistant to get help. And if the assistant has permissions, it can also install these for you.
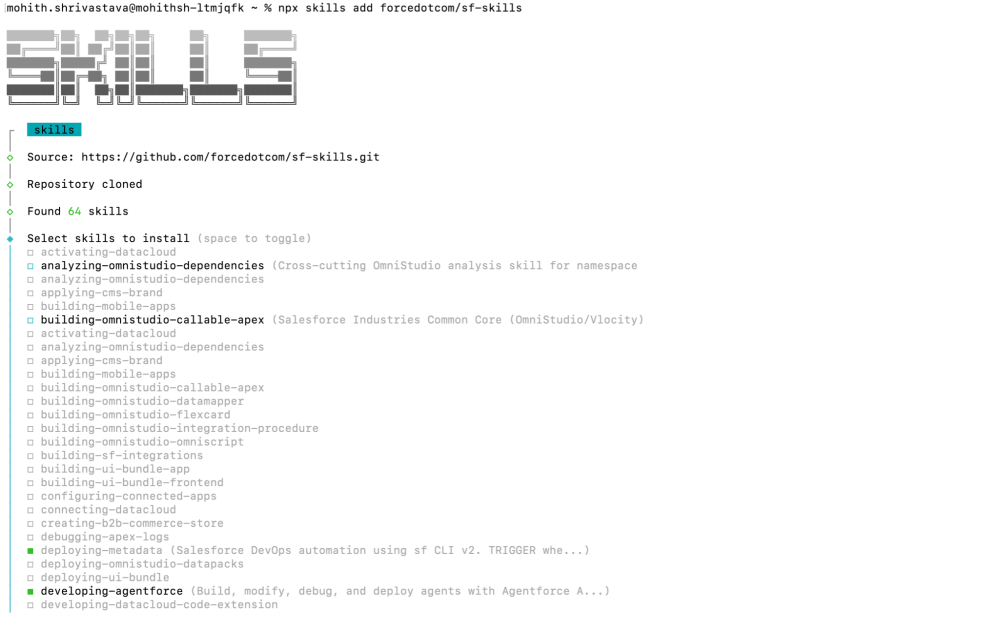
To install Salesforce Agent Skills, run the below command from your terminal or ask your assistant to run the below command.
1npx skills add forcedotcom/sf-skillsAfter executing the command, you will navigate through a few quick configuration choices. First, you’ll pick the specific skills from the library to equip your assistant. Then, designate your preferred coding agent and decide if these instructions should be available across all your projects or just for the current local directory.
Scaffold the project and connect your org
Every Salesforce project starts with a scaffold — a folder holding all your metadata as files. This is the same project structure you already pull into an integrated development environment (IDE) like VS Code. Your assistant works against those local files, then deploys them to an org.
Here’s the shift that matters. You no longer memorize CLI flags or look up command syntax. You describe what you want in plain language, and the coding agent runs the right Salesforce CLI command for you. The CLI does the actual work — the agent just knows which command to call and translates your words into it.
For example, scaffolding a project used to mean typing the exact command and its flags:
1sf project generate --name agent-script-demoNow, you simply describe the goal in plain language, and the agent runs that command for you:
“Create a Salesforce project scaffold named agent-script-demo”
Keep each project in its own folder, so the agent only touches what it should. From there, the same pattern repeats for every step. For example, when you ask it to set up your org, the agent checks the current default and sets your scratch org or sandbox as the default for this project using the commands below.
1sf config get target-org --json
2sf config set target-org agent-build --json
You can also ask the coding agent to open your default org, and the coding agent will use the command below to open it.
1sf org openA best practice is to build in scratch orgs or sandboxes and never give your agent access to the production environment. Also, never paste secrets like passwords into a prompt. A handy workflow is to run a second terminal without the assistant. That way you can copy, edit, and run sensitive commands yourself.
Design before you build
This is the most important habit in the whole lifecycle. If you let an agent build on its own, it may produce something you have to throw away. So, slow down and design first.
Two things make this easy. First, switch your assistant into plan mode (in Claude Code, press Shift+Tab to cycle to “plan mode”). In plan mode, the assistant proposes a plan instead of changing files. Second, ask the assistant to interview you before it builds. A prompt like this works well:
“Before you build anything, interview me to design this agent. Ask one question at a time and recommend a sensible default for each. Treat the design as a decision tree: when my answer opens new choices, follow that branch and keep asking until it’s fully resolved, then move to the next branch. Cover the data model, actions, permissions, and agent structure. Don’t stop or start building until every decision needed to build the agent is made.”
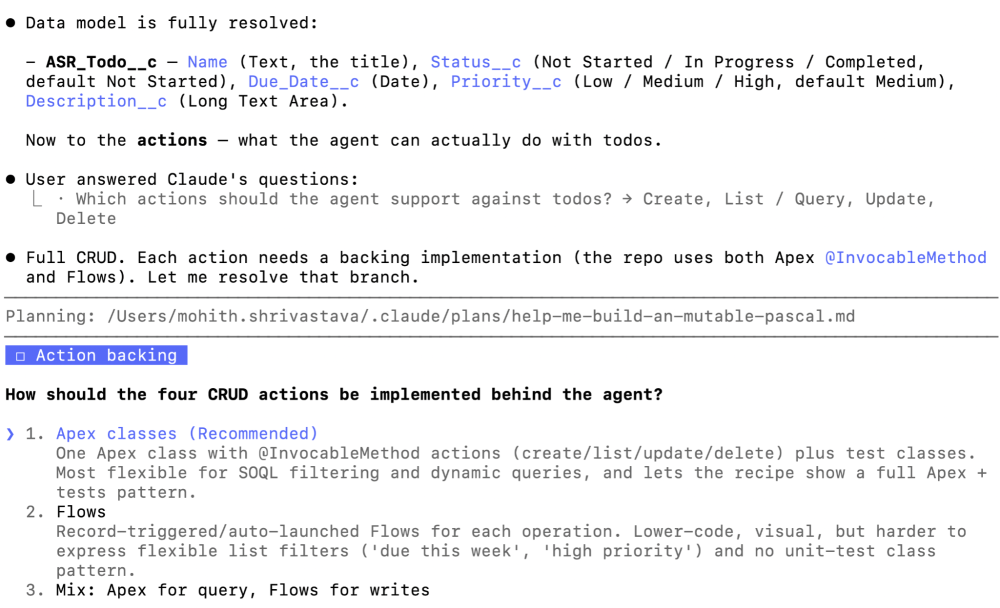
That single instruction turns the assistant into a design partner. It walks down every branch of the decision tree — following each answer to the sub-decisions it raises — and only stops once nothing is left to decide. Nothing gets built on a guess. For our example, an employee To-Do Manager agent, it walked through real architectural choices:
- Where should to-dos live: in a custom object, or the standard Task object?
- Which fields and status values does the agent need?
- Should the agent run as the logged-in user?
- Use one sub-agent with three flow actions, or a hub-and-spoke model with a sub-agent per task?
- Should the backing logic be Salesforce Flows or Apex?
Note that the above is an example prompt, and based on your organization’s best practices, you can build an agent skill of your own to help you design this, so you do not have to repeat this prompt.
The Claude Code coding assistant interviews the developer one question at a time, recommending a default for each design decision.
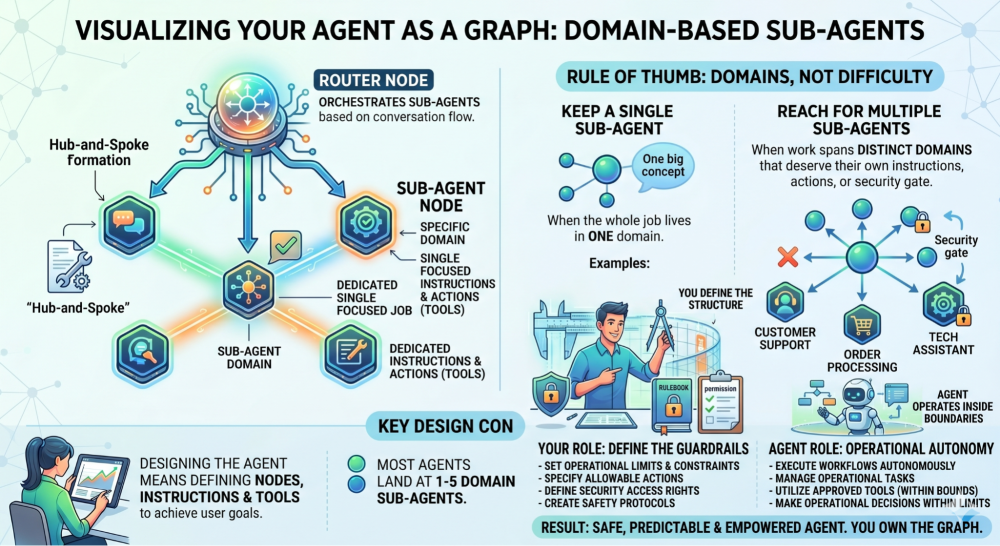
Visualizing your agent as a graph is helpful. Each sub-agent acts as a node representing a specific domain: a single, focused job with its own dedicated instructions and actions. A router node at the top orchestrates these sub-agents based on the conversation. Designing the agent means defining these nodes and providing clear instructions and tools to ensure that the agent achieves the user’s goals.
So, the rule of thumb is about domains, not difficulty. Keep a single sub-agent when the whole job lives in one domain, for example, frequently asked questions (FAQ) or a status lookup. Reach for multiple sub-agents in a hub-and-spoke shape when the work spans distinct domains that each deserve their own instructions, actions, or security gate. Most agents land at one to five domain sub-agents. You make these calls, not your coding agent. That’s the point — you end up more confident because you designed the graph.
The AI-generated info graphic below conveys these ideas.
Generate, deploy, and let the agent fix and retry
Once the plan is approved, the assistant builds everything: the custom object and fields, the flows, and the agent definition file written in Agent Script (the declarative format that specifies your agent’s sub-agents, routing logic, instructions, and action bindings). The output is an authoring bundle: the deployable package containing the agent’s complete definition as local metadata files. You can watch it happen live in VS Code as files appear.
Be sure to scope the work explicitly in your plan. A common choice is “build, deploy, and validate” before you publish. You can also add reminders that the assistant might otherwise skip, for instance, “make sure the new object has the right permissions; create a permission set.” Field-level security (FLS) and create-read-update-delete (CRUD) permissions matter, so call them out.
The standout behavior is an automated fix-and-retry loop. When a deploy fails, the assistant reads the compiler or deploy error, traces it to the offending metadata, applies a fix, and redeploys, repeating that cycle until the deploy succeeds. It’s the same edit-compile-debug loop you’d run by hand, just driven by the agent. If you want to go faster, you can fan out the work, so parallel agents build several flows at once instead of one after another. When you go for parallel work, make sure you understand dependencies and group them, so they can execute without stepping on each other.
You drive this in plain language: “Build a single sub-agent To-Do Manager using Salesforce Flows, build, deploy, and validate it, and create a permission set for the new object”. Behind that prompt, the developing-agentforce skill runs a precise sequence. It first generates the authoring bundle (the agent scaffold), then validates that Agent Script compiles with a local check, deploys the backing flows or Apex the actions reference, and finally deploys the authoring bundle itself. Knowing the sequence helps you follow along and step in when needed.
1sf agent generate authoring-bundle --json --no-spec --name "To-Do Manager" --api-name To_Do_Manager
2sf agent validate authoring-bundle --json --api-name To_Do_Manager
3sf project deploy start --json --metadata Flow
4sf project deploy start --json --metadata AiAuthoringBundle:To_Do_Manager
Notice two best practices baked into the skill. Every command leads with --json to make the output machine-readable, and every deploy names its metadata explicitly. A bare sf project deploy start ships everything that changed, and scoping each deploy keeps agent metadata from going out by accident.
Validate, then test in two modes
When the build finishes, the assistant validates the agent’s behavior paths automatically, checking far more paths than you’d test by hand. Validation is required before the agent can be published, so it’s built into the flow.
Still, don’t skip your own testing. Automated validation is a safety net, not a substitute for judgment. This is where the testing-agentforce skill comes in. It gives you two modes: quick smoke tests while you iterate, and a saved batch suite for regression testing and continuous integration. Use the first to move fast, and the second to keep the agent honest as it grows.
Quick smoke tests with preview sessions
The quick mode is a live preview session. You start a session, send a real utterance, and end the session when you’re done — each preview sends a trace you can read afterward. Note that --authoring-bundle must appear on all three subcommands.
1sf agent preview start --json --authoring-bundle To_Do_Manager
2
3sf agent preview send --json --authoring-bundle To_Do_Manager --session-id SESSION_ID --utterance "Create a to-do to write a blog"\
4
5sf agent preview end --json --authoring-bundle To_Do_Manager --session-id SESSION_ID
Batch regression testing with test specs
For repeatable testing, you describe the cases you care about and the skill writes a test spec. The spec is a YAML file that lists each utterance alongside what should happen. Three assertions matter per case:
expectedTopic: The sub-agent that the conversation should route toexpectedActions: The actions that should fireexpectedOutcome: A plain-language description of the right result
That last one is graded by a large language model (LLM) acting as a judge, so it reads the response the way a person would. It’s the most reliable assertion, so include it on every case.
1name: To_Do_Manager_Tests
2subjectType: AGENT
3subjectName: To_Do_Manager
4testCases:
5  - utterance: "Create a to-do to write a blog"
6    expectedTopic: To_Do_Management
7    expectedActions:
8      - Create_To_Do
9    expectedOutcome: "A new to-do titled 'write a blog' is created and confirmed to the user."
You then create the test definition from that spec and run it as a batch, waiting for the results.
1sf agent test create --json --spec specs/To_Do_Manager-testSpec.yaml --api-name To_Do_Manager_Tests --force-overwrite
2
3sf agent test run --json --api-name To_Do_Manager_Tests --wait 10
When a case fails, the skill diagnoses it straight from the trace — a sub agent that didn’t match, an action that never fired, or an ungrounded response. It then applies a targeted fix and retries for a few iterations before asking for your help. You can also run the live preview in the new Agent Builder for an admin-friendly view, or use the Agentforce DX panel in VS Code to start a test session.
Note: We are enhancing the automated testing experience to support multi-turn conversation, injection of state variables, and verify action validations. Keep an eye on the release notes.
Publish and activate your agent
When it works, publish and activate the agent. Publishing turns the deployed bundle into a runnable agent version as Inactive; activating turns it on so users and tests can reach it. You can publish now and activate later if you prefer. Below are commands that the agent runs for publish and activation.
1sf agent publish authoring-bundle --json --api-name To_Do_Manager
2sf agent activate --json --api-name To_Do_Manager
And if you forgot a piece of metadata, just ask the agent to build it for you. The whole point is that you describe the gap and the assistant fills it. Maintain a repeatable history by committing your Agent Script and associated metadata to a source control system like Git. This practice ensures you can revert to a known functional version whenever necessary, keeping your development environment stable and secure.
Debug with traces, not guesswork
The agent trace is the primary debugging signal for Agentforce agents. It’s a JSON file generated after each conversation turn that shows which sub-agent handled the request, what the LLM received, and which actions fired. Agents rarely come out perfect on the first try, so you’ll keep tweaking them. You’ll work with traces in two places, and they look slightly different in each.
Local traces during development
While you build, the traces are local. After each preview send, the runtime writes one JSON file per conversation turn. Each trace shows the full execution path: which sub-agent handled the turn, what variables were set, what the LLM saw, and which actions it called. You’ll find these files in your project.
1.sfdx/agents/To_Do_Manager/sessions//traces/.jsonThese local traces are instant and complete, but they only cover your own preview sessions. The fix loop is simple: open the trace, paste it back into your assistant, and explain what you expected versus what happened. In the Agent DX panel, you can grab the same trace with one click. The trace is detailed enough that the assistant usually pinpoints and fixes the issue — you can even ask it to “self-test using the trace and fix it.” This resolves the large majority of problems before the agent ever ships.
Production traces with the observing-agentforce skill
Once real users are on the agent, you need a different lens. That’s the job of the observing-agentforce skill. Instead of one local file, it queries the Session Trace Data Model (STDM) — the production session data that Agentforce stores in Data 360 — so you can see how the agent behaves across real conversations at volume.
The skill follows a three-step loop: observe, reproduce, improve. It queries production sessions to surface the failures that matter — sub-agent misroutes, action errors, low adherence, slow actions, and abandoned sessions. It then reproduces a suspect case in a local preview to confirm the root cause, and only then edits the agent to fix it. You ask in plain language, “find the worst-performing sessions from the last day and tell me why”, and the skill runs the queries and reads the results for you.
For either kind of trace, a visualizer helps when the routing itself is hard to follow. The agent is a graph: a router hands each conversation to a sub-agent, which builds variables and prompts, sends them to the LLM, and calls tools until it has an answer. A tool like AgentLens lets you walk that graph step by step, seeing each sub-agent handoff, the tools sent to the LLM, and the response that ends the flow.
Note: for agent observability at scale for production agents, it is recommended to set up dashboards and metrics using Agent Observability
Extend the lifecycle with custom agent skills
Adopt this lifecycle and your day-to-day changes. You stop clicking through Salesforce setup for routine work and start describing outcomes instead. When something isn’t right, the fix almost always lives in one of four places: your prompt, your context, the tools you built, or the skills you installed.
That last one is the real unlock. When a skill produces metadata you don’t like, improve the skill and contribute it back. Your fixes compound for everyone, and the assistant gets better at Salesforce over time. Pairing that with a design-first interview keeps you in control — you slow down just enough to learn and to own the design.
The agentic development lifecycle: Recap
The agentic development lifecycle gives you a faster, more reliable way to build Agentforce agents. Install Agent Skills from the Salesforce Skills Library so your assistant knows Salesforce, scaffold and connect your project, then design before you build with plan mode and a design-first interview. Let the assistant generate the metadata and fix-and-retry failed deployments, validate and test the result, and debug with traces when something’s off. You move quicker and stay the designer the entire time.
Want to go deeper or share what you’ve built? Join the conversation in the Salesforce Developers Trailblazer Community.
Resources
- Agentforce Developer Center
- Salesforce Skills Library on GitHub (forcedotcom/sf-skills)
- Agentforce DX Visual Studio Code extension
About the author
Mohith Shrivastava is a Principal Developer Advocate at Salesforce with 15 years of experience building enterprise-scale products on the Agentforce 360 Platform. Mohith is currently among the lead contributors on Salesforce Stack Exchange, a developer forum where Salesforce Developers can ask questions and share knowledge. You can follow him on LinkedIn.