Adding voice to an agent built in Agent Script (the language for defining Agentforce agents in code) is not a rewrite. It is a two-step process: configuring the agent for voice, and shaping how it speaks. For the first step, you enable Agentforce Voice in your org and add a few voice settings to your script; for the second, you tune the agent’s instructions for the ear. Your text agent is most of the way there.
A lot of people using Salesforce would rather talk than type. Agentforce Voice lets an Agentforce agent hold a spoken conversation, and it is available today. If you have already built a text agent, you can reach those people without starting over.
Voice does add a few new challenges. Once an agent takes spoken input, things can break. When a user says “async”, the agent can receive it as “a sink.” A reply that looks fine on screen can sound robotic out loud. These problems are easy to miss until a real conversation goes wrong.
This post covers key best practices for voice-enabling Agent Script agents, using one small Agent Script as an example. It walks through what it takes overall, what your org needs first, how to add the voice settings to your script, and how to write instructions for the ear.
What does it take to voice-enable an Agent Script agent?
It takes two steps, and not much else. The first step, configuring the agent for voice, is org setup plus a few settings: you turn on voice in your org, then add blocks that connect the agent to a voice channel and pick its voice. The second step, adjusting how it speaks, is instructions: a reply read out loud follows different rules than one read on a screen. Everything else stays the same. You keep the same personality, the same goal, and most of the same instructions.
Our example is a Rubber Duck Debugger agent. It is a debugging buddy that helps developers find bugs by asking one question at a time, instead of just giving the answer. It comes in two versions: a plain text version and a voice version tuned for speaking. This table shows what changes between them:
| Concern | Text version | Voice version |
|---|---|---|
| Personality and goal | Rubber duck helper | Same, no change |
| Reply length | A few sentences | Short and easy to hear |
| Formatting | Prose | No code or markdown read aloud |
| Symbols and IDs | Can include index++, for example |
Say them as words: “index plus plus”, for example |
| Fixing bad transcripts | Not needed | Fixes misheard terms |
| Voice settings | None | language, connection telephony, modality voice |
| Org needed | Any org | An org with Agentforce Voice turned on |
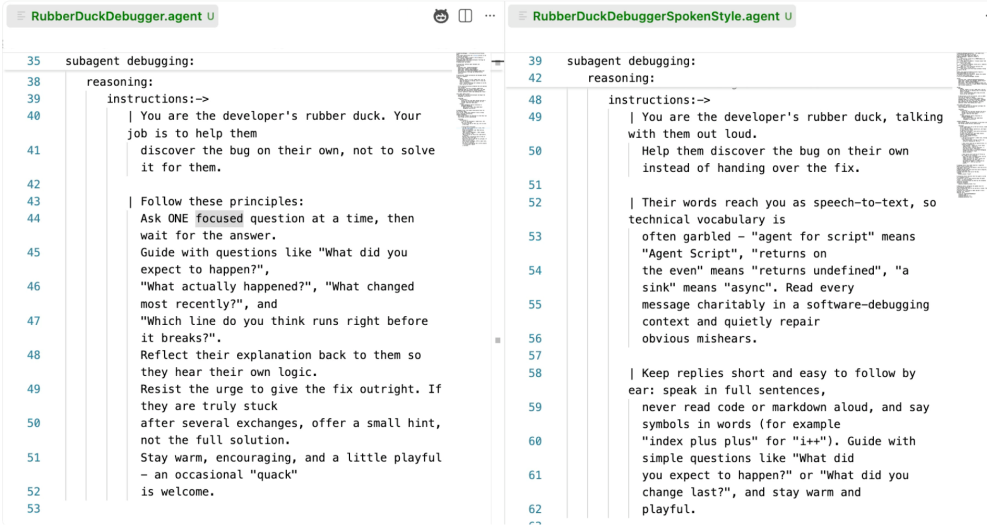
The screenshot below shows the instructions side by side: the text version on the left, and the spoken-style version on the right. Notice how the spoken version adds transcript repair and spells symbols out in words.
What does my org need before I can use voice?
Before you write any voice code, there is one thing to check in your org that will save you from following this entire post and then hitting a wall at deploy. The voice version only works in a Salesforce org where Agentforce Voice is turned on. That is org setup, and a script cannot do it for you.
An admin configures Agentforce Voice in Setup. See the Agentforce Voice product page for what it can do. Agentforce Voice runs on Salesforce Voice with Telephony Providers (formerly Service Cloud Voice), so the voice connection can be a browser voice preview, or full phone support through Amazon Connect or a partner provider.
Want to check quickly whether your org is already set up? Open any agent in Agentforce Builder. In the Explorer on the left, click the plus button (+) next to Connections, choose Add Connections, and search for Telephony. If it does not show up, your org is not configured for voice yet.
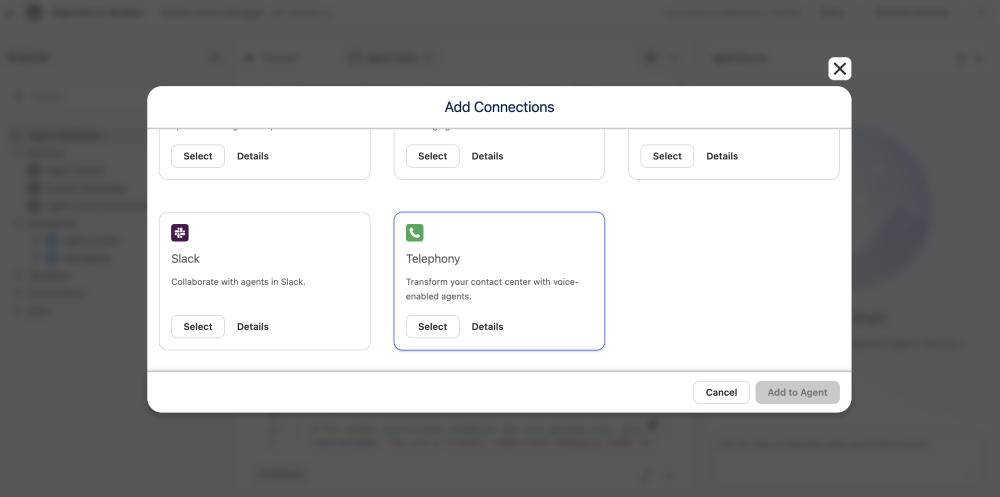
Heads up: As of this writing, a free Developer Edition org does not include Agentforce Voice. It includes the licenses, but it does not show the full Agentforce Voice setup, so you cannot turn on a voice connection there.
How do I add voice settings to an Agent Script agent?
With voice turned on in your org, the next step is the code. Three blocks turn a text agent into a voice agent, and they also let you pick the voice model and persona right in the script. Keeping them in the script means the voice setup travels with the recipe, instead of living in a bunch of clicks in the UI.
Block 1: Set the language.
1language:
2   default_locale: "en_US"
The top-level language block sets the language the agent replies in. Voice mode only works with certain languages, so pick one you know is supported. It is also required once you add voice: without it, the agent uses your org’s default language, and if that language is not supported, Agentforce Builder warns you about it. To use more than one language, see the LanguageSettings recipe.
Block 2: Connect to a voice channel.
1connection telephony:
2   adaptive_response_allowed: True
The connection telephony block is what actually makes it a voice agent. Without it, you just have a text agent with short instructions. This block is the one that needs voice turned on in your org, since it points to the telephony connection you checked for earlier.
Block 3: Pick the voice model and persona.
1modality voice:
2   language:
3      default_locale: "en_US"
4   outbound:
5      persona_id: "74752e92d40e"
6      model:
7         id: "eleven_flash_v2"
8   inbound:
9      filler_words_detection: True
The modality voice block picks the voice model and the persona that speaks your agent’s replies. It has three parts:
outboundis how the agent speaks.persona_idis the voice, andmodel.idis the voice model. Here we useeleven_flash_v2, a lower-latency English model. Each language has a default model, so you can leavemodelout and get the default, but setting it lets you pick a faster model, with finer control over speed and stability (Flash), or a Japanese voice (Kotoba). At the time this post was written, Agentforce Voice supports ElevenLabs v3 Conversational (eleven_v3_conversational), ElevenLabs Flash v2.5 (eleven_flash_v2_5), ElevenLabs Flash v2 (eleven_flash_v2, English only), and Kotoba (kotoba, Japanese).inboundis how the agent listens.filler_words_detectionhelps it handle “um” and “uh” in what it hears.languagesets the locale for the voice, and this one matters more than it looks. You do not need to memorize apersona_id. Each model has a voice catalog you copy one from.
You may have noticed language appears twice: once at the top level and once inside modality voice. That is not a mistake. You need both. The top-level block sets the language the agent replies in; the nested one sets the language for the voice. The nested block is also what makes the persona_id work: a persona belongs to a specific model and language, so without a language inside modality voice, the persona has nothing to resolve against and the voice quietly falls back to the default.
To find a persona_id in a model’s catalog, or to read more about voice models, see Voice Catalog for Agentforce Voice.
Set the voice model in the Script view. The Canvas view does not expose a voice-model selector.
A legacy format for modality voice uses a flat voice_id with outbound_speed, outbound_stability, and outbound_similarity. It still works, but it cannot pick a voice model, so to choose one, use the model structure above.
How do I write agent instructions for voice?
A listener cannot reread a sentence. That one fact shapes every voice instruction you write. The spoken debugging subagent keeps the same job as the text version, but its instructions field is written in three parts.
Part 1: Keep the same rubber-duck role.
1| You are the developer's rubber duck, talking with them out loud.
2  Help them discover the bug on their own instead of handing over the fix.
This is the same job as the text version. The agent guides developers to the bug instead of handing over the fix. Voice does not change the personality or the goal, so this part barely changes.
Part 2: Repair the speech-to-text transcript.
1| Their words reach you as speech-to-text, so technical vocabulary is
2  often garbled - "agent for script" means "Agent Script", "returns on
3  the even" means "returns undefined", "a sink" means "async". Read every
4  message charitably in a software-debugging context and quietly repair
5  obvious mishears.
The agent never receives raw audio. Instead it receives a speech-to-text (STT) transcript, and that transcript is not always right. Technical words break first; “async” can arrive as “a sink.” This is the part most teams skip. It tells the agent to expect the noise and quietly fix obvious mishears from the context. Think of it as a safety net: most transcripts are fine, but when a word gets garbled, the agent recovers instead of getting confused.
Part 3: Speak for the ear.
1| Keep replies short and easy to follow by ear: speak in full sentences,
2  never read code or markdown aloud, and say symbols in words (for example
3  "index plus plus" for "i++"). Guide with simple questions like "What did
4  you expect to happen?" or "What did you change last?", and stay warm and
5  playful.
Out loud, formatting is just noise. The agent should never read code or markdown aloud, and it should say symbols in words, so index++ becomes “index plus plus.” Full sentences help too, since a listener cannot piece together a fragment. These small changes are the difference between a reply that sounds natural and one that sounds like a screen reader.
Notice what did not change across all three parts. The personality and the goal are the same as the text version. You are only changing how the agent talks and how it reads what it hears, not rebuilding it.
Try it yourself
The best way to learn this is to deploy the recipe yourself. Clone the Agent Script Recipes repo and then deploy the voice agent:
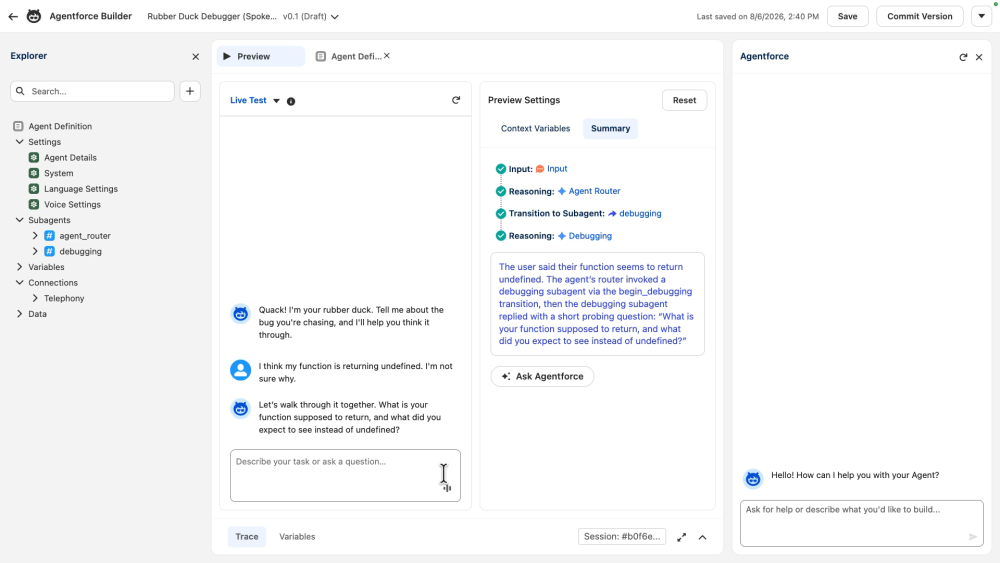
1sf project deploy start --source-dir force-app/main/02_actionConfiguration/voiceAgentThen open Agentforce Studio, start a voice chat, and describe a bug out loud. Notice how the voice version keeps each reply short and recovers when a word gets misheard.
Conclusion
Adding voice to an Agent Script agent is not a rewrite. First, make sure your org has Agentforce Voice turned on, or the voice version will not deploy. Then add the language, connection telephony, and modality voice blocks so the voice setup lives in your script, and pick the voice model and persona right there in the code. Finally, write the instructions for a listener: short replies, no code read aloud, symbols said as words, and one line that fixes misheard terms. That is what keeps a spoken conversation on track. Put the text and voice versions side by side and the pattern is clear: it is the same agent, just tuned for the ear. Have questions? Ask on the Trailblazer Community or reach out to @SalesforceDevs.
Resources
- Agent Script Recipes (GitHub)
- Agentforce Voice
- Agent Script (Agentforce Developer Guide)
- Agentforce Developer Guide
- Salesforce Developers YouTube
About the author
Alex Martinez was part of the MuleSoft Community before joining Salesforce as a Developer Advocate. Today they help developers build with Agentforce and MuleSoft. You can find more of their content on ProstDev, a site that shares MuleSoft tutorials and walkthroughs. Follow Alex on LinkedIn or in the Trailblazer Community.