Configure a JWT Bearer Flow
The standard External Client App (ECA) setup for Tableau Next embedding uses the OAuth 2.0 web server flow. If your app requires non-interactive, server-to-server authentication, you can configure a JWT bearer flow by using the Salesforce External Client App Manager. The web server flow remains the recommended flow for SDK embedding on behalf of interactive users. The JWT bearer flow is an alternative for non-interactive scenarios only.
| User Permissions Needed | |
|---|---|
| To view Salesforce Setup: | View Setup and Configuration |
| To manage External Client Apps in Salesforce Setup: | Create, edit, and delete External Client Apps |
| To assign permission sets: | Assign Permission Sets |
For Tableau Next Embedding, the web server flow is the recommended and default flow.
The JWT bearer flow is a non-interactive, server-to-server OAuth 2.0 flow. Your app proves its identity by signing a JSON Web Token (JWT) with an RSA private key and sending it to the Salesforce token endpoint. Salesforce verifies the signature against a public certificate uploaded to the ECA and returns an access token directly. There’s no browser redirect and no user login.
To use the JWT bearer flow with embedding, you’re required to perform extra configuration steps. You must create a public certificate, upload it to your ECA, and then create and assign a custom permission set.
The JWT bearer flow signs each token request with your app’s private key. Generate a 2048-bit RSA private key and a self-signed X.509 public certificate. The private key stays with your app, and you upload the public certificate to your ECA.
The openssl req -new -x509 command is interactive and prompts for a subject. To skip prompts, add -subj to your command, similar to -subj "/CN=tableau-next-eca".
This flow assumes you’ve created your ECA in Tableau Next and are now editing it for more options.
-
From the Salesforce setup page, enter External in the Quick Find box, and then select External Client App Manager.
-
For your existing ECA, in the dropdown menu, select Edit Settings.

-
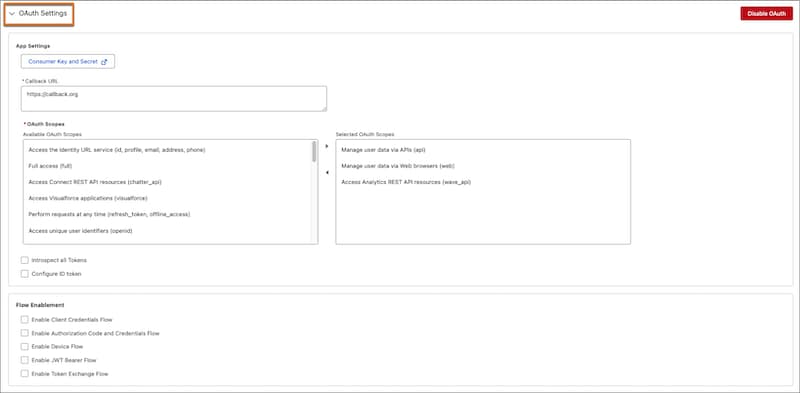
Open the OAuth Setting section.
-
For OAuth Scopes, select the scopes you need for your flow.
- We recommend these OAuth scopes when using a JWT Bearer Flow for embedding,
Manage user data via Web browsers (web)andPerform requests at any time (refresh_token, offline_access).
- We recommend these OAuth scopes when using a JWT Bearer Flow for embedding,
-
In the Flow Enablement section, select the JWT Bearer Flow.
- Upload the public certificate file,
sf_public_cert.crt.
- Upload the public certificate file,
-
For Security, select Require secret for Refresh Token and any other options you need. Configure these options only if your security policy requires them.
-
Save your changes.
Before leaving this page, on the Settings tab, click Consumer Key and Secret to copy and save the values. You need the consumer key value for the client_id and the consumer secret value for the client_secret.
The JWT bearer flow requires a pre-authorized JWT subject user, the user named in the JWT’s sub claim, in the ECA settings. Pre-authorization is granted by adding a custom permission set to the allowlist in the ECA. Create a custom permission set with the access your JWT subject user needs. Creating a permission set scoped to the access for your JWT subject user only follows the principle of least privilege.
- In Salesforce Setup, enter Permission Sets in the Quick Find box, and then select Permission Sets.
- Click New.
- Enter a label and API name. For example, set the label to Tableau Next Embedding JWT and the API name to TableauNextEmbeddingJWT.
- Leave License set to None unless your org requires a specific user license for this permission set.
- Save the customized permission set.
On the customized permission set details page, configure the access required for Tableau Next embedding. At a minimum, the permission set needs:
- System Permissions: grant any system-level permissions that your org requires for Tableau Next API access
- Object Settings: grant Read on the Tableau Next objects that your app needs read access to
- Custom Permissions: assign any Tableau Next custom permissions required by your app
- On the custom permission Details page, click Manage Assignments.
- Click Add Assignment.
- Select the JWT subject user, the user named in the sub claim of your JWT, or a profile whose users will act as JWT subjects.
- Click Assign and then Done.
-
In Salesforce Setup, enter External in the Quick Find box, and then select External Client App Manager.
-
To edit your ECA, select it from the list of apps.
-
Click Edit.
-
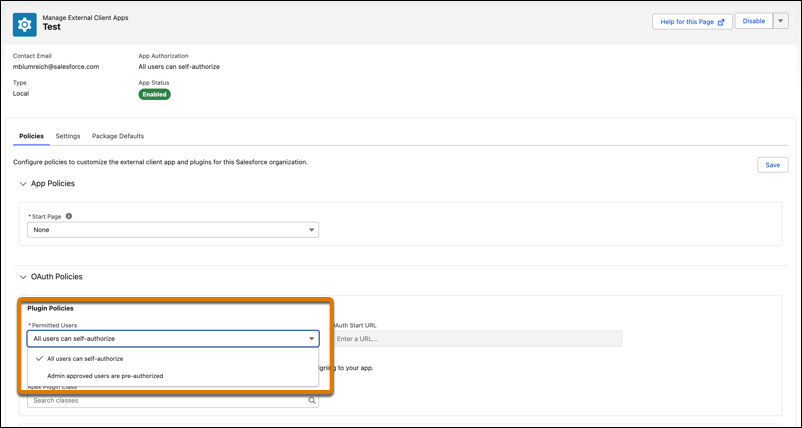
On the OAuth Policies panel, update the Permitted Users value to Admin approved users are pre-authorized.
-
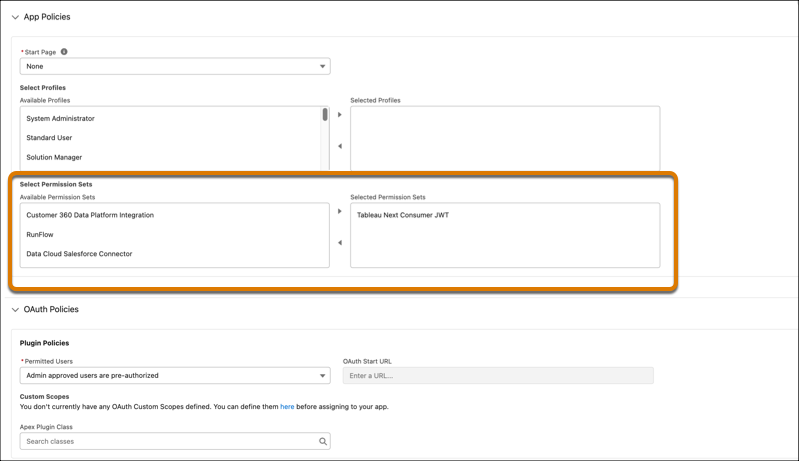
On the App Policies panel, add the custom permission set to the Select Permission Sets list.
-
Save and close.
For your users that are viewing embedded Tableau Next assets in your web app, assign the custom permission set. This assignment adds users for pre-authorization. For more information on assigning permission sets to users, see Assign Tableau Next User Permissions.
On the Settings tab for your ECA, click Consumer Key and Secret and copy the consumer key. The consumer key is used as the iss claim in the JWT. Store the private key securely on your app server.
For Node.js, the recommended approach is to use an environment variable, with the key file kept out of source control:
For Heroku, use a config var:
Your app builds a signed JWT and issues a POST to the Salesforce token endpoint with grant_type=urn:ietf:params:oauth:grant-type:jwt-bearer. Salesforce verifies the signature against the uploaded certificate and returns an access token.
This example is JavaScript and runs on Node.js with Express. You can implement the same JWT bearer flow in any server-side language, substituting the equivalent JWT signing and HTTP primitives in your stack of choice. For example, Java with Spring Boot using java.security and a JWT library, Python with pyjwt and requests, Go with golang-jwt/jwt, Ruby on Rails with ruby-jwt, or .NET / C# with System.IdentityModel.Tokens.Jwt. The endpoint path, claim set, and request and response shapes are identical regardless of language.
When your app has the access token, generate the frontdoor URL with a POST to ${instance_url}/services/oauth2/singleaccess and pass the resulting frontdoor URL to the SDK as the authCredential value. This step is identical to the web server flow. See Generate the Access Token and Frontdoor URL for Tableau Next Embedding.