Embedded Service Chat SDK for Android Developer Guide
 j
jShow Pre-Chat Fields to User
Before a chat session begins, you can request that the user enter pre-chat fields that
are sent to the agent at the start of the session.
To create pre-chat fields in your app, instantiate ChatUserData objects during session configuration and then pass the
pre-chat info to your ChatConfiguration builder.
-
Create a -derived object for each pre-chat field. Use the subclass PreChatTextInputField for string fields, the subclass PreChatPickListField for picklists, and you can directly use ChatUserData for fields that don't require any user input at all. For
fields that require user interaction, specify the display label and the label that the
agent sees. You can also specify other characteristics, such as whether the field is
required and what type of text field it is. When building the input field object, the
first string is what the user sees on the device and the second string is what the agent
sees in the transcript.
In Java:
1// Some simple string fields
2PreChatTextInputField firstName = new PreChatTextInputField.Builder()
3  .required(true)
4  .build("Please enter your first name", "First Name");
5  // First string in build() is what the user sees on the device,
6  // the second string is what the agent sees in the transcript...
7PreChatTextInputField lastName = new PreChatTextInputField.Builder()
8  .required(true)
9  .build("Please enter your last name", "Last Name");
10
11// An email field
12PreChatTextInputField email = new PreChatTextInputField.Builder()
13  .required(true)
14  .inputType(EditorInfo.TYPE_TEXT_VARIATION_EMAIL_ADDRESS)
15  .mapToChatTranscriptFieldName("Email__c")
16  .build("Please enter your email", "Email Address");
17
18// A phone number field (that isn't displayed to agent)
19PreChatTextInputField phoneNumber = new PreChatTextInputField.Builder()
20  .displayedToAgent(false)
21  .inputType(InputType.TYPE_CLASS_PHONE)
22  .build("Phone number (Agent can't see this)", "Phone");
23
24// A read-only field
25PreChatTextInputField subject = new PreChatTextInputField.Builder()
26  .readOnly(true)
27  .initialValue("Read-only case subject")
28  .build("Case Subject", "Subject");
29
30// A long message field
31PreChatTextInputField description = new PreChatTextInputField.Builder()
32  .inputType(EditorInfo.TYPE_TEXT_VARIATION_LONG_MESSAGE)
33  .maxValueLength(200)
34  .build("Please describe your problem", "Description");
35
36// A picklist field
37PreChatPickListField priority = new PreChatPickListField.Builder()
38  .required(true)
39  .addOption(new PreChatPickListField.Option("Low Priority", "Low"))
40  .addOption(new PreChatPickListField.Option("Medium Priority", "Medium"))
41  .addOption(new PreChatPickListField.Option("High Priority", "High"))
42  .addOption(new PreChatPickListField.Option("AHHHHHHHH!!!", "Critical"))
43  .build("Issue Priority", "Priority");
44
45// You can also create hidden fields that the user doesn't see, but
46// still gets passed along to the agent using ChatUserData...
47ChatUserData hiddenField = new ChatUserData(
48  "Hidden Custom Data",
49  "The user doesn't see this information",
50  true);
In Kotlin:
1// Some simple string fields 2val firstName = PreChatTextInputField.Builder() 3 .required(true) 4 .build("Please enter your first name", "First Name") 5 // First string in build() is what the user sees on the device, 6 // the second string is what the agent sees in the transcript... 7val lastName = PreChatTextInputField.Builder() 8 .required(true) 9 .build("Please enter your last name", "Last Name") 10 11// An email field 12val email = PreChatTextInputField.Builder() 13 .required(true) 14 .inputType(EditorInfo.TYPE_TEXT_VARIATION_EMAIL_ADDRESS) 15 .mapToChatTranscriptFieldName("Email__c") 16 .build("Please enter your email", "Email Address") 17 18// A phone number field (that isn't displayed to agent) 19val phoneNumber = PreChatTextInputField.Builder() 20 .displayedToAgent(false) 21 .inputType(InputType.TYPE_CLASS_PHONE) 22 .build("Phone number (Agent can't see this)", "Phone") 23 24// A read-only field 25val subject = PreChatTextInputField.Builder() 26 .readOnly(true) 27 .initialValue("Read-only case subject") 28 .build("Case Subject", "Subject") 29 30// A long message field 31val description = PreChatTextInputField.Builder() 32 .inputType(EditorInfo.TYPE_TEXT_VARIATION_LONG_MESSAGE) 33 .maxValueLength(200) 34 .build("Please describe your problem", "Description") 35 36// A picklist field 37val priority = PreChatPickListField.Builder() 38 .required(true) 39 .addOption(PreChatPickListField.Option("Low Priority", "Low")) 40 .addOption(PreChatPickListField.Option("Medium Priority", "Medium")) 41 .addOption(PreChatPickListField.Option("High Priority", "High")) 42 .addOption(PreChatPickListField.Option("AHHHHHHHH!!!", "Critical")) 43 .build("Issue Priority", "Priority") 44 45// You can also create hidden fields that the user doesn't see, but 46// still gets passed along to the agent using ChatUserData... 47val hiddenField = ChatUserData( 48 "Hidden Custom Data", 49 "The user doesn't see this information", 50 true) -
(Optional) Create a list of ChatEntity objects to associate pre-chat fields with fields from a
record in your org.
Pre-chat fields are always sent to the agent at the start of the session. But if you want to fill in fields of a particular record, instantiate a ChatEntity for each Salesforce object (for example, Case or Contact) and add a ChatEntityField for each field association within that Salesforce object (for example, Subject or LastName). After you've built your ChatEntity objects, pass them to your ChatConfiguration builder using the chatEntities method.
To learn more, see Create or Update Salesforce Records from a Chat Session.
-
Pass the pre-chat info to your ChatConfiguration builder using the chatUserData method.
In Java:
1// Create the chat configuration builder
2final ChatConfiguration.Builder chatConfigurationBuilder =
3  new ChatConfiguration.Builder(ORG_ID, BUTTON_ID,
4                                DEPLOYMENT_ID, LIVE_AGENT_POD);
5
6// Add user data and entities
7chatConfigurationBuilder
8  .chatUserData(firstName, lastName, email, priority,
9    subject, description, phoneNumber, hiddenField);
10
11// Build the chat configuration object
12ChatConfiguration chatConfiguration = chatConfigurationBuilder.build();
In Kotlin:
1// Create the chat configuration builder
2val chatConfigurationBuilder =
3    ChatConfiguration.Builder(ORG_ID, BUTTON_ID,
4                              DEPLOYMENT_ID, LIVE_AGENT_POD)
5
6// Add user data and entities
7chatConfigurationBuilder
8    .chatUserData(firstName, lastName, email, priority,
9        subject, description, phoneNumber, hiddenField)
10
11// Build the chat configuration object
12val chatConfiguration = chatConfigurationBuilder.build()
From here, you can start the chat session normally.
In Java:
1// Create a UI configuration instance from a core config object
2// and start session!
3ChatUI.configure(ChatUIConfiguration.create(chatConfiguration))
4  .createClient(getApplicationContext())
5  .onResult(new Async.ResultHandler<ChatUIClient>() {
6      @Override public void handleResult (Async<?> operation,
7        ChatUIClient chatUIClient) {
8            chatUIClient.startChatSession(MainActivity.this);
9      }
10});
In Kotlin:
1// Create a UI configuration instance from a core config object
2// and start session!
3ChatUI.configure(ChatUIConfiguration.create(chatConfiguration))
4  .createClient(applicationContext)
5  .onResult { _,
6    chatUIClient -> chatUIClient.startChatSession(this@MainActivity)
7  }
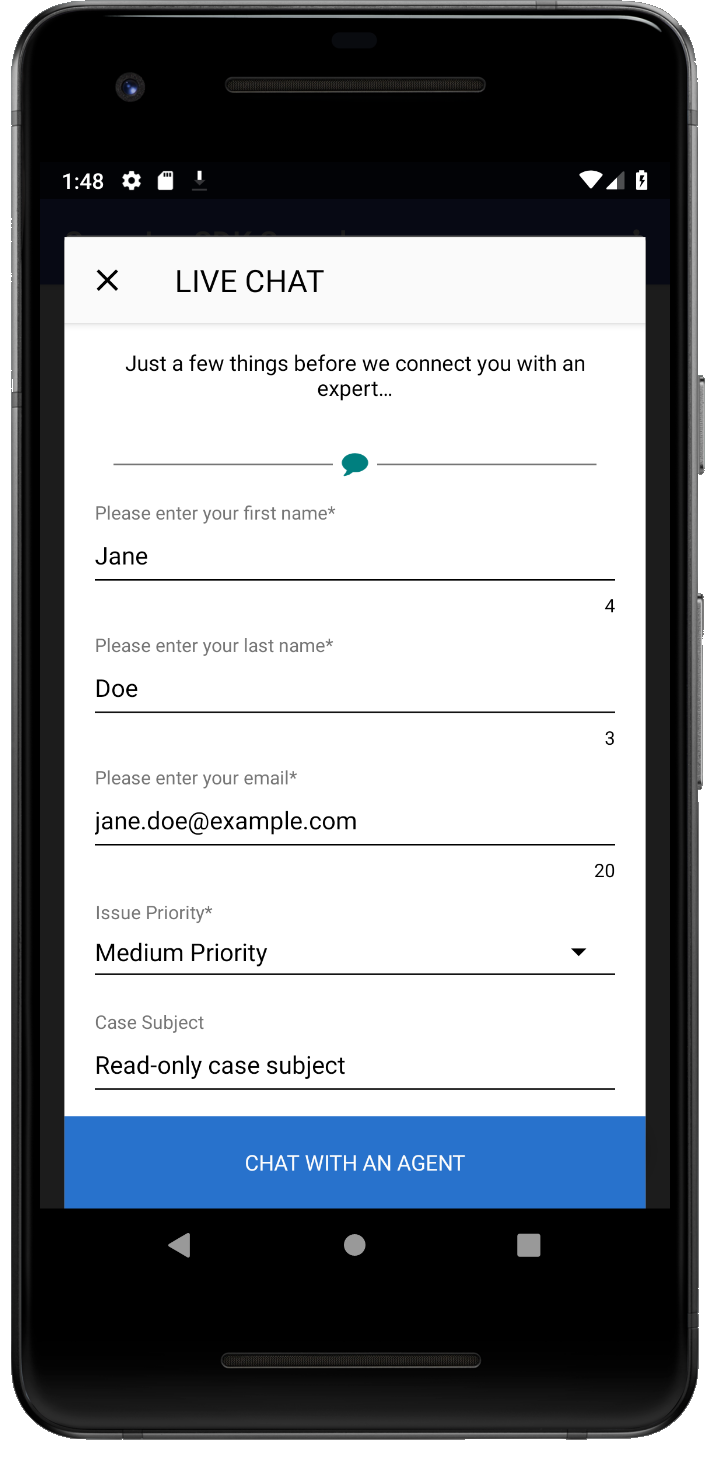
With this code, the user sees the following pre-chat UI in their mobile app.