


Guide for JavaScript Developers
This document explains how to configure the UTAM compiler, generate UTAM JavaScript page objects and use them in a JavaScript or TypeScript UI test. Examples of tests and setup are available in the JavaScript recipes repo.
Compiler Setup
To configure the UTAM compiler, add a dependency for UTAM in your project. Optionally, create a JSON configuration file and declare the required options and the optional values for which the default values don’t match your project structure.
Project Dependencies for JavaScript
The package.json file configures the dependencies for a JavaScript project.
Add a development dependency for the UTAM compiler by running one of these commands:
yarn add utam --devnpm install utam --save-dev
These commands are equivalent and add utam to the devDependencies property in package.json, where x.y.z represents the installed version and is the latest version by default.
1{
2  "devDependencies": {
3    "utam": "x.y.z"
4  }
5}
For a working example, see the utam-js-recipes repo.
The wdio-utam-service dependency includes an adapter between UTAM page objects and the browser API that WebdriverIO provides. The dependency includes a transitive dependency on the UTAM compiler. If the project needs the UTAM compiler only, use the "utam" dependency instead.
Add a development dependency for wdio-utam-service by running one of these commands:
yarn add wdio-utam-service --devnpm install wdio-utam-service --save-dev
Running one of these commands updates devDependencies to look like this:
1{
2  "devDependencies": {
3    "wdio-utam-service": "x.y.z"
4  }
5}
Set Up Compile Step in package.json
This package.json file has a script that runs the utam compile CLI command. The utam CLI is installed locally in your project because you added it to the devDependencies in package.json. In this example, the compiler configuration file is utam.config.json.
1{
2  "scripts": {
3    "build": "yarn build:utam && yarn build:ts",
4    "build:ts": "tsc -b tsconfig.json",
5    "build:utam": "utam -c utam.config.json"
6  }
7}
The build script name is arbitrary. You could use another name, such as compile. Use the script name with yarn or npm to run the script. For example:
1yarn build
2or
3npm run build
The "build:ts" option is needed only if you’re using TypeScript.
Compiler Configuration File
The compiler configuration file enables you to customize the options supported by the JavaScript compiler. We recommend utam.config.json as the name of the compiler configuration file. The file can have any name, as long as the name matches the value of the -c flag used with the utam CLI.
After you’ve added utam as a dependency, run the compiler using one of these approaches:
- Set up a script in
package.json. If the script is calledbuild, runyarn buildornpm run build. - Invoke the
utamCLI. Use yarn:yarn utam -c utam.config.jsonor npx:npx utam -c utam.config.json. The-cflag points the compiler at theutam.config.jsonconfiguration file.
Some developers prefer to use a utam.config.js configuration file because it’s easier to add comments to a JavaScript file compared to a JSON file. The compiler automatically looks for a utam.config.js configuration file at the project root. If you use utam.config.js, you don’t need to use the -c flag.
Configure the JavaScript Compiler
To configure the JavaScript compiler, you have two options:
- Use the default convention, which is the easiest way to configure the compiler. It implies that your project structure adheres with some built-in assumptions; for example, where to find declarative page objects, and where to output compiled page objects. That’s the recommended approach when starting a new project because you don’t have to tweak the compiler configuration.
- Explicitly declare compiler options to fit your project structure. Consider this option when you integrate UTAM with an existing project or when the default convention doesn’t align with your project structure. It gives you more control at the expense of additional configuration time.
Option 1: JavaScript Compiler Default Convention
You don’t have to explicitly declare any options for the JavaScript compiler because all options have default values. If your project
structure follows the default convention, the compiler works out of the box. In that case, set the utam.config.json compiler
configuration file to be an empty object, {}.
Here’s an overview of all configuration options supported by the JavaScript compiler with their associated default values:
1{
2  "pageObjectsRootDir": "./", // config file directory name
3  "pageObjectsFileMask": ["**/__utam__/**/*.utam.json"],
4  "extensionsFileMask": ["**/__utam__/**/*.utam.js"],
5  "pageObjectsOutputDir": "pageObjects",
6  "extensionsOutputDir": "utils",
7  "moduleTarget": "commonjs",
8  "skipCommonJs": false,
9  "alias": {},
10  "version": undefined,
11  "copyright": undefined,
12  "module": undefined,
13  "profiles": undefined
14}
Let’s look at an example project that follows the default convention.
1<packageRoot>
2├── package.json
3├── utam.config.json
4└── src/
5   └── modules/
6      └── component1/
7         └── __utam__/
8            └── component1.utam.json
9      ├── component2/
10         └── __utam__/
11            ├── component2.utam.json
12            └── extension.utam.js
13      ..
14      └── componentN/
15         └── __utam__/
16            └── componentN.utam.json
This sample project structure follows the default convention. The utam.config.json compiler configuration file is
at the package root level and is a sibling to package.json. The declarative page objects are next to their associated components in __utam__ subfolders.
The resulting project structure after compiling is:
1<packageRoot>
2├── package.json
3├── utam.config.json
4├── pageObjects/
5   ├── component1.d.ts
6   ├── component1.js
7   ├── component1.mjs
8   ..
9   ├── componentN.d.ts
10   ├── componentN.js
11   └── componentN.mjs
12├── src/
13   └── modules/
14      ├── component1/
15         └── __utam__/
16            └── component1.utam.json
17      ├── component2/
18         └── __utam__/
19            ├── component2.utam.json
20            └── extension.utam.js
21      ..
22      └── componentN/
23         └── __utam__/
24            └── componentN.utam.json
25└── utils/
26   ├── extension.js
27   └── extension.mjs
By following the default convention, the compiler finds the declarative page objects and extensions and
generates their respective implementations in pageObjects and utils folders at the package root level.
Option 2: Explicitly Declare Compiler Options
Explicitly declare compiler options when the default convention doesn’t align with your project structure.
There are multiple approaches to configure compiler options. We offer these different approaches to allow for different project structures and different developer preferences.
Use a compiler configuration file
You can specify options in the compiler configuration file.
Use the -c flag of the utam CLI to point at the configuration file. In this example, we use utam.config.json.
1utam -c utam.config.jsonUse the -p flag of the utam CLI to point the compiler at multiple configuration files. Pass in a list of space-separated UTAM compiler configuration file paths. This approach is useful if you have a repo where you need different compiler configuration options in different subprojects. In most scenarios, the -c flag suffices and you don’t need to use the -p flag.
1utam -p 'path/to/project1/utam.config.json' 'path/to/project2/utam.config.json'Use a configuration object in package.json
Alternatively, you can specify options in a configuration object for the utam key in package.json. For example:
1{
2  "devDependencies": {
3    "utam": "x.y.z"
4  },
5  "utam": {
6    "pageObjectsOutputDir": "pageObjectsJS",
7    "extensionsOutputDir": "pageObjects/utils"
8  }
9}
As you can see, we offer multiple approaches to configure compiler options. With great flexibility comes the risk of over complicating your configuration. We recommend that you stick to one approach for each project for the sake of simplicity.
The compiler looks for configuration options in this order:
utamCLI with the-cor-pflags- Default
utam.config.jsconfiguration file - Configuration object in
package.json
JavaScript Compiler Options Reference
This section lists all the options supported by the JavaScript compiler. For each option, we describe its JSON type, its default value, and what it does.
pageObjectsRootDir
- Type:
string - Default:
path.dirname(configFilePath)
The relative path from the configuration file’s directory that represents the root directory path. The compiler looks recursively in the root directory for declarative JSON page objects and extensions. It’s also the directory in which the compiler generates compiled page objects and extensions.
Defaults to the configuration file’s directory if not specified. For instance, if your utam.config.json configuration file is
at the package root (the same level as the package.json file), the page object root directory defaults to the package root directory.
pageObjectsFileMask
- Type:
string[] - Default:
["**/__utam__/**/*.utam.json"]
The file mask pattern used by the compiler to find input JSON page objects. It tells the compiler
where to find the source JSON page objects relative to pageObjectsRootDir. Declare the file mask as a list of glob
patterns.
For example, if we want to search for input files inside the src directory only, set the pageObjectsFileMask as follows:
1{
2  "pageObjectsFileMask": ["src/**/__utam__/**/*.utam.json"]
3}
extensionsFileMask
- Type:
string[] - Default:
["**/__utam__/**/*.utam.js"]
The file mask pattern used by the compiler to find input extensions (JavaScript ESM extensions). It works exactly as the pageObjectsFileMask option but for extensions rather than declarative page objects.
pageObjectsOutputDir
- Type:
string - Default:
"pageObjects"
The relative path from the root directory to the target directory for generated page objects. That’s where the compiler generates compiled JavaScript modules from the JSON page objects.
extensionsOutputDir
- Type:
string - Default:
"utils"
The relative path from the root directory to the target directory for generated extensions. That’s where the compiler copies and transpiles JavaScript extensions.
moduleTarget
- Type:
"module" | "commonjs" - Default:
"commonjs"
The module system used for compiled page objects and extensions whose file extension is .js. Configure this option to match
your package’s module system. If your package uses ES Modules, set this option to "module". If your package uses CommonJS,
set this option to "commonjs" or use the default value.
This table illustrates the module format used for a generated file extension depending on the moduleTarget
value. CJS stands for “CommonJS” and ESM stands for “ES Modules.”
| Page Objects file ext | commonjs | module |
|---|---|---|
*.js | CJS | ESM |
*.cjs | CJS ¹ | |
*.mjs | ESM |
¹ The CJS file is only generated if skipCommonJs is set to false.
Note
skipCommonJs
- Type:
boolean - Default:
false
Toggle page objects and extensions transpilation from ES Modules to CommonJS. If set to false or missing,
the compiler transpiles ESM Page Objects and extensions to CJS. If set to true, the compiler doesn’t
transpile ESM page objects and extensions and only generates ES Modules.
This option is only useful when moduleTarget is set to module
Note
alias
- Type:
string | Record<string, string> - Default:
{}
A collection of matching patterns and replacement values used to map type values to import paths for custom elements and extensions. An alias provides flexibility by enabling you to match a type value and replace it in the generated import path.
When you declare a custom element or extension in a declarative page object, the type property represents the path
used by the platform module resolver. By default, the type property value translates to the custom
element or extension module specifier.
Let’s look at an example that illustrates how the compiler translates the type property value into an import path:
Let’s declare a custom element in a JSON page object:
1// filename: myPageObject.utam.json
2{
3  "elements": [
4    {
5      "name": "myCustomElement",
6      "selector": {
7        "css": ".my-custom-element"
8      },
9      "type": "packageName/pageObjects/path/to/myCustomElement"
10    }
11  ]
12}
The import statement for that element in the generated page object is:
1// filename: myPageObject.mjs
2import _myCustomElement from "packageName/pageObjects/path/to/myCustomElement";
That built-in behavior ensures that the type property value has a specific semantic structure with three parts:
- the first part represents the package name (required)
- the path to the page object (optional)
- the page object name (required)
Sometimes, that coupling between the type property value and the import path lacks flexibility.
For instance, you might want to use an internal import reference that’s different from the package name published
on the public registry.
An alias decouples the 1-to-1 relationship between type and import paths. Let’s look at how we can use aliases to
add a package scope in front of your custom element.
Define an alias in the compiler configuration file:
1// filename: utam.config.json
2{
3  "alias": {
4    "packageName/*": "@scope/packageName/*"
5  }
6}
With this mapping, the compiler replaces all type values that contain packageName by @scope/packageName.
The generated import statement is:
1// filename: myPageObject.mjs
2import _myCustomElement from "@scope/packageName/pageObjects/path/to/myCustomElement";
The * character is replaced by everything it matches in the type property value. Here, * matches path/to/myCustomElement
so @scope/packageName/* translates to @scope/packageName/path/to/myCustomElement in the import path.
The matching pattern is a simple string matching pattern that supports the * wildcard.
Note
There are two ways to declare type aliases:
- Inline in the compiler configuration file
- Externally in another JSON file that is referenced in the compiler config file
To declare type aliases inline, set the alias property value to be an object:
1// filename: utam.config.json
2{
3  "alias": {}
4}
Declare all aliases as key-value pairs where the keys represent matching patterns and the values represent replacement values.
1// filename: utam.config.json
2{
3  "alias": {
4    // aliases are key-values of
5    // type Matching Pattern: import Replacement Value
6    "packageName/pageObjects/*": "@scope/packageName/pageObjects/*"
7  }
8}
To declare type aliases externally, create a JSON file that defines the aliases:
1// filename: utam-alias.config.json
2{
3  "packageName/pageObjects/*": "@scope/packageName/pageObjects/*"
4}
Then set the alias property in the compiler configuration file to reference the aliases JSON config file:
1// filename: utam.config.json
2{
3  // assuming both config files are siblings
4  "alias": "./utam-alias.config.json"
5}
The JavaScript compiler automatically resolves the alias configuration path and loads the aliases.
version
- Type:
string - Default: the current date and time
Version is an optional string that is propagated as @version in the generated page object JSDoc.
For example, if version is set:
1{
2  "version": "Spring '22"
3}
The generated JSDoc in the code is:
1/**
2 * ...
3 * @version Spring '22
4 */
5export default class DescriptionClass extends _UtamBasePageObject {
If the version isn’t set, the current date and time is used:
1/**
2 * ...
3 * @version 2022-12-01 09:12:01
4 */
5export default class DescriptionClass extends _UtamBasePageObject {
copyright
- Type:
string[] - Default: none
An optional array of strings that is added at the top of the generated page object. If the copyright is set:
1{
2  "copyright": ["Copyright (c) 2022, salesforce.com, inc.", "All rights reserved."]
3}
The generated JSDoc in the code is:
1/**
2 * Copyright (c) 2022, salesforce.com, inc.
3 * All rights reserved.
4 */
5import { By as _By } from "@utam/core";
6
7// ... class code
module
- Type:
String - Default: none
The name of the module used to generate injections config. It’s a mandatory configuration parameter if the UTAM compiler generates page objects for interfaces.
profiles
- Type: array of objects
- Default: none
Used in injections config. See interfaces.
interruptCompilerOnError
- Type:
boolean - Default: true
By default, the compiler interrupts execution if a compilation error occurs. If this parameter is set to false, the compiler continues to generate other page objects, combines all compilation errors into one report, and throws an error at the end. All the errors are added to the utam.errors.txt file and printed to the console.
Test Setup
After you generate UTAM page objects, you can create a UI test that uses the page objects. Before your test can interact with the UI, UTAM needs to have access to a driver and to certain configuration parameters.
UTAM and WebdriverIO Integration
This package.json file includes a dependency for WebdriverIO, which is an automation framework for JavaScript apps.
1{
2  "devDependencies": {
3    "wdio-utam-service": "0.0.7"
4  }
5}
wdio-utam-service is an adapter between UTAM page objects and the browser API that WebdriverIO provides. The dependency includes a transitive dependency on the UTAM compiler.
WDIO config and utam service
The wdio.config.js file configures WebdriverIO and requires wdio-utam-service. It’s set in the root folder of the project.
We describe only the relevant parts of the wdio configuration. For the full configuration, see the JavaScript recipes repository.
For the complete list of WebdriverIO configuration properties, see WebdriverIO’s configuration page.
1const { UtamWdioService } = require('wdio-utam-service');
2...
3exports.config = {
4    ...
5    services: ['chromedriver', [UtamWdioService, {}]]
6    ...
7}
A driver instance is created by WebDriverIO. UtamWdioService wraps the driver instance and uses the configured timeouts. Now, you can create an instance of a UTAM page object in a test.
Set Timeouts for JavaScript in WebDriverIO
The wdio.config.js file also configures the timeouts and should be set depending on the speed of your testing environment.
1// This service creates an instance of UtamLoader from a WebDriverIO driver
2const { UtamWdioService } = require("wdio-utam-service");
3// ...
4
5exports.config = {
6  // ...
7  // sets explicit timeout to 5 seconds
8  waitforTimeout: 1000 * 5,
9  // optional parameter that sets the polling interval for explicit waits
10  waitforInterval: 200,
11  // ....
12  services: [
13    // WebDriverIO doesn't allow setting an implicit timeout through config
14    // so we set it via UtamWdioService parameters
15    [UtamWdioService, { implicitTimeoutMsec: 0 }],
16  ],
17  // ...
18};
waitforTimeout property sets the default timeout for all waitFor* basic actions and for explicit waits. This example sets the explicit wait timeout to 5 seconds.
The implicit wait timeout is set via implicitTimeout argument of the UTAM WDIO service and we recommend using 0 (which is also the default).
Set up injection config for interfaces
If your UI tests use UTAM interfaces, you must set up injection configs.
Find injection configs in consumed modules
The injection config is generated with page objects. It can be:
- in the root folder of your local generated page objects
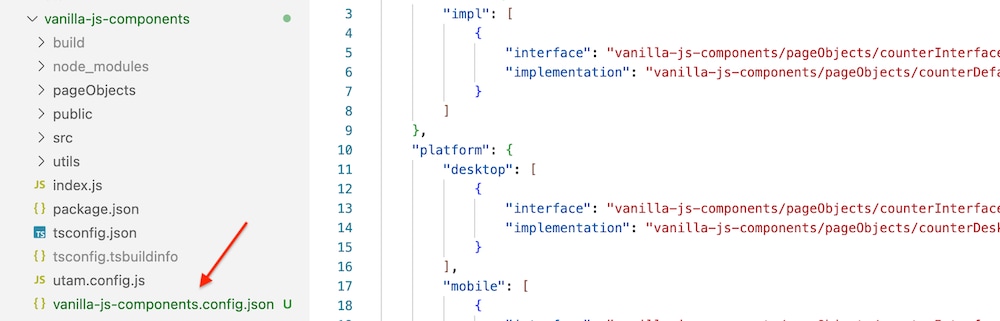
- or a file from a dependency package
Add injection configs to UtamLoader
Add injectionConfigs to WebDriverIO config as a UtamWdioService parameter:
1{
2    // ...
3    services: [
4        'chromedriver',
5        [
6            UtamWdioService,
7            {
8                implicitTimeout: 0,
9                injectionConfigs: [
10                       // load a dependency config from a dependency
11                       'vanilla-js-components/profile.config.json',
12                       // load a dependency config local to the project
13                       path.join(__dirname, '../path/to/anotherProfile.config.json')
14                ]
15            }
16        ]
17    ],
18    // ...
19}
Each string in the injectionConfigs array should point to the actual JSON injection configuration file generated with page objects.
Set active profile
Setting the active profile affects which implementing class is picked. A common example is mobile tests, which must set the current platform in UtamWdioService:
1// utam variable is instance of UtamLoader
2utam.setProfile("platform", getMobilePlatformType(browser));
Mobile setup
To execute a test using a UTAM page object against a local simulator or emulator, the UTAM framework needs to know your local environment through the wdio configuration file.
For iOS:
1exports.config = {
2    ...baseMobileConfig,
3    capabilities: [
4        {
5            ...
6            'appium:deviceName': 'iPhone 12',
7            'appium:app': '<path to iOS test app>',
8            'appium:platformVersion': '15.2',
9        },
10    ]
11};
For Android:
1exports.config = {
2    ...baseMobileConfig,
3    capabilities: [
4        {
5            ...
6            'appium:deviceName': 'emulator-5554',
7            'appium:app': '<path to Android test app>',
8            'appium:appActivity': 'com.salesforce.chatter.Chatter',
9            'appium:appPackage': 'com.salesforce.chatter',
10        },
11    ]
12};
Start Appium server
Start an Appium server locally before executing any test by running appium --port 4444.
Write UI Tests
Before you start to write test code, clarify the use case for your test. Identify the DOM elements that your test needs to exercise and ensure that those elements are accessible in your page objects. Start small and iterate when you’re creating your first test and page objects.
The Write a Test tutorial gives you a good introduction to test code for a Hello World example. The UI enables you to see the DOM, JSON page object, generated JavaScript code, test code, and a DOM tree viewer. The sidebar walks you through the moving parts.
Let’s look at the test code in the compose method tutorial.
1// Import a root page object
2import LoginFormRoot from "tutorial/loginForm";
3
4runPlaygroundTest(async () => {
5  // Load the page object
6  const loginFormRoot = await utam.load(LoginFormRoot);
7  const usernameElement = await loginFormRoot.getUsername();
8  const passwordElement = await loginFormRoot.getPassword();
9
10  await loginFormRoot.login("utam@salesforce.com", "azerty123");
11
12  assert.strictEqual(await usernameElement.getValue(), "utam@salesforce.com");
13  assert.strictEqual(await passwordElement.getValue(), "azerty123");
14});
The runPlaygroundTest() method is specific to the tutorial environment. For a more generic test, see Sample Repo Using WebDriverIO.
Note
Here are the basic steps you perform in test code.
Import the root page object
Import a root page object using JavaScript module syntax. You can use any name to refer to the default export from the module. The tutorial code uses LoginFormRoot.
1import LoginFormRoot from "tutorial/loginForm";To load a page object directly from a UI test, the page object must declare "root" : true in its JSON page object file.
Tip
Load a page object
This line loads the root page object.
1const loginFormRoot = await utam.load(LoginFormRoot);The utam.load() method guarantees that by the time you load, the root element is available and present. If the page object can’t be loaded, you get an error. UTAM always tries to fail as fast as possible if there’s an error. The fast failure makes it easier to locate the line of code that’s failing when you debug a test.
Call page object methods
The page object exposes the getUsername(), getPassword(), and login() methods so you can call them in your test.
Use a compose method instead of a public element in a page object where possible. A compose method provides better encapsulation of element structure and gives you better flexibility for page-object maintenance.
Tip
1const usernameElement = await loginFormRoot.getUsername();
2const passwordElement = await loginFormRoot.getPassword();
3
4await loginFormRoot.login("utam@salesforce.com", "azerty123");
The getPassword() method returns an element on the page. You can then call a basic action on the element. The getValue() basic action returns the value of an input element’s value property. For example:
1await passwordElement.getValue();Use assertions
Use assertions to ensure that your test returns expected results. Use any assertion library of choice, such as Node.js assertions. For example:
1assert.strictEqual(await passwordElement.getValue(), "azerty123");Run tests
The process to run tests depends on your test automation framework and the programming language that you use. For an example, see Sample Repo Using WebDriverIO.
We looked at the basic steps in a test. Now, let’s see some other common actions in a test.
Use Developer Tools and console.log()
If you’re playing around with tutorial code, you can add a debugger; statement to invoke the Developer Tools debugger and step through your code. Call console.log() to output a message to the browser console and to the tutorial console.
Wait until a condition is met
Write more durable tests by waiting for certain actions to complete and yield until the conditions are met. Use an explicit wait to wait for a condition to be ready for the test to proceed.
Use Jasmine to structure tests
Jasmine is a behavior-driven development framework for testing JavaScript code. This repo uses a WebdriverIO Jasmine plugin that’s an adapter for the Jasmine testing framework.
When you look at the test code in utam-js-recipes repo, you see some standard Jasmine methods.
-
describe()creates a group of specs, also known as a suite. -
it()defines a single spec. A spec should contain one or more expectations that test the state of the code.
We don’t have documentation yet for integrating with other test frameworks.
Code completion (IntelliSense) for UTAM JSON files
The JSON schema for UTAM page objects is available at Schema Store.
Most source code editors or IDEs support code completion (IntelliSense) for .utam.json file extensions either automatically or through configuration.
Example configuration for Visual Studio Code
To configure IntelliSense for UTAM JSON files, add the following snippet to .vscode/settings.json.
1{
2 "json.schemas": [
3 {
4 "fileMatch": ["*.utam.json"],
5 "url": "https://json.schemastore.org/utam-page-object.json"
6 }
7 ]
8} j
j