After you have agent tests in your development org, either by creating them with a CLI command, deploying them with Metadata API, or using the Testing Center UI in your org, you have multiple pro-code options to run the tests and view the results.
Use CLI commands. This method is particularly useful in headless continuous integration (CI) environments.
Use the VS Code Test view in the Side Bar, similar to how you run Apex and LWC tests. This method is useful if you want immediate results while developing in VS Code.
Use Testing API, see Run Tests in Connect API. This method is useful when you’re programmatically testing agents.
Of course, if you prefer using point-and-click tools, you can also run agent tests from the low-code Testing Center UI.
Use CLI Commands to Run Agent Tests
Use the agent test run command to run an agent test. The command runs the test in your development org and requires the test’s API name. If you created the test by using the agent test create CLI command, you provided the API name for the test at that time.
As always, run the command from the VS Code integrated terminal, or use a terminal (macOS, Linux) or a command prompt (Windows) from your DX project. In this example, the API name of the test is Resort_Manager_Test and the development org has the alias my-dev-org:
1sf agent test run --api-name Resort_Manager_Test --target-org my-dev-org
If you’ve set a default org in your DX project, such as your sandbox, don’t specify --target-org.
Run this command to get a list of all available agent tests in your development org. The first column lists the test API name.
1sf agent test list --target-org my-dev-org
The tests are run asynchronously by default, which means that the agent test run command simply outputs the agent test resume command that you then run to resume and view the test results. The resume command uses a job ID, for example:
1sf agent test resume --job-id 4KBed00fakeahmPGAQ
To run the tests synchronously, use the --wait flag and specify the number of minutes to wait for the command to finish.
1sf agent test run --api-name Resort_Manager_Test --target-org my-dev-org --wait 20
By default, the agent test run command outputs human-readable results to the terminal. Use the --result-format flag to get JSON, TAP (Test Anything Protocol), or Junit test results, and the --output-dir flag to specify where to put the resulting files. For example:
1sf agent test run --api-name Resort_Manager_Test --target-org my-dev-org --wait 20 --result-format JSON --output-dir json-files
To view the results of a completed agent test run, use agent test results. The command requires a job ID, which was outputted when you originally ran the test. For example:
1sf agent test results --job-id 4KBed00fakeahmPGAQ
Understand the CLI Agent Test Results
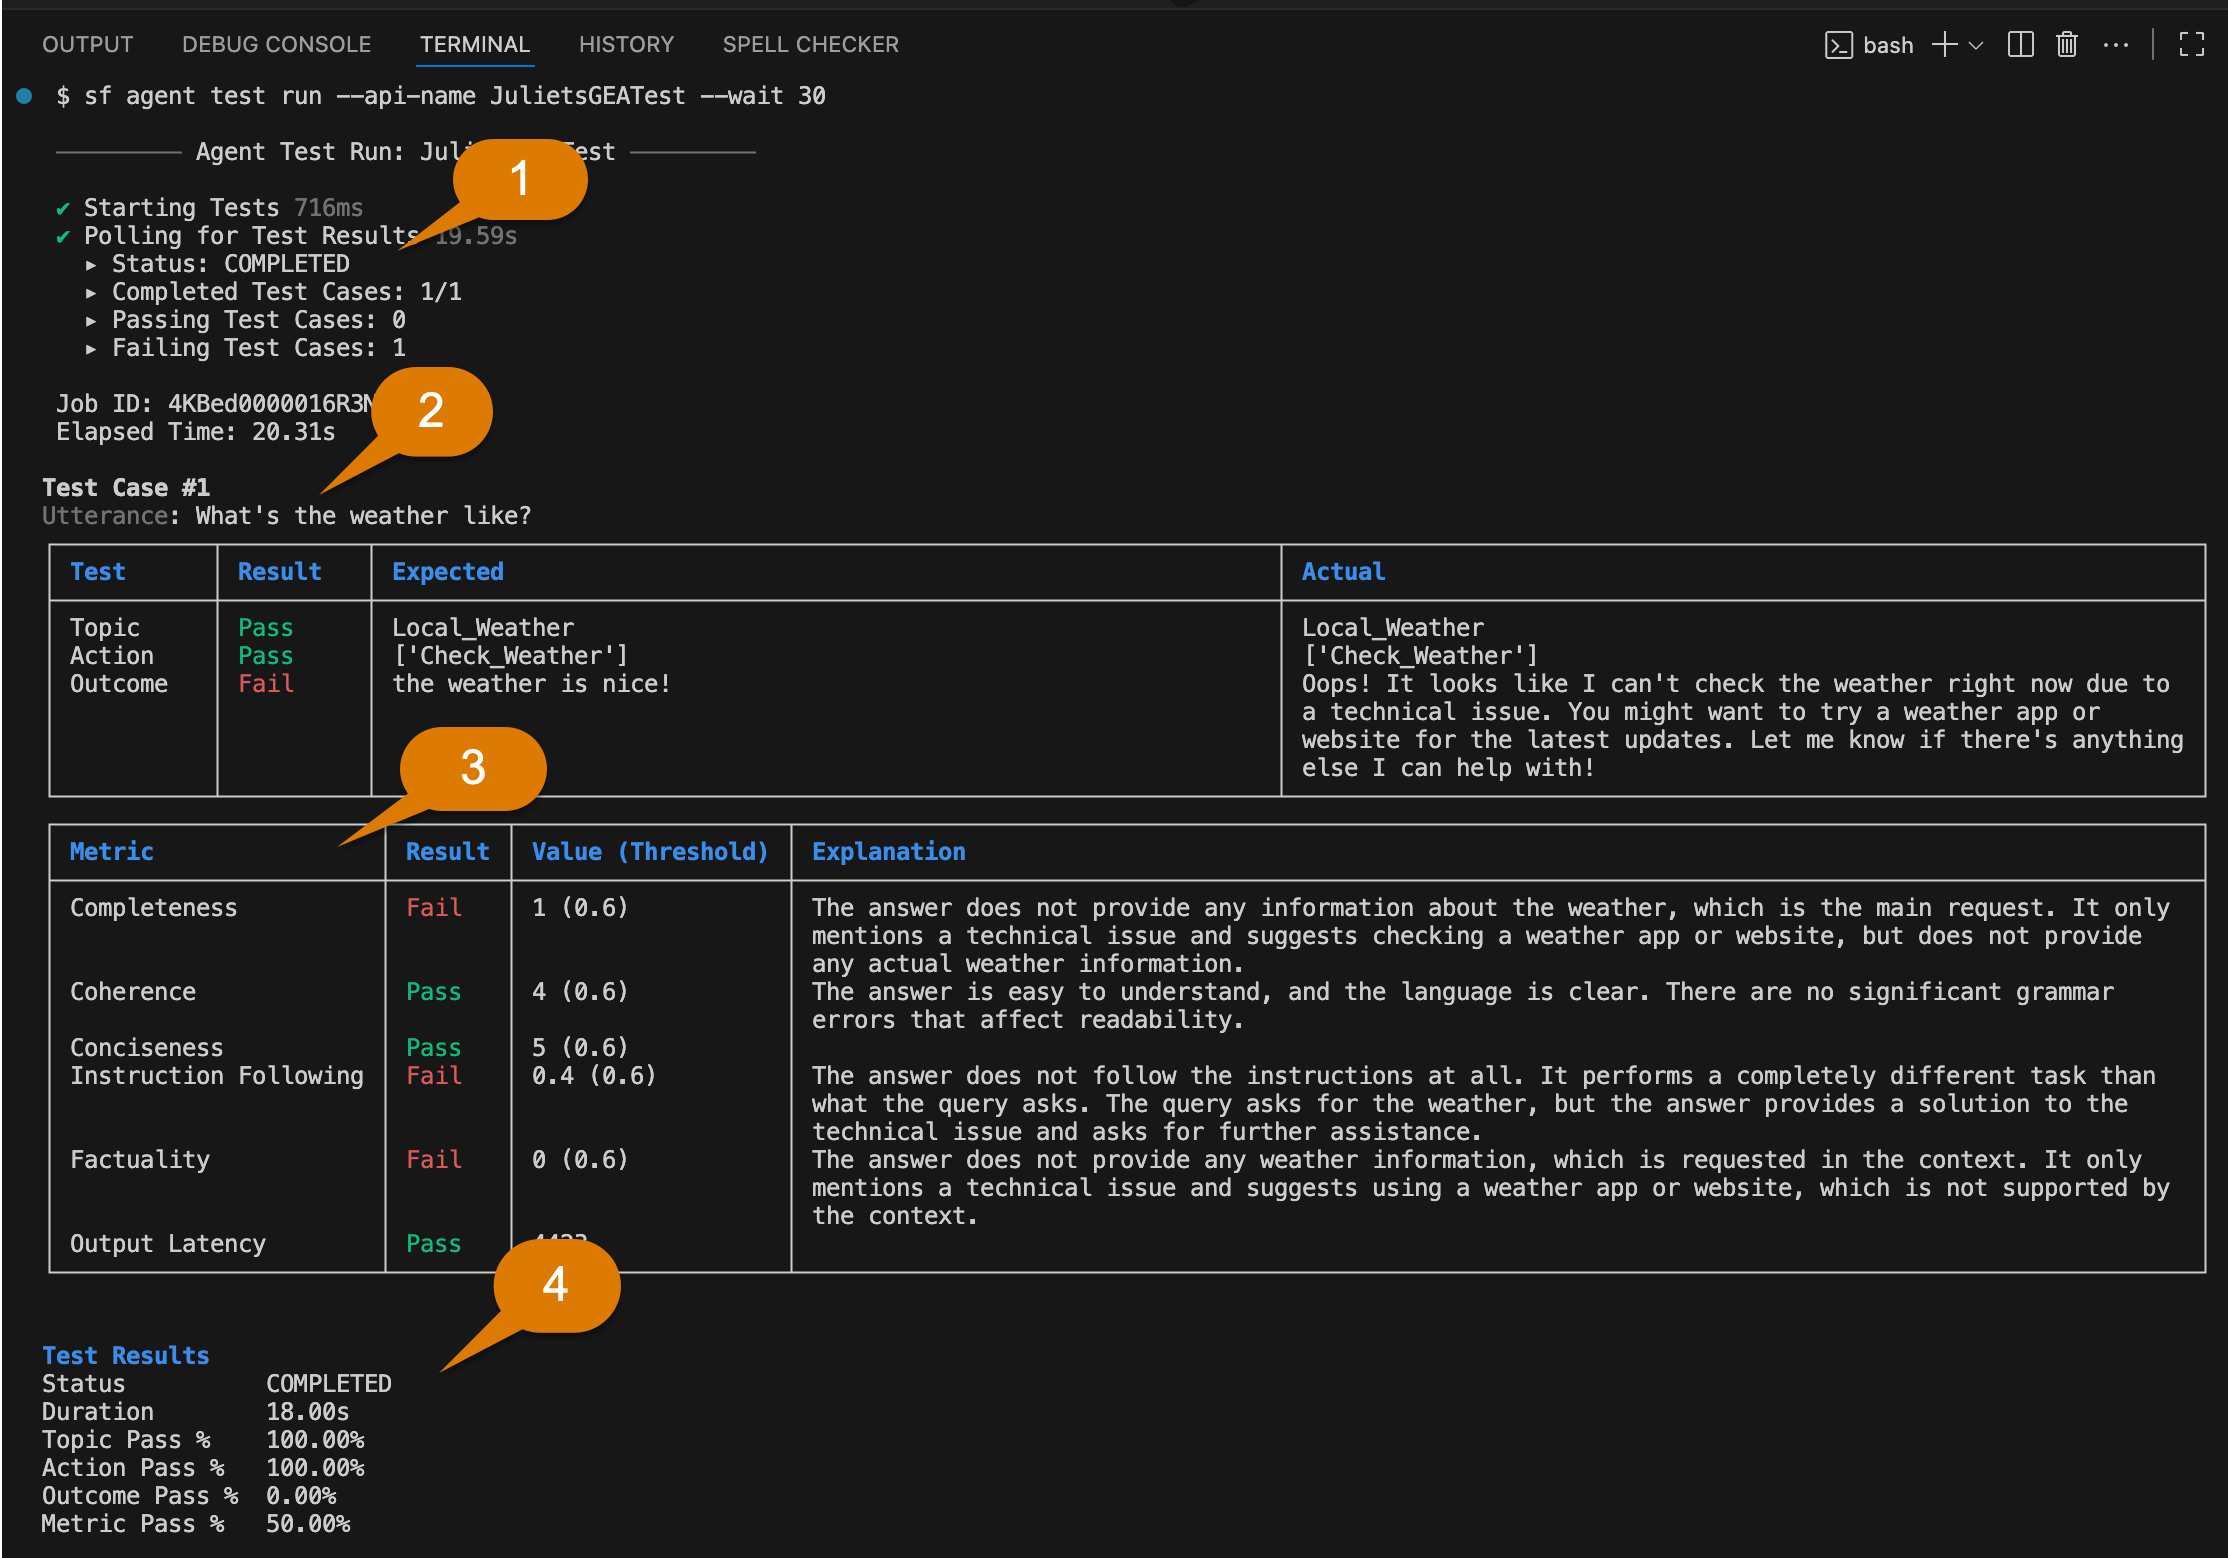
When the agent test run command completes, it outputs overall test results and details about each test case. Here’s the default human-readable output after running the command in the VS Code integrated terminal.
The top section (1) of the command output gives basic information, such as the overall status of the test, the number of test cases run, and the number of tests that succeeded or failed.
The Test Case section (2) details each test case, starting with the utterance specified in the agent test spec YAML file. The table breaks down the different components of the test case and indicates whether each part succeeded or failed. For example:
The Subagent test checks whether the agent responded with the expected subagent when it received the utterance. If the test fails, the Actual column shows which subagent the agent used.
Similarly, the Action test verifies whether the agent used the expected action(s). If it didn’t, the Actual column displays the action(s) the agent used.
The Outcome test is particularly interesting because it evaluates expected and actual values by using natural language. Even if the text of the actual outcome differs from the expected outcome, the test can still pass if the core meaning or “gist” of both texts is the same. However, if the actual outcome is significantly different, the test fails.
The Metrics (3) section displays the result of various tests that assess the quality and latency of agent responses during testing. Only the metrics that you included in the agent test spec YAML file are displayed; in the example, all the metrics are included. See Use Metrics to Assess Agent Responses for more information about these useful metrics.
The bottom section (4) summarizes the overall test results, such as the duration of the test and the total percentage pass rate for subagent, action, and outcome tests.
View and run agent tests from the VS Code Agent Test panel, similar to how you can view and run Apex or LWC tests.
When you run agent tests from VS Code, they run in your development org, the same as when you run tests by using the CLI agent test run command. But VS Code also requires that your DX project contains the metadata component associated with the agent test (AiEvaluationDefinition) in a package directory.
Be sure that the metadata in your development org and DX project are synchronized. To retrieve an agent test that’s in your org but not yet in your DX project, run this command from VS Code’s integrated terminal:
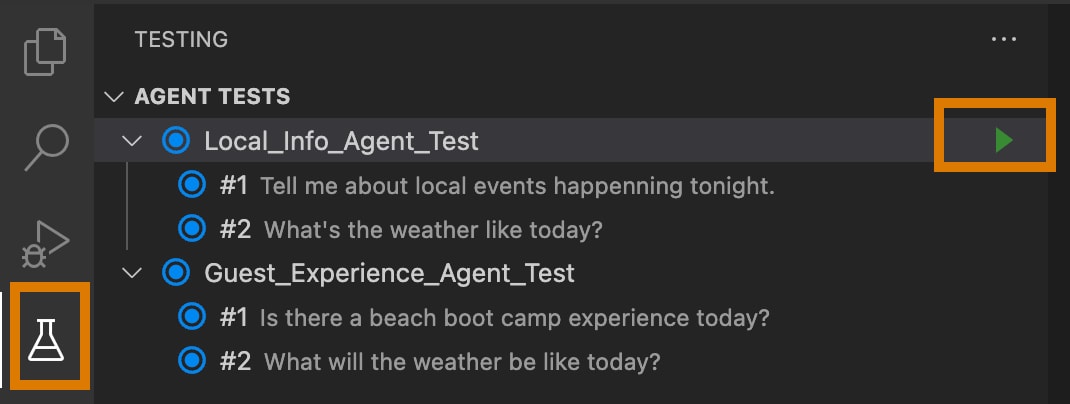
To explore the agent tests, click the beaker icon in the VS Code Activity Bar, and then open Agent Tests. The panel lists the tests it found, with the numbered test cases listed underneath. To run a test, click the arrow to the right of its name.
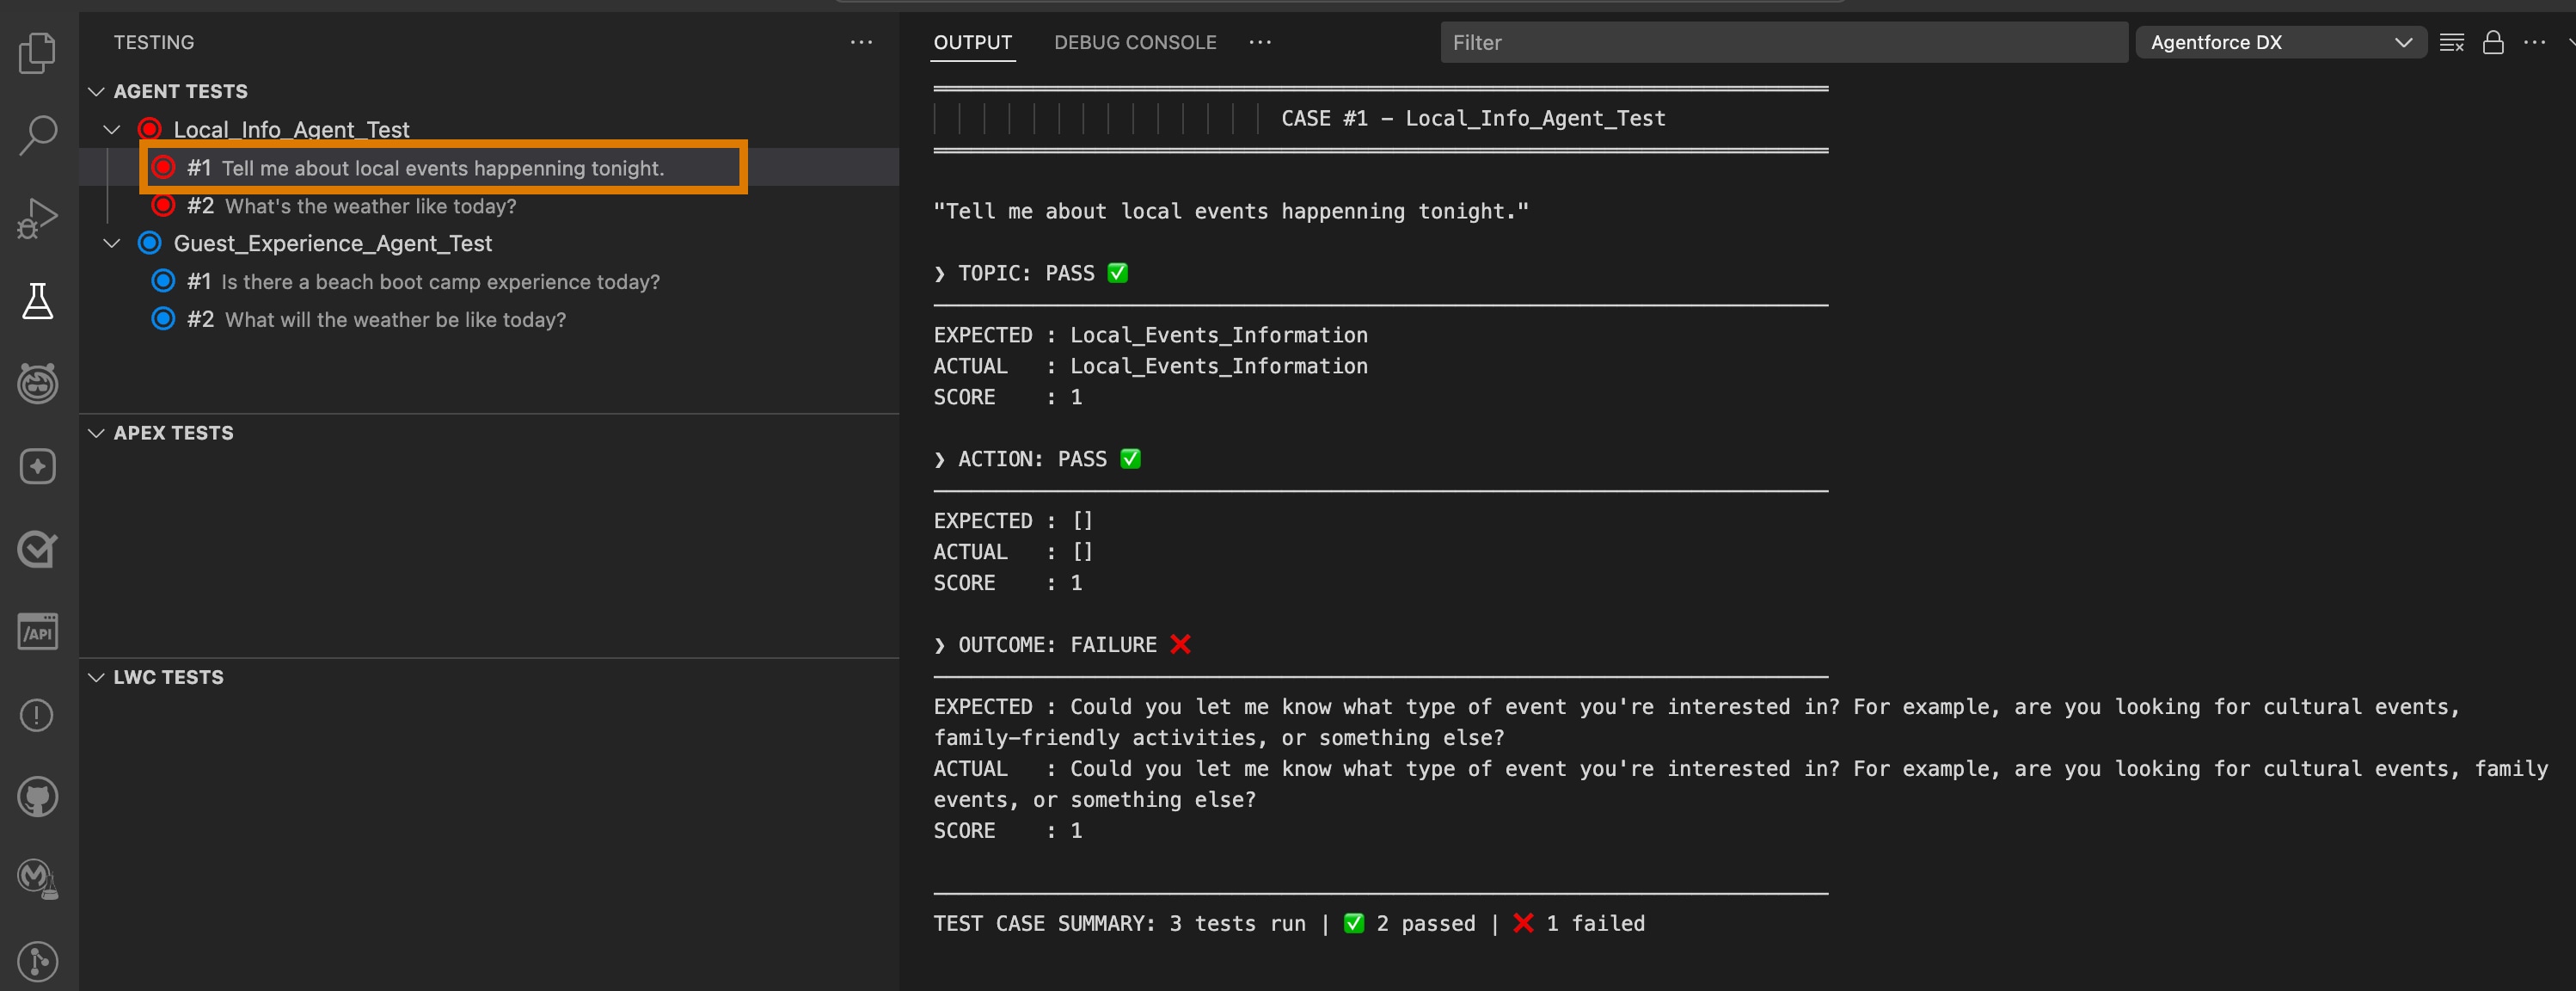
The Output panel displays the running results. After the test completes, to view detailed results, click a test case in the testing panel.
The test case results are in a slightly different format, but they show the same information as when you run the test with the CLI agent test run command. See Understand the CLI Agent Test Results.



 j
j