Build Lightning Web Components and Flows with Models API
You can use the Models API Apex classes to build Lightning web components (LWCs), flows, and other applications that have access to any of the capabilities of the Models API. This feature opens up many use cases that take advantage of generative AI and the Einstein Trust Layer. Use this page to get started with some sample implementations.
These examples are meant to demonstrate what you can do with the Models API. They’re not intended as production-quality code samples.
Prerequisites
These examples use the Models API Apex classes. Review how to use these Apex classes before proceeding.
For the Lightning web component (LWC) examples, ensure that you’re familiar with building LWCs.
- Trailhead: Lightning Web Component Trail
- Lightning Web Components Developer Guide: Get Started with Lightning Web Components
- Lightning Web Components Developer Guide: Calling Apex Methods
- Lightning Web Components Developer Guide: Call Apex Methods Imperatively
For the Flow Builder examples, ensure that you’re familiar with building Flow Builder actions.
- Salesforce Help: Flow Builder
- Salesforce Help: Let Flows Execute Apex Actions
- Apex Developer Guide: InvocableMethod Annotation
- Trailhead: Flow Builder Trail
Trailhead and Videos
The best way to get started building Lightning web components that access the Models API is to check out our Trailhead module: Get Started with the Models API.
This video shows you how to build a Lightning web component that accesses the Models API, using one of the examples on this page.
Simple Gen AI LWC
This example shows you how to build a simple component that takes a prompt, calls the Models API Generate Text capability, and passes back the generated response.

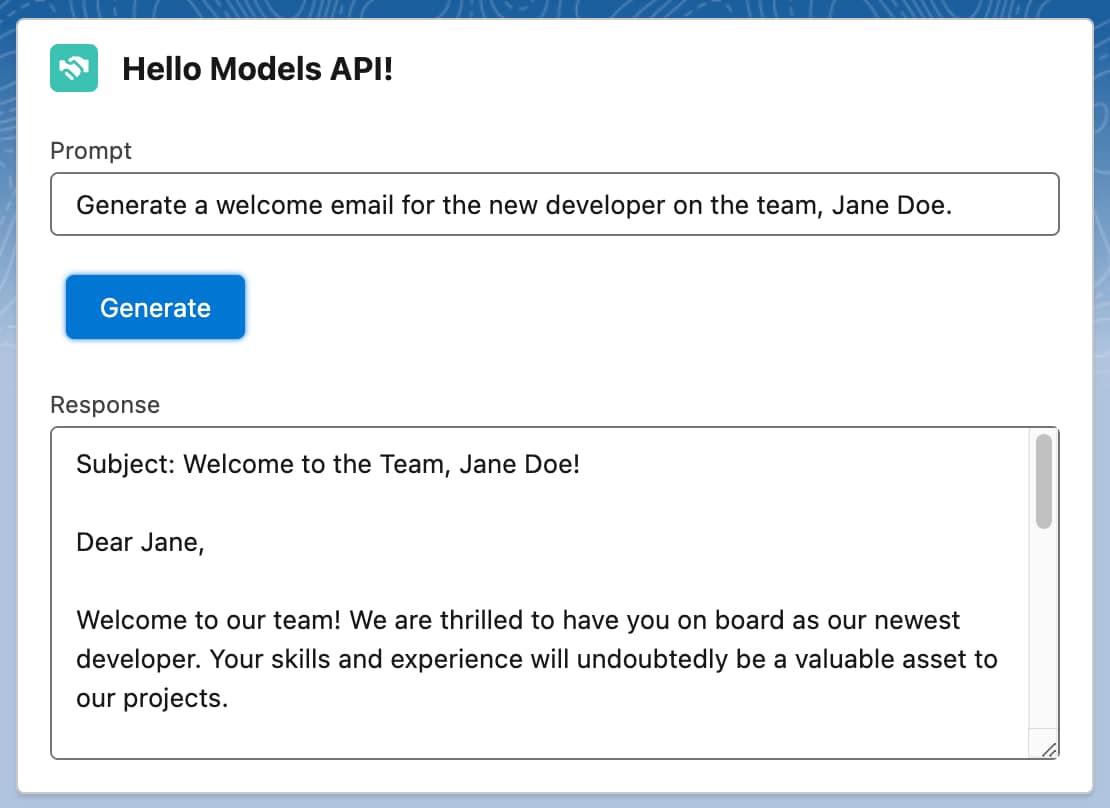
This Apex code takes a prompt as input and returns a response from the createGenerations method. You need to add this Apex code to your org so that you can call the code imperatively.
public class ModelsAPIHelloWorld {
@AuraEnabled(cacheable=true)
public static String createGeneration(String prompt) {
// Create generations request
aiplatform.ModelsAPI.createGenerations_Request request = new aiplatform.ModelsAPI.createGenerations_Request();
// Specify model
request.modelName = 'sfdc_ai__DefaultOpenAIGPT4OmniMini';
// Create request body
aiplatform.ModelsAPI_GenerationRequest body = new aiplatform.ModelsAPI_GenerationRequest();
request.body = body;
// Add prompt to body
body.prompt = prompt;
String modelsApiResponse = '';
try {
// Make request
aiplatform.ModelsAPI modelsAPI = new aiplatform.ModelsAPI();
aiplatform.ModelsAPI.createGenerations_Response response = modelsAPI.createGenerations(request);
// Add response to return value
modelsApiResponse = response.Code200.generation.generatedText;
// Handle error
} catch(aiplatform.ModelsAPI.createGenerations_ResponseException e) {
System.debug('Response code: ' + e.responseCode);
System.debug('The following exception occurred: ' + e);
// Add error to the return value
modelsApiResponse = 'Unable to get a valid response. Error code: ' + e.responseCode;
}
// Return response
return modelsApiResponse;
}
}This HTML code presents a simple UI that contains an input field for the prompt, a button to generate the text, and an output field for the response.
<template>
<lightning-card title="Hello Models API!" icon-name="custom:custom14">
<div class="slds-m-around_medium">
<lightning-input label="Prompt" value={prompt} onchange={handlePromptChange}>
></lightning-input>
<br/>
<lightning-button variant="brand" label="Generate" title="Generate response" onclick={handleClick} class="slds-m-left_x-small"></lightning-button>
<br/><br/>
<lightning-textarea label="Response" value={response} readonly> </lightning-textarea>
</div>
</lightning-card>
</template>This JavaScript code handles the button click event and makes a request to the Apex method.
import { LightningElement } from 'lwc';
import createGeneration from '@salesforce/apex/ModelsAPIHelloWorld.createGeneration';
export default class HelloWorld extends LightningElement {
prompt = 'Generate a welcome email for the new developer on the team, Jane Doe.';
response = '';
handlePromptChange(event) {
this.prompt = event.target.value;
}
handleClick(event) {
this.response = 'Working…';
createGeneration({ prompt: this.prompt })
.then(result => {
this.response = result;
this.error = undefined;
})
.catch(error => {
this.response = 'Error';
this.error = error;
})
}
}Simple Gen AI Flow
This example shows you how to build an Apex invocable action compatible with Flow Builder that takes a prompt, calls the Models API Generate Text capability, and returns the generated response.

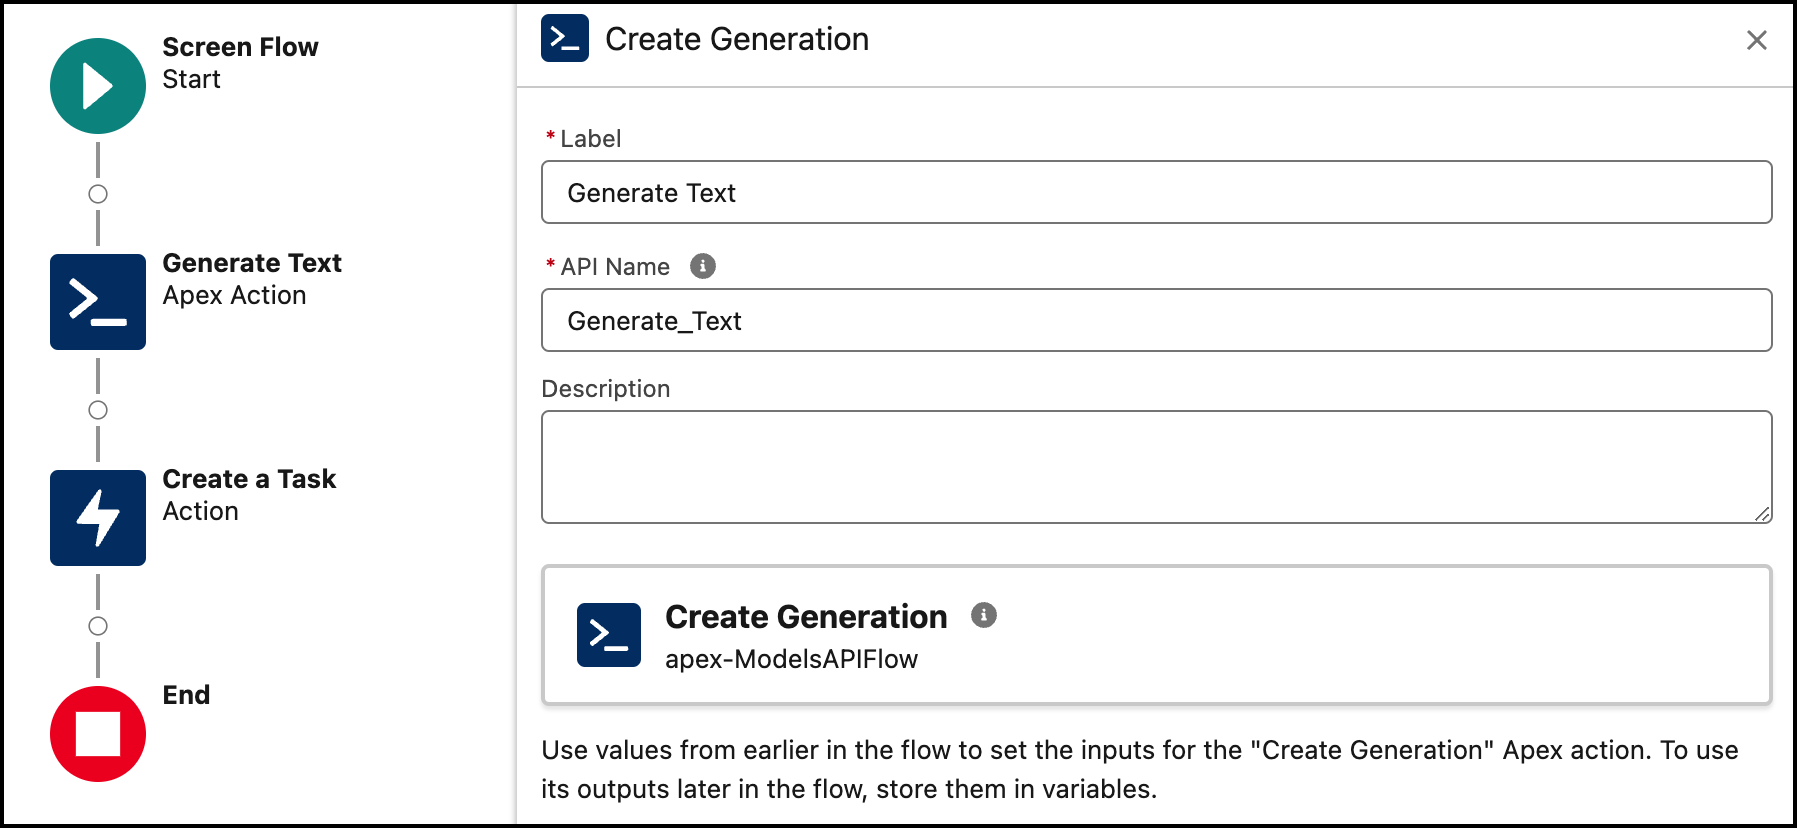
This Apex code takes a prompt as input and returns a response from the model. It uses the @InvocableMethod annotation so that it can be accessed from Flow Builder.
public class ModelsAPIFlow {
@InvocableMethod(label='Generate Text' description='Use the Models API to generate text')
public static List<FlowOutput> createGeneration(List<FlowInput> inputVariables) {
// Create generations request
aiplatform.ModelsAPI.createGenerations_Request request = new aiplatform.ModelsAPI.createGenerations_Request();
// Specify model
request.modelName = 'sfdc_ai__DefaultOpenAIGPT4OmniMini';
// Create request body
aiplatform.ModelsAPI_GenerationRequest body = new aiplatform.ModelsAPI_GenerationRequest();
request.body = body;
// Add prompt to body using the input variable
body.prompt = inputVariables.get(0).prompt;
// Prepare output object
FlowOutput output = new FlowOutput();
try {
// Make request
aiplatform.ModelsAPI modelsAPI = new aiplatform.ModelsAPI();
aiplatform.ModelsAPI.createGenerations_Response response = modelsAPI.createGenerations(request);
// Add response to the output
output.response = response.Code200.generation.generatedText;
// Handle error
} catch(aiplatform.ModelsAPI.createGenerations_ResponseException e) {
System.debug('Response code: ' + e.responseCode);
System.debug('The following exception occurred: ' + e);
// Add error to the output
output.response = 'Unable to get a valid response. Error code: ' + e.responseCode;
}
// Create result
List<FlowOutput> result = new List<FlowOutput>();
result.add(output);
// Return result
return result;
}
public class FlowInput{
@InvocableVariable public String prompt;
}
public class FlowOutput{
@InvocableVariable public String response;
}
}Prompt Engineering LWC
This example shows you how to use the Models API Generate Chat capability to build a component that takes a system prompt and a user prompt and produces a response. This example allows you to experiment with various prompt engineering patterns, such as chain-of-thought (CoT) prompting.

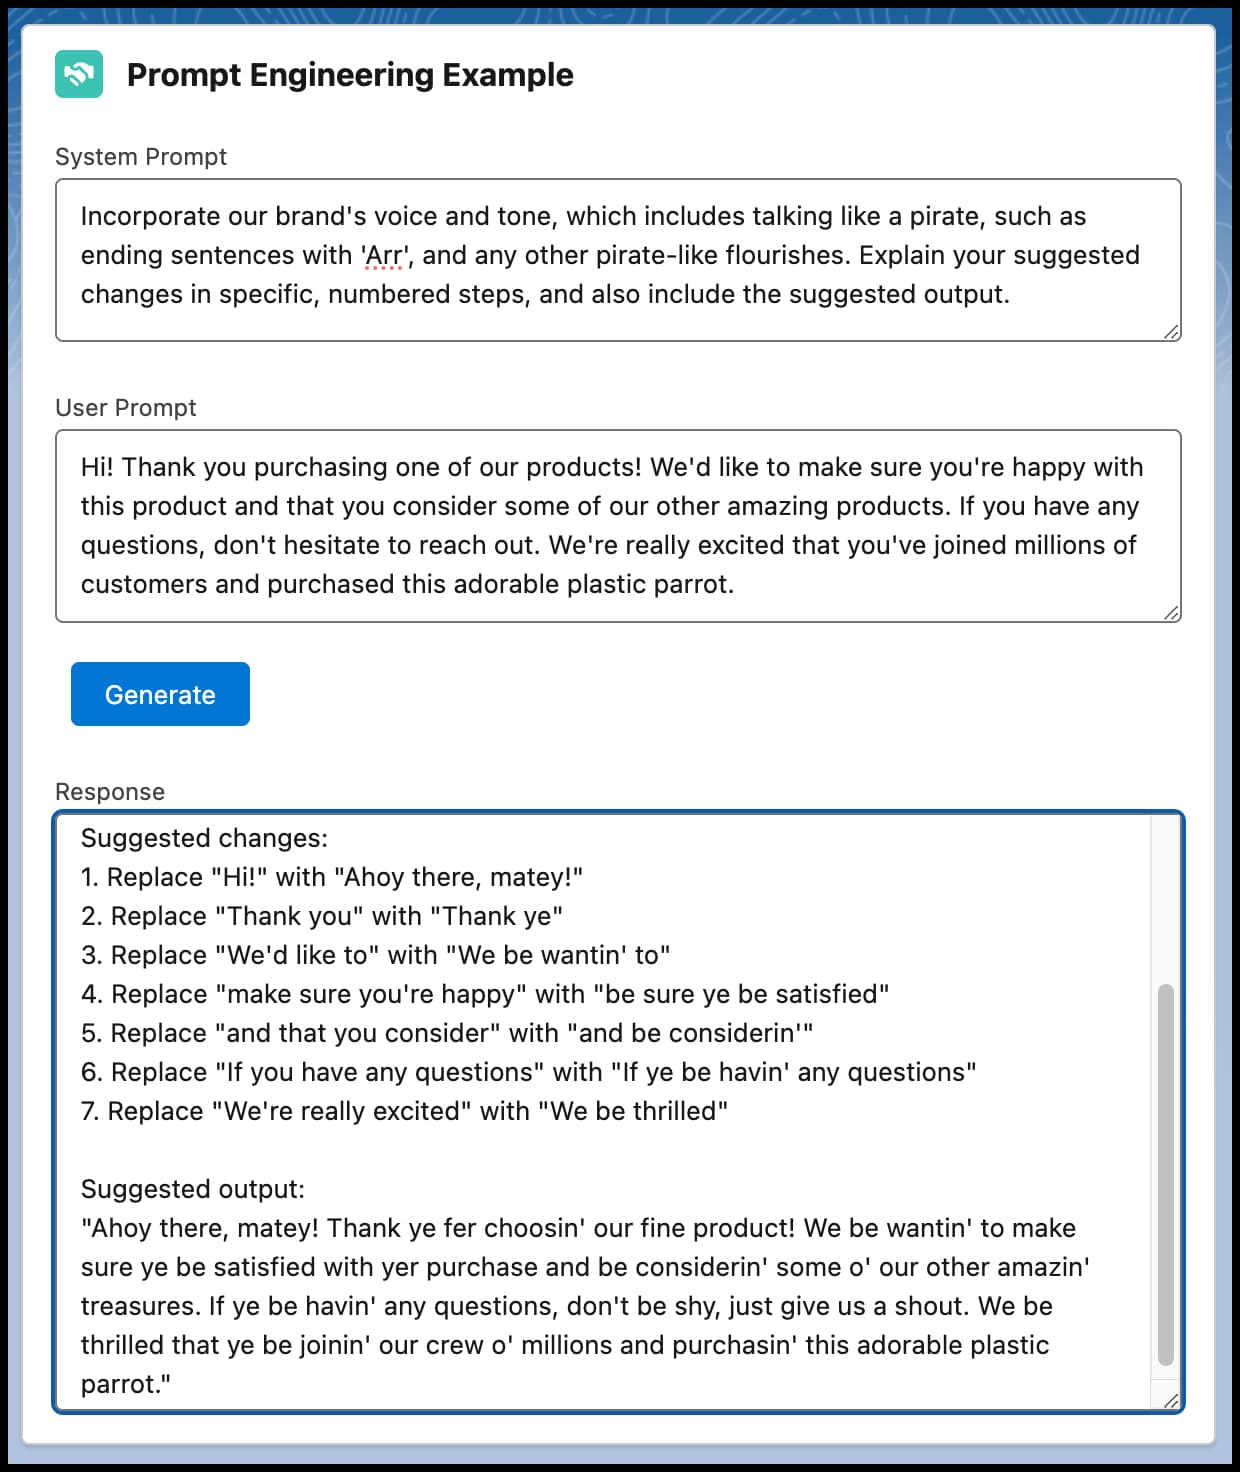
This Apex code takes the system and user prompts and calls the Generate Chat capability of the Models API.
public class ModelsAPIChat {
@AuraEnabled(cacheable=true)
public static String createChat(String systemPrompt, String userPrompt) {
// Create chat generations request
aiplatform.ModelsAPI.createChatGenerations_Request request = new aiplatform.ModelsAPI.createChatGenerations_Request();
// Specify model
request.modelName = 'sfdc_ai__DefaultOpenAIGPT4OmniMini';
// Create request body
aiplatform.ModelsAPI_ChatGenerationsRequest body = new aiplatform.ModelsAPI_ChatGenerationsRequest();
request.body = body;
// Create a list to hold chat messages
List<aiplatform.ModelsAPI_ChatMessageRequest> messagesList = new List<aiplatform.ModelsAPI_ChatMessageRequest>();
// Add system message
aiplatform.ModelsAPI_ChatMessageRequest systemMessageRequest = new aiplatform.ModelsAPI_ChatMessageRequest();
systemMessageRequest.content = systemPrompt;
systemMessageRequest.role = 'system';
messagesList.add(systemMessageRequest);
// Add user message
aiplatform.ModelsAPI_ChatMessageRequest userMessageRequest = new aiplatform.ModelsAPI_ChatMessageRequest();
userMessageRequest.content = userPrompt;
userMessageRequest.role = 'user';
messagesList.add(userMessageRequest);
// Set the messages in the request body
body.messages = messagesList;
// Set the request body and model name
request.body = body;
String response = '';
try {
// Call the API and get the response
aiplatform.ModelsAPI modelsAPI = new aiplatform.ModelsAPI();
aiplatform.ModelsAPI.createChatGenerations_Response apiResponse = modelsAPI.createChatGenerations(
request
);
// Check that we have a non-null response
if (
apiResponse?.Code200?.generationDetails?.generations != null &&
!apiResponse.Code200.generationDetails.generations.isEmpty()
) {
// Set the variable from the response
response = apiResponse.Code200.generationDetails.generations[0]
.content;
} else {
// Handle the case where response is null
response = 'No content generated';
}
// Handle error
} catch(aiplatform.ModelsAPI.createChatGenerations_ResponseException e) {
System.debug('Response code: ' + e.responseCode);
System.debug('The following exception occurred: ' + e);
// Add error to the output
response = 'Unable to get a valid response. Error code: ' + e.responseCode;
}
return response;
}
}This HTML code contains the user interface for the prompts and the response.
<template>
<lightning-card title="Prompt Engineering Example" icon-name="custom:custom14">
<div class="slds-m-around_medium">
<lightning-input label="System Prompt" value={system_prompt} onchange={handleSystemPromptChange}>
></lightning-input>
<br/>
<lightning-input label="User Prompt" value={user_prompt} onchange={handleUserPromptChange}>
></lightning-input>
<br/>
<lightning-button variant="brand" label="Generate" title="Generate response" onclick={handleClick} class="slds-m-left_x-small"></lightning-button>
<br/><br/>
<lightning-textarea label="Response" value={response} readonly> </lightning-textarea>
</div>
</lightning-card>
</template>This JavaScript passes prompt information to the Apex code.
import { LightningElement } from 'lwc';
import createChat from '@salesforce/apex/ModelsAPIChat.createChat';
export default class HelloWorld extends LightningElement {
system_prompt = 'Think about it in small, simple steps.';
user_prompt = '';
response = '';
handleSystemPromptChange(event) {
// Update the system prompt when a new option is selected in the combobox
this.system_prompt = event.target.value;
}
handleUserPromptChange(event) {
// Update the user prompt when a new option is selected in the combobox
this.user_prompt = event.target.value;
}
handleClick(event) {
this.response = 'Processing your question… One moment.';
createChat({ systemPrompt: this.system_prompt, userPrompt: this.user_prompt })
.then(result => {
this.response = result;
this.error = undefined;
})
.catch(error => {
this.error = error;
this.accounts = undefined;
})
}
}Chat LWC
This example shows you how to build a simple chat component that uses the Models API Generate Chat capability to build a chat interface.

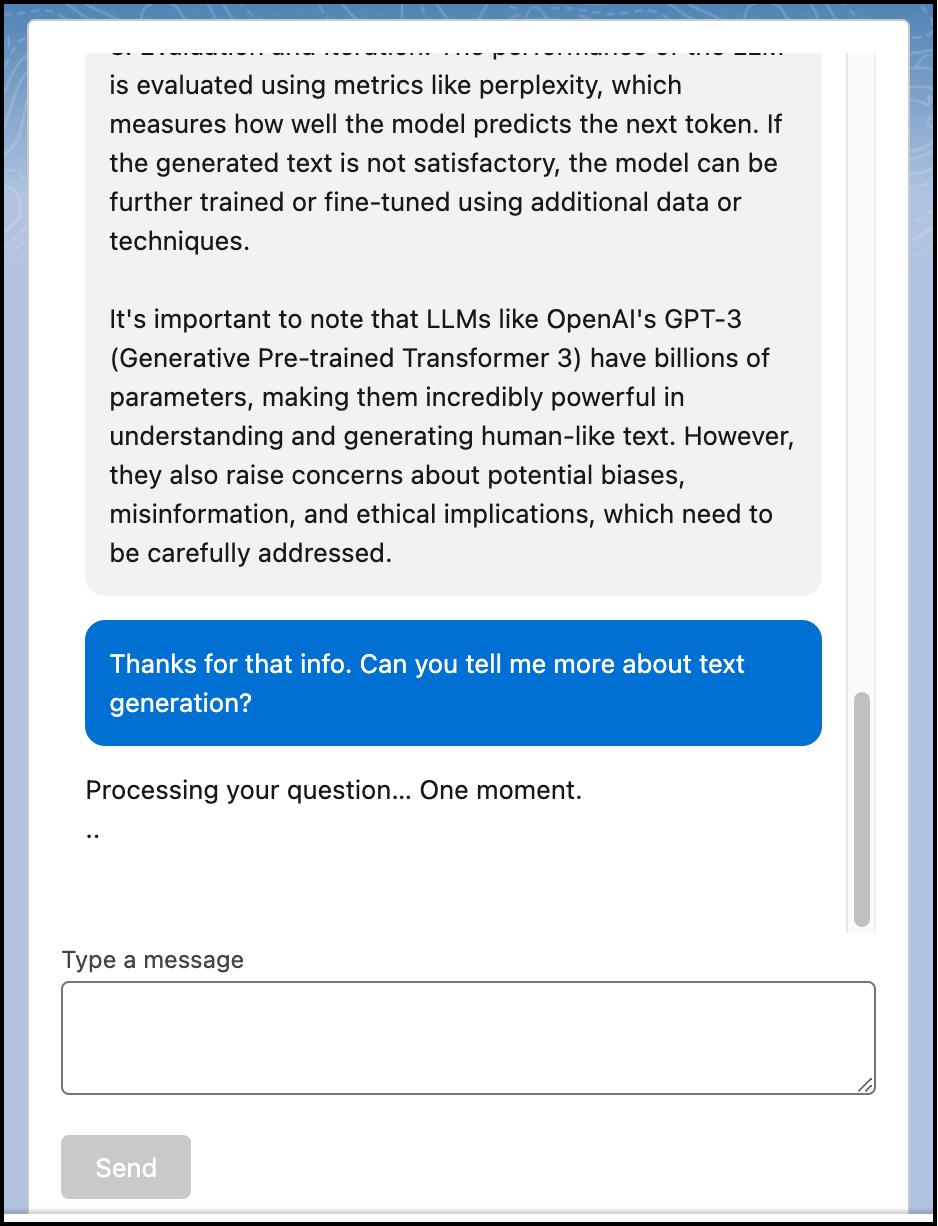
This Apex code parses the chat input messages and calls the Generate Chat capability of the Models API.
public with sharing class ModelsAPIChatGenerations {
@AuraEnabled
public static String createChatGenerations(String input) {
List<ChatMessage> messages = (List<ChatMessage>) JSON.deserialize(
input,
List<ChatMessage>.class
);
// Instantiate the API class
aiplatform.ModelsAPI modelsAPI = new aiplatform.ModelsAPI();
// Prepare the request and body objects
aiplatform.ModelsAPI.createChatGenerations_Request request = new aiplatform.ModelsAPI.createChatGenerations_Request();
aiplatform.ModelsAPI_ChatGenerationsRequest body = new aiplatform.ModelsAPI_ChatGenerationsRequest();
// Specify model
request.modelName = 'sfdc_ai__DefaultOpenAIGPT4OmniMini';
// Create a list to hold chat messages
List<aiplatform.ModelsAPI_ChatMessageRequest> messagesList = new List<aiplatform.ModelsAPI_ChatMessageRequest>();
// Loop through the input messages and create message requests
for (ChatMessage msg : messages) {
aiplatform.ModelsAPI_ChatMessageRequest messageRequest = new aiplatform.ModelsAPI_ChatMessageRequest();
messageRequest.content = msg.message != null ? msg.message : ''; // Handle null message
messageRequest.role = msg.role != null ? msg.role : 'user'; // Handle null role
messagesList.add(messageRequest);
}
// Set the messages in the request body
body.messages = messagesList;
// Set the request body and model name
request.body = body;
String response = '';
try {
// Call the API and get the response
aiplatform.ModelsAPI.createChatGenerations_Response apiResponse = modelsAPI.createChatGenerations(
request
);
// Check that we have a non-null response
if (
apiResponse?.Code200?.generationDetails?.generations != null &&
!apiResponse.Code200.generationDetails.generations.isEmpty()
) {
// Set the variable from the response
response = apiResponse.Code200.generationDetails.generations[0]
.content;
} else {
// Handle the case where response is null
response = 'No content generated';
}
// Handle error
} catch(aiplatform.ModelsAPI.createChatGenerations_ResponseException e) {
System.debug('Response code: ' + e.responseCode);
System.debug('The following exception occurred: ' + e);
// Add error to the output
response = 'Unable to get a valid response. Error code: ' + e.responseCode;
}
return response;
}
}This Apex class holds information about a chat message.
public class ChatMessage {
@AuraEnabled
public String role;
@AuraEnabled
public String message;
public ChatMessage() {
}
public ChatMessage(String role, String message) {
this.role = role;
this.message = message;
}
}This HTML code contains the user interface for the chat component.
<template>
<div
class="slds-var-m-around_medium slds-grid slds-grid_vertical slds-box slds-theme_default"
>
<!-- Chat messages container -->
<div
class="slds-scrollable_y"
style="height: 440px"
lwc:ref="chatContainer"
>
<!-- Iterate over each message in the messages array -->
<template for:each={messages} for:item="message">
<div key={message.id} class="slds-var-m-around_small">
<!-- If the message is from the user -->
<template lwc:if={message.isUser}>
<div class="custom-chat-message_outbound slds-var-p-around_small">
<div class="slds-chat-message__body">
<div class="slds-chat-message__text">{message.text}</div>
</div>
</div>
</template>
<!-- If the message is from the assistant -->
<template lwc:else>
<div class="custom-chat-message_inbound slds-var-p-around_small">
<div class="slds-chat-message__body">
<div class="slds-chat-message__text">{message.text}</div>
</div>
</div>
</template>
</div>
</template>
<!-- Loading indicator -->
<template lwc:if={isLoading}>
<div class="loading-container slds-var-m-around_small">
<div class="loading-text">
Processing your question… One moment.
</div>
<div class="loading-indicator"></div>
</div>
</template>
</div>
<!-- User input textarea -->
<div class="slds-grid slds-grid_vertical-align-center">
<lightning-textarea
class="custom-textarea slds-size_full"
label="Type a message"
value={userMessage}
onchange={handleInputChange}
style="margin-bottom: 20px"
></lightning-textarea>
</div>
<!-- Send button -->
<div class="slds-grid slds-grid_vertical-align-center">
<div class="slds-col slds-size_1-of-4">
<lightning-button
label="Send"
variant="brand"
onclick={handleSendMessage}
disabled={isLoading}
></lightning-button>
</div>
</div>
</div>
</template>This JavaScript passes user interface information to the Apex code.
import { LightningElement, track } from "lwc";
import createChatGenerations from "@salesforce/apex/ModelsAPIChatGenerations.createChatGenerations";
export default class CustomChat extends LightningElement {
@track messages = []; // Array to store chat messages
userMessage = ""; // User input message
isLoading = false; // Track loading state
// Handle user input change
handleInputChange(event) {
this.userMessage = event.target.value;
}
// Scroll to the bottom of the chat container
renderedCallback() {
this.scrollToBottom();
}
// Handle send message button click
handleSendMessage() {
if (this.userMessage.trim()) {
const userMessageObj = {
id: this.messages.length + 1,
text: this.userMessage,
role: "user",
isUser: true,
};
// Add user message to the messages array
this.messages = [...this.messages, userMessageObj];
this.isLoading = true; // Show loading indicator
// Prepare message array for API call
let messageArray = this.messages.map((msg) => ({
role: msg.isUser ? "user" : "assistant",
message: msg.text,
}));
// Call Apex method to fetch chat response
createChatGenerations({ input: JSON.stringify(messageArray) })
.then((result) => {
this.simulateTypingEffect(result);
})
.catch((error) => {
console.error("Error fetching bot response", JSON.stringify(error));
})
.finally(() => {
this.isLoading = false; // Hide loading indicator
});
this.userMessage = ""; // Clear user input
}
}
// Simulate typing effect for the chat response
simulateTypingEffect(fullText) {
const words = fullText.split(" ");
let currentIndex = 0;
let displayText = "";
const intervalId = setInterval(() => {
if (currentIndex < words.length) {
displayText += words[currentIndex] + " ";
const botResponseObj = {
id: this.messages.length + 1,
text: displayText.trim(),
role: "assistant",
isUser: false,
};
// Replace the last message if it’s the bot’s typing message
if (currentIndex > 0) {
this.messages.splice(this.messages.length - 1, 1, botResponseObj);
} else {
this.messages = [...this.messages, botResponseObj];
}
this.scrollToBottom();
currentIndex++;
} else {
clearInterval(intervalId);
}
}, 30); // Adjust typing speed (ms per word)
}
// Scroll to the bottom of the chat container
scrollToBottom() {
const chatContainer = this.template.querySelector(".slds-scrollable_y");
if (chatContainer) {
chatContainer.scrollTop = chatContainer.scrollHeight;
}
}
}This CSS code styles the user interface to look like a chat experience.
.custom-chat-message_inbound {
border-radius: 10px;
max-width: 100%;
background-color: #f3f2f2;
align-self: flex-start;
}
.custom-chat-message_outbound {
border-radius: 10px;
max-width: 100%;
background-color: #0070d2;
color: white;
align-self: flex-end;
}
.custom-textarea {
width: 100%;
}
.loading-indicator {
width: 50px;
height: 50px;
overflow: hidden;
vertical-align: middle;
position: relative;
}
.loading-indicator::after {
content: "";
display: inline-block;
width: 50px;
height: 50px;
overflow: hidden;
position: absolute;
top: 50%;
left: 50%;
transform: translate(-50%, -50%);
animation: loading 1s infinite steps(7);
}
@keyframes loading {
0% {
content: ".";
}
12.5% {
content: "..";
}
25% {
content: "...";
}
37.5% {
content: ".....";
}
50% {
content: "......";
}
62.5% {
content: "........";
}
75% {
content: "............";
}
87.5% {
content: "";
}
}See Also
- Models API Developer Guide: Access Models API with Apex
- Trailhead: Get Started with the Models API
