
Appearance
Exercise 3: Connect to Salesforce and Add Workflow
In this exercise, you'll turn the Merchant Operations Center into a Salesforce-backed app. You'll replace the mock data, add related Order details, recommend next actions, and polish the interface.
No @wire here
React apps don't use @wire or lightning/* modules. Data comes from the Data SDK:
- GraphQL on top of UI API, so object, field, and sharing rules are enforced like in any Lightning component.
- Apex is reachable only through Apex REST endpoints, not
@AuraEnabledmethods. - Responses are cached for 5 minutes by default, but writes don't refresh that cache. Refresh it yourself after saving.
Step 1: Replace Mock Data with Salesforce Data
Use this prompt to connect the app to Salesforce data:
txtContext: this org's Order__c sample data only covers April 2026 and July 2026. There is no order data for recent dates, so do not calculate any metric using "today" or a recent rolling date window unless a step explicitly asks for it. Replace the mock storefront data in Merchant Operations Center with real Salesforce data. Load Storefront__c records directly. For each Storefront__c record, calculate: - Storefront Name - Cuisine - City - Orders Today from related Order__c records placed today - Average Monthly Revenue: total revenue from related Order__c records divided by the number of distinct months that have orders - Average Rating from Average_Review_Score__c - Open Orders: count of related Order__c records in an open status, regardless of order date Keep the existing filters, search, sorting, summary cards, and detail panel. Add loading and error states.Review the data access approach Vibes chooses.
If Vibes needs to create or update Salesforce metadata, approve the changes only after reviewing what it plans to change.
Preview the app and confirm that loading and error states are handled.
Step 2: Show Related Orders
Use this prompt to add Order details:
txtContext: this org's Order__c sample data only covers April 2026 and July 2026, so do not filter Orders by a recent date window. Update the storefront detail panel to show related Orders. For the selected storefront, show: - Open Orders: any related Order__c record in an open status, regardless of order date - Completed Orders: any related Order__c record in a completed status, regardless of order date For each Order, display: - Order number - Customer name - Status - Amount - Order datePreview the app and select a storefront.
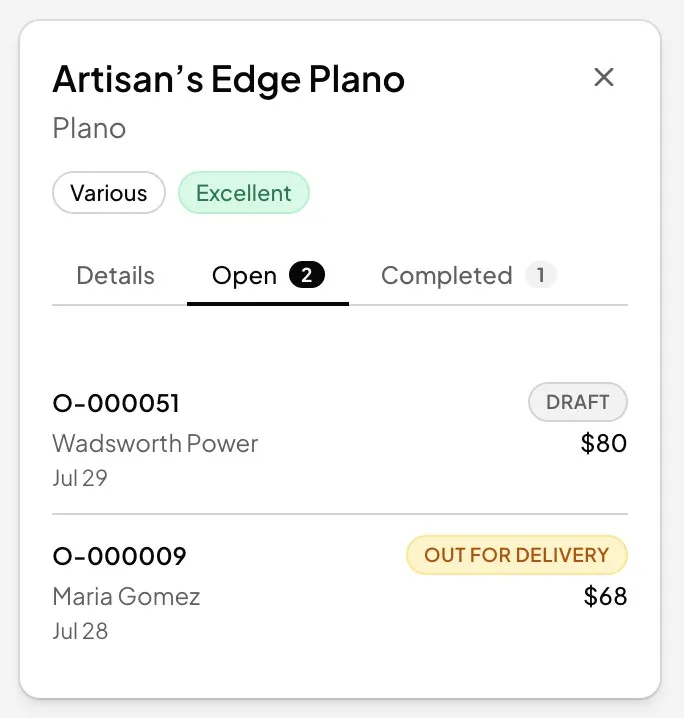
Confirm that the detail panel shows related Orders.
Step 3: Add Recommended Next Actions
Use this prompt to add simple workflow guidance:
txtAdd recommended next actions to the storefront detail panel. Use these rules: - If average rating is 4.5 or higher, recommend featuring the storefront in the app - If open orders are high but revenue is low, recommend reviewing order fulfillment - If average rating is below 3.5 but total review count is low, recommend flagging the storefront for closer monitoring rather than immediate action - If average rating is below 3.5 and total review count is high, recommend scheduling a storefront performance reviewPreview the app and select storefronts with different performance levels.
Confirm that the recommendation changes based on the selected storefront.
Step 4: Polish the UI
Use this prompt to improve the final app without changing the scope:
txtPolish the Merchant Operations Center UI. Improve spacing, card layout, typography, empty states, and responsive behavior. Update the storefront detail view so it opens in a modal instead of a side panel. The modal has a sticky header, a scrollable body, and a sticky footer. Use a flex column layout: the dialog container gets `flex flex-col`, the scrollable body region gets `flex-1 overflow-y-auto`, and the footer is a plain `shrink-0` sibling. Never nest the footer inside the scrollable region. Keep the design Salesforce-inspired and professional. Do not add new features.Preview the app on a wide screen and a narrower screen.
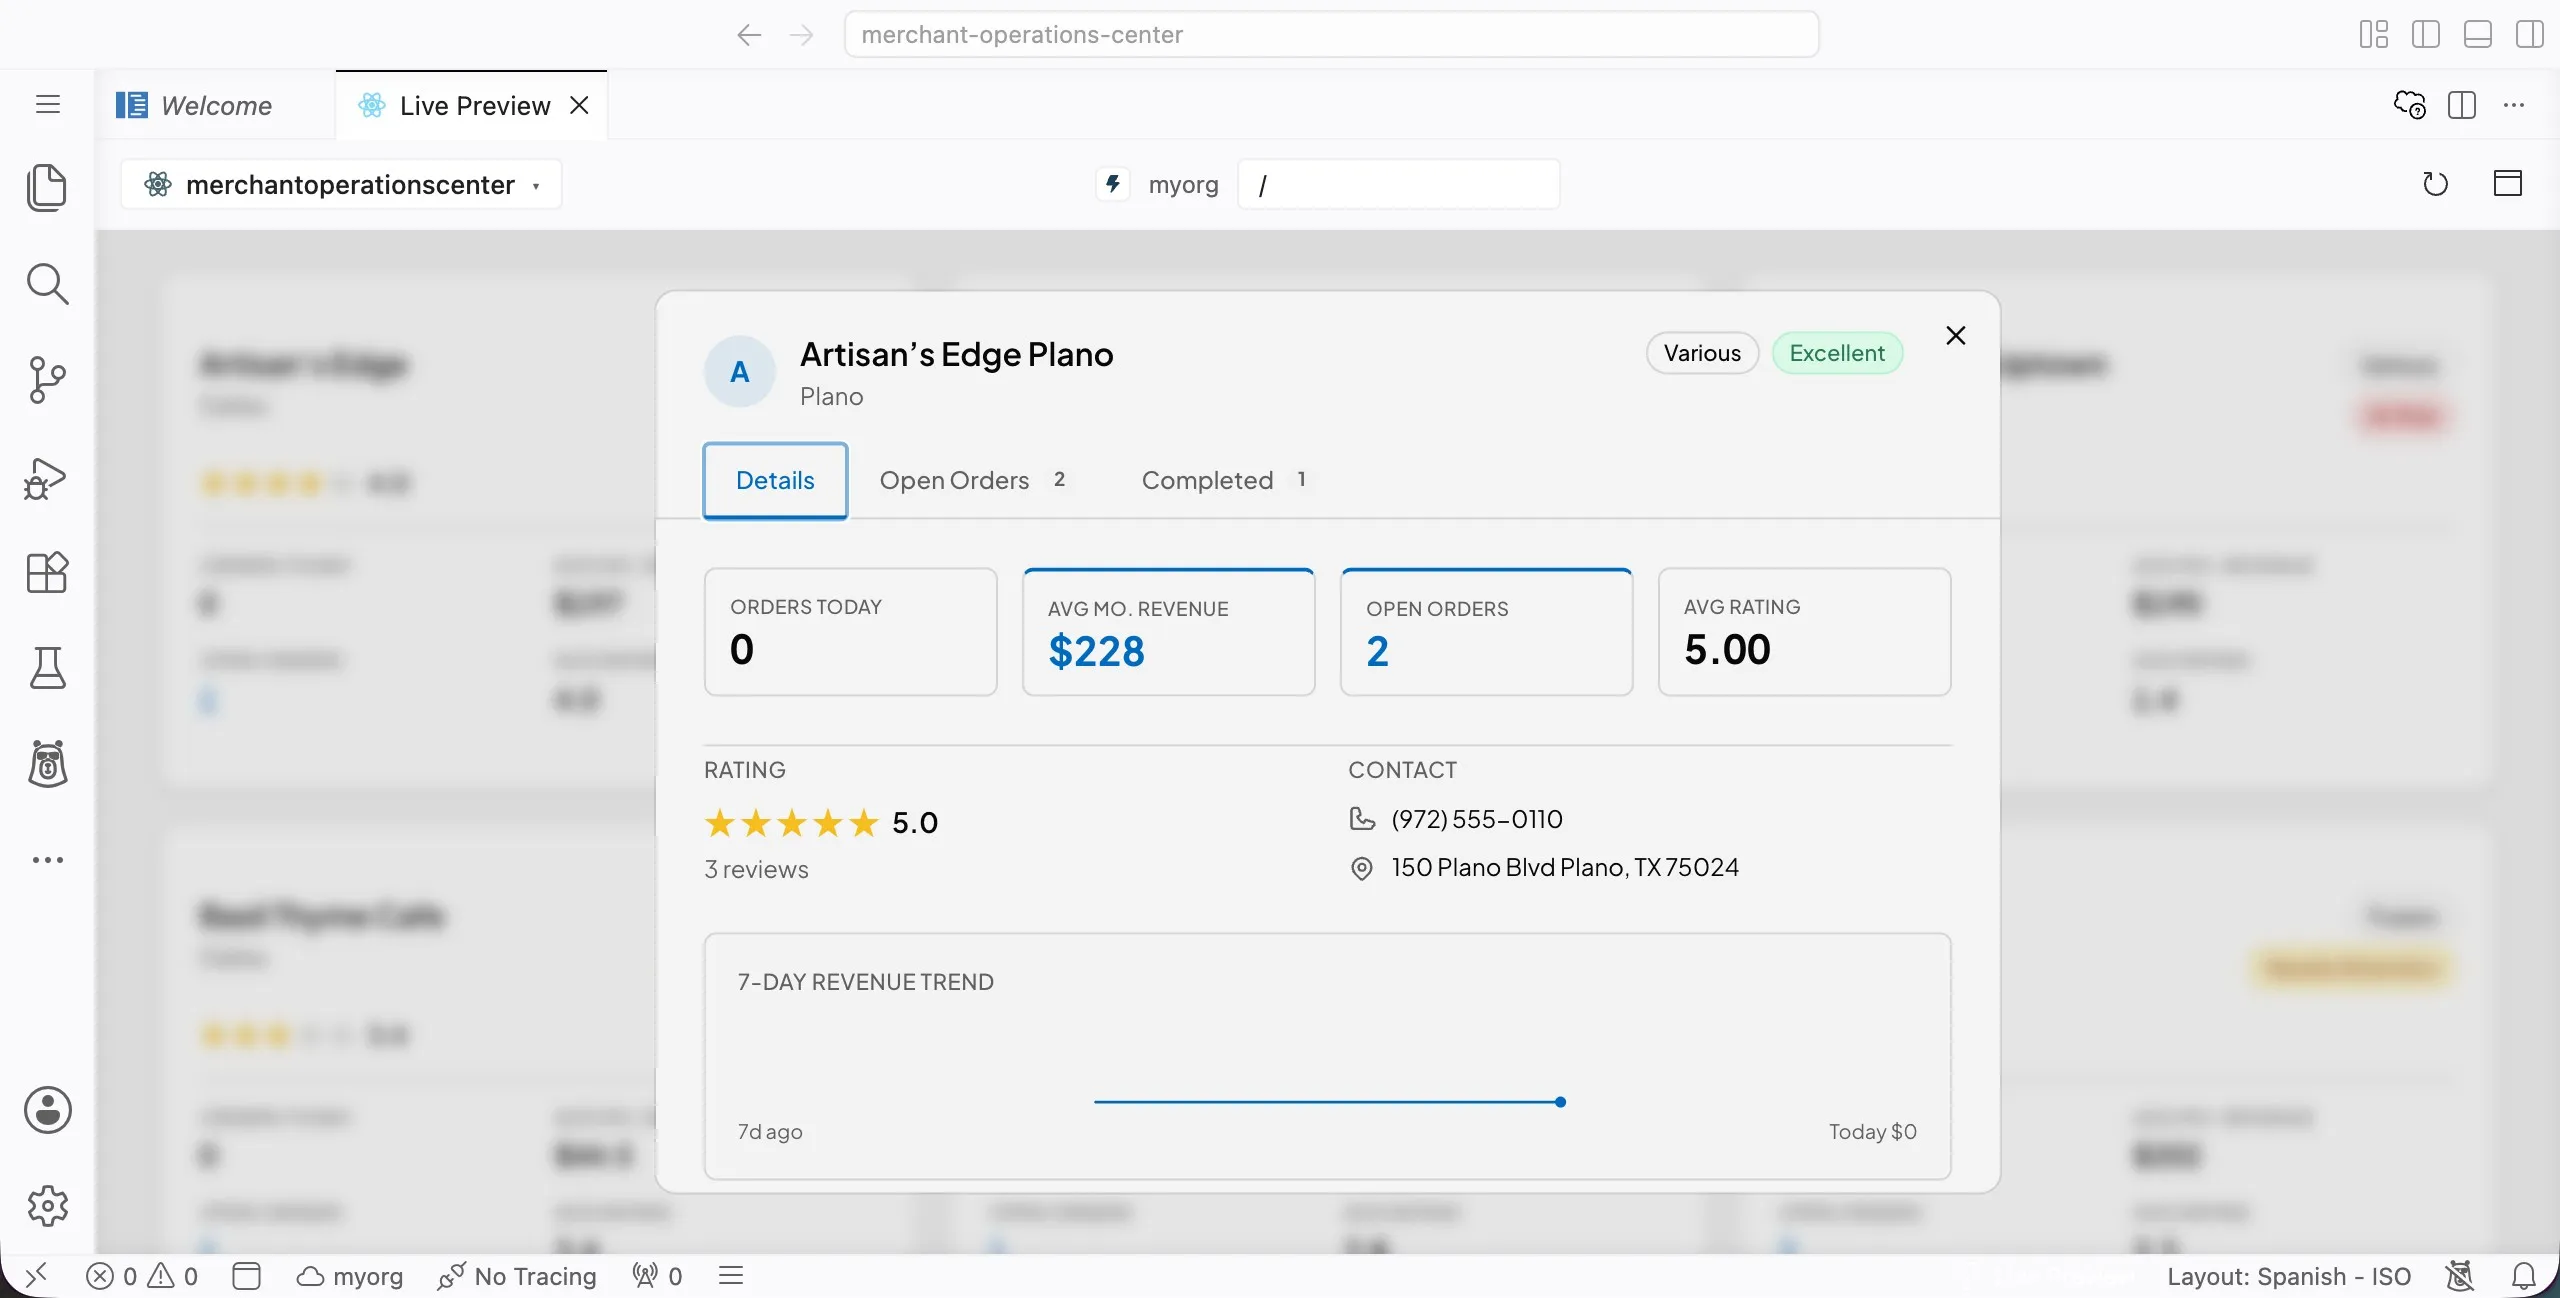
Confirm that the app still supports filters, search, sorting, the detail modal, Order details, and recommendations.
Step 5: Create a Follow-Up Task from the Modal
Use this prompt to add an action from the modal UI:
txtAdd a Create Follow-Up Task action to the storefront detail modal. Add a Create Follow-Up Task button in the footer of the storefront detail modal. When a user clicks the button, open a modal form that lets them create a Task for the selected Storefront__c record. This modal also has a sticky header, a scrollable body, and a sticky footer. Use the same flex column layout: the dialog container gets `flex flex-col`, the scrollable body region gets `flex-1 overflow-y-auto`, and the footer is a plain `shrink-0` sibling, never nested inside the scrollable region. The modal form should include: - Subject - Due date - Priority - Comments Default the subject based on the recommended next action. When the user saves, create the Task in Salesforce and relate it to the selected Storefront__c record. Show success and error states. Keep the UI simple and Salesforce-inspired.Preview the app and open a storefront detail modal.
Click Create Follow-Up Task and confirm that the form opens.
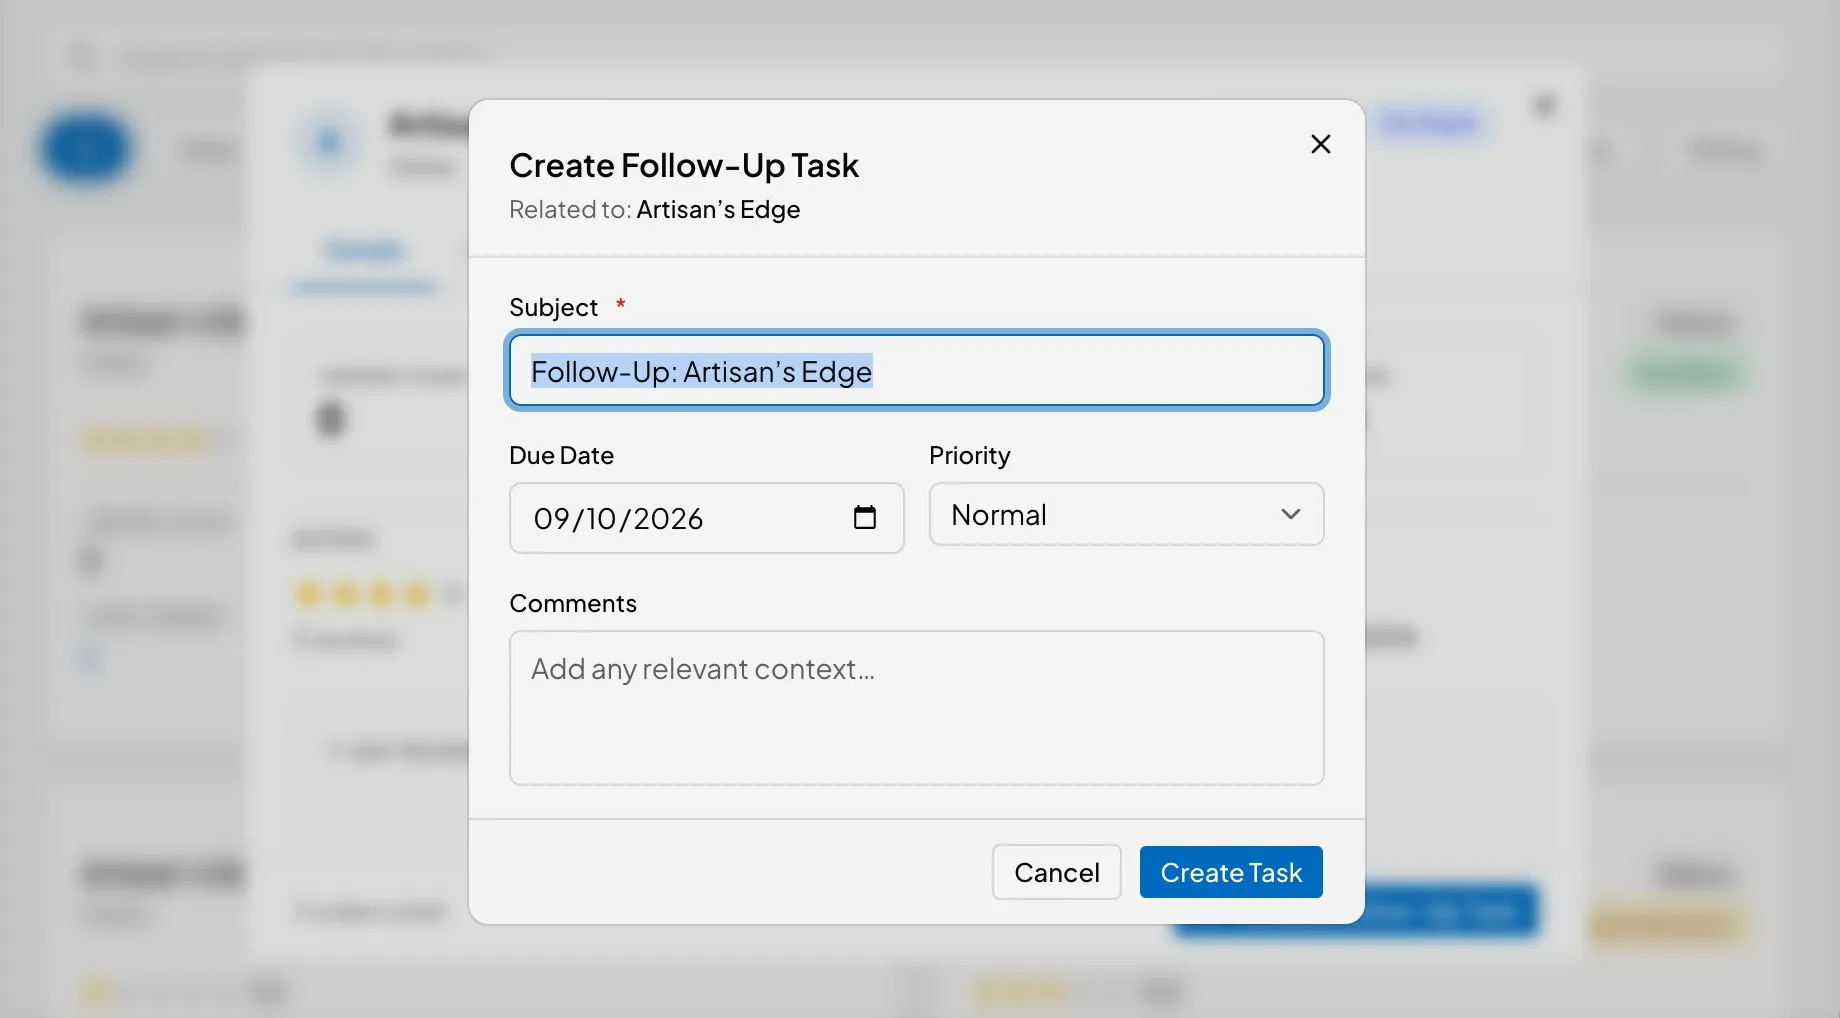
Save a test task and confirm that the app shows a success state.
Summary
- You replaced mock data with Salesforce data.
- You kept the React interactions from the previous exercise.
- You added related Orders to the detail panel.
- You added recommended next actions.
- You created follow-up Tasks from the storefront detail modal.
- You polished the app without adding extra scope.
You now have a Salesforce-backed React app that helps merchant operations teams understand storefront performance and choose the next best action.