Server-Side Campaigns and Templates
Marketing Cloud Personalization allows business users to build server-side campaigns and templates using a streamlined version of the web templates editor and the same campaign builder that you are familiar with from web campaigns. By leveraging the same campaign builder and the same underlying template infrastructure, clients can more easily extend campaigns across channels and even build a single campaign that multiple applications can call. Server-side campaigns are available to Premium Edition clients.
- Log in to your Personalization Account.
- Navigate to the dataset where you want to build your server-side campaign.
-
Select Server-Side from the left-hand navigation in the Channels & Campaigns section. Doing so takes you to a screen where you can view all of your published & disabled server-side campaigns. (Published campaigns have bolded names. Names of unpublished campaigns are not bolded.)
-
To create a campaign, click New Campaign.
a. When you create a new server-side campaign, it will open the campaign interface and have a campaign targeting rule of
channel: Serverapplied by default.The campaign level
channel: Serverrule means that by default, a server-side campaign requires the/autheventAPI endpoint and an API token to return a response.b. Campaign targeting rules are configurable by the business user. For more information about channel targeting, see Campaign Targeting and Experience Rules.
Creating a new server-side campaign using the Classic editor is no longer supported for clients leveraging the campaigns & templates system. If you have existing server-side Classic campaigns, they continue to function and you can still access and edit those campaigns, but you cannot create a new one.
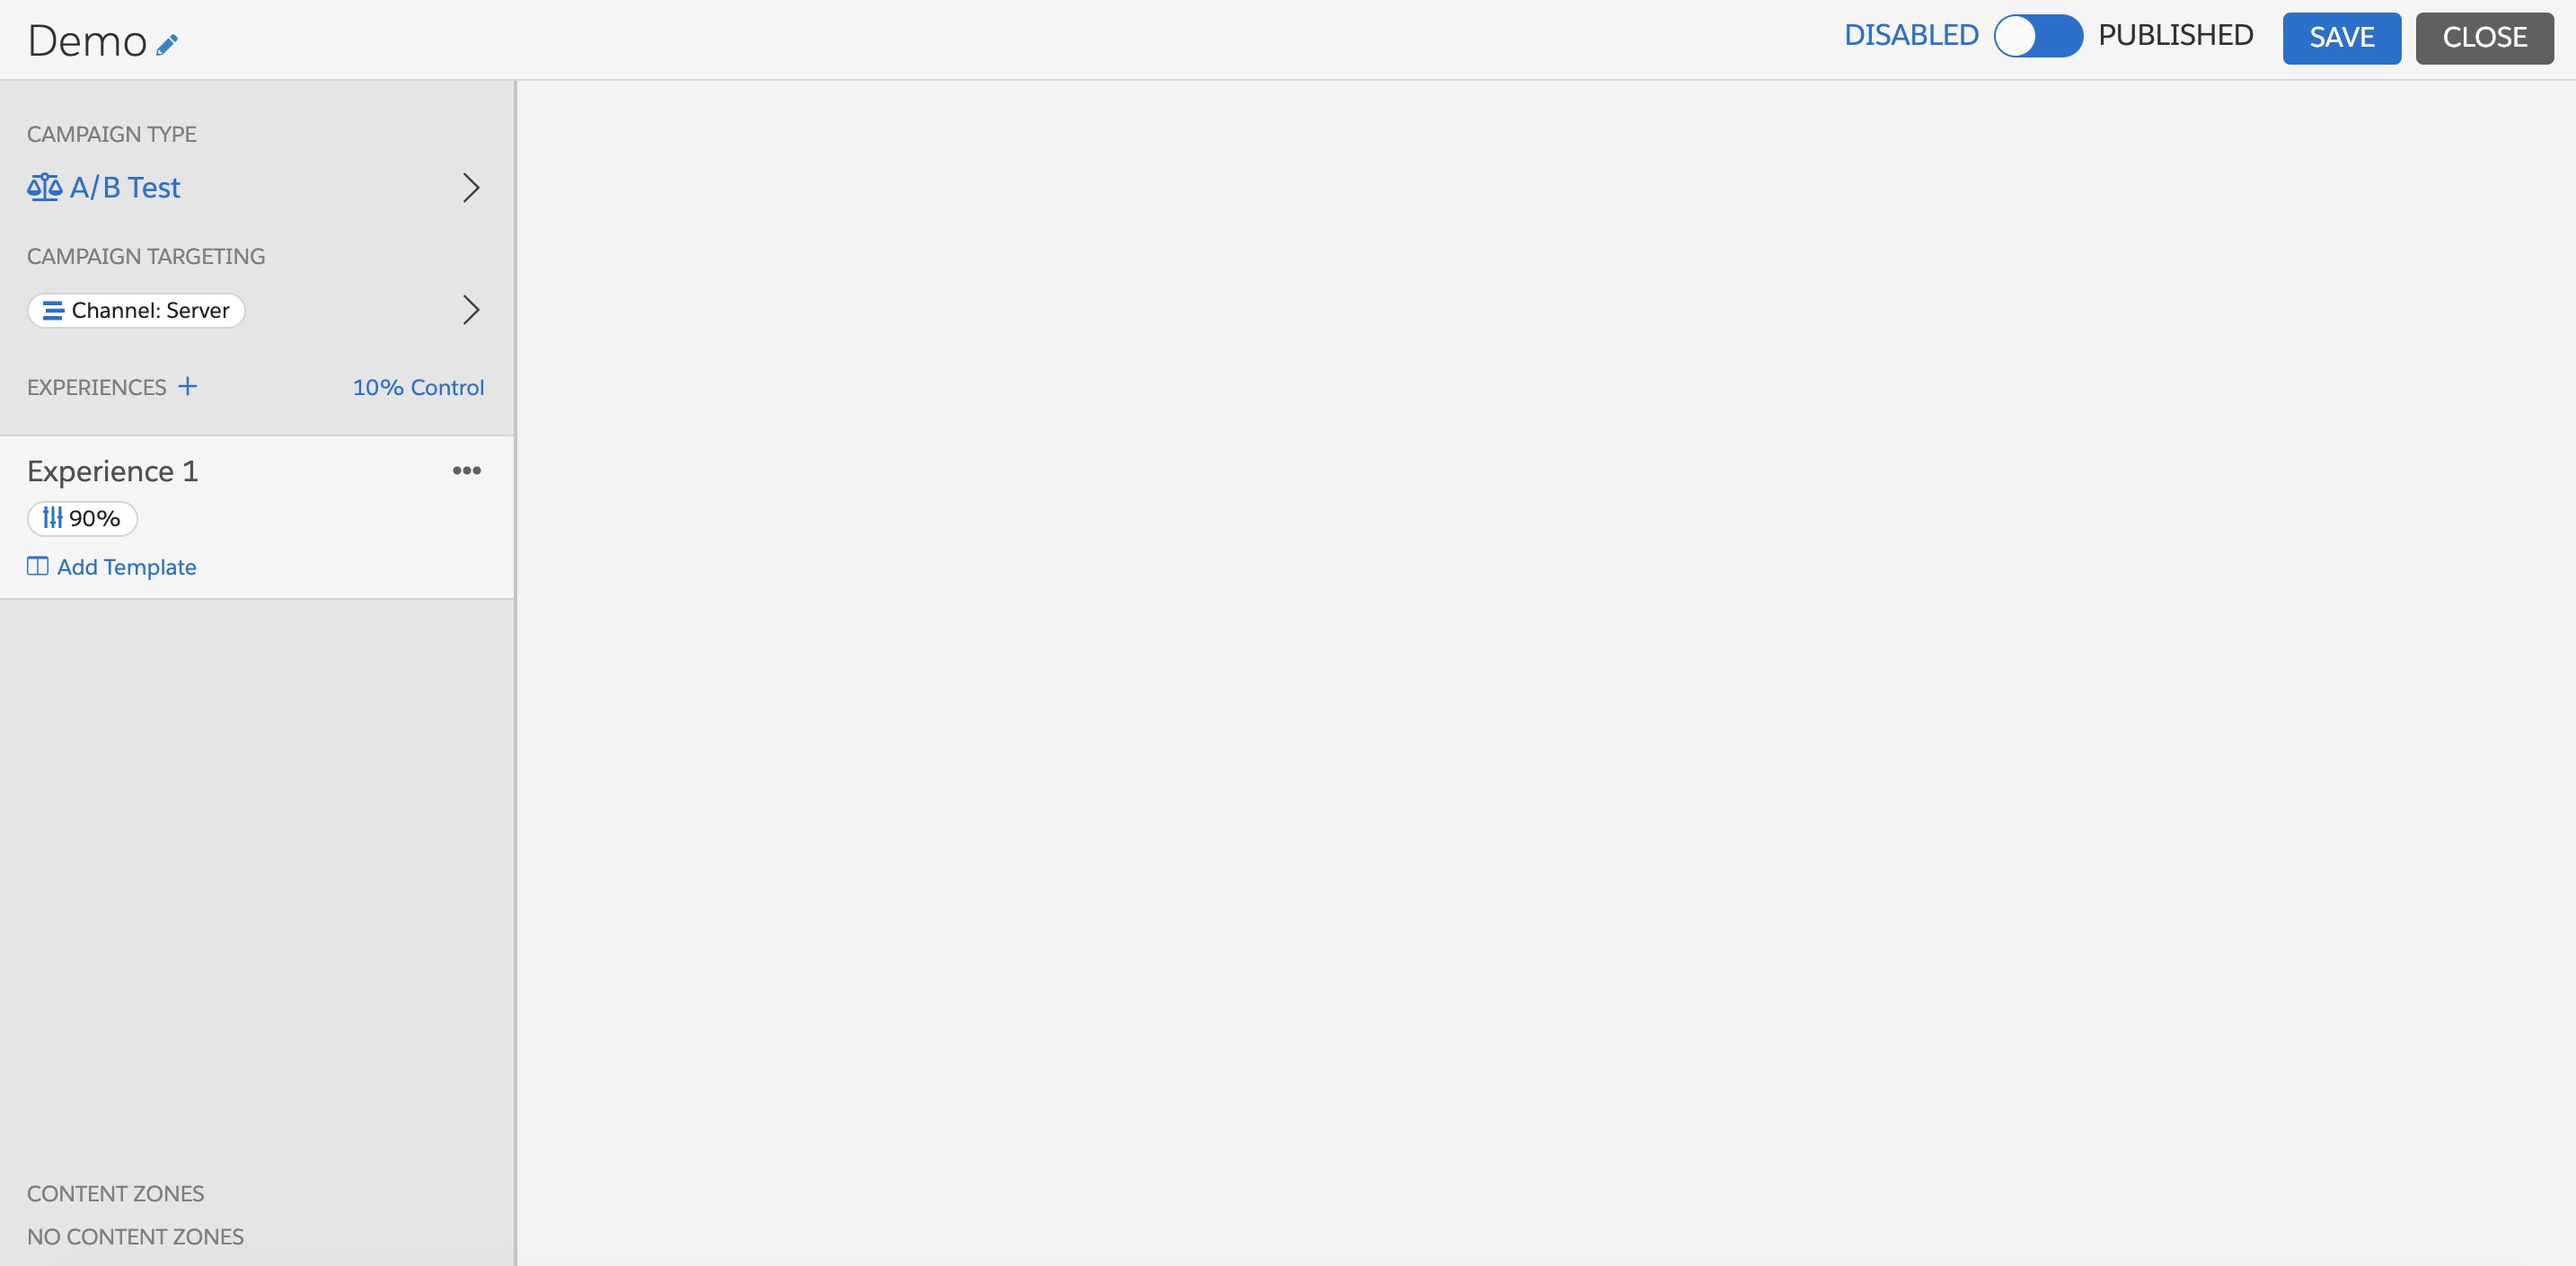
Both rule-based and A/B tests provide options for a control experience. With A/B tests, you determine control traffic using a slider. With rules-based campaigns you enter a control percentage in an input field.
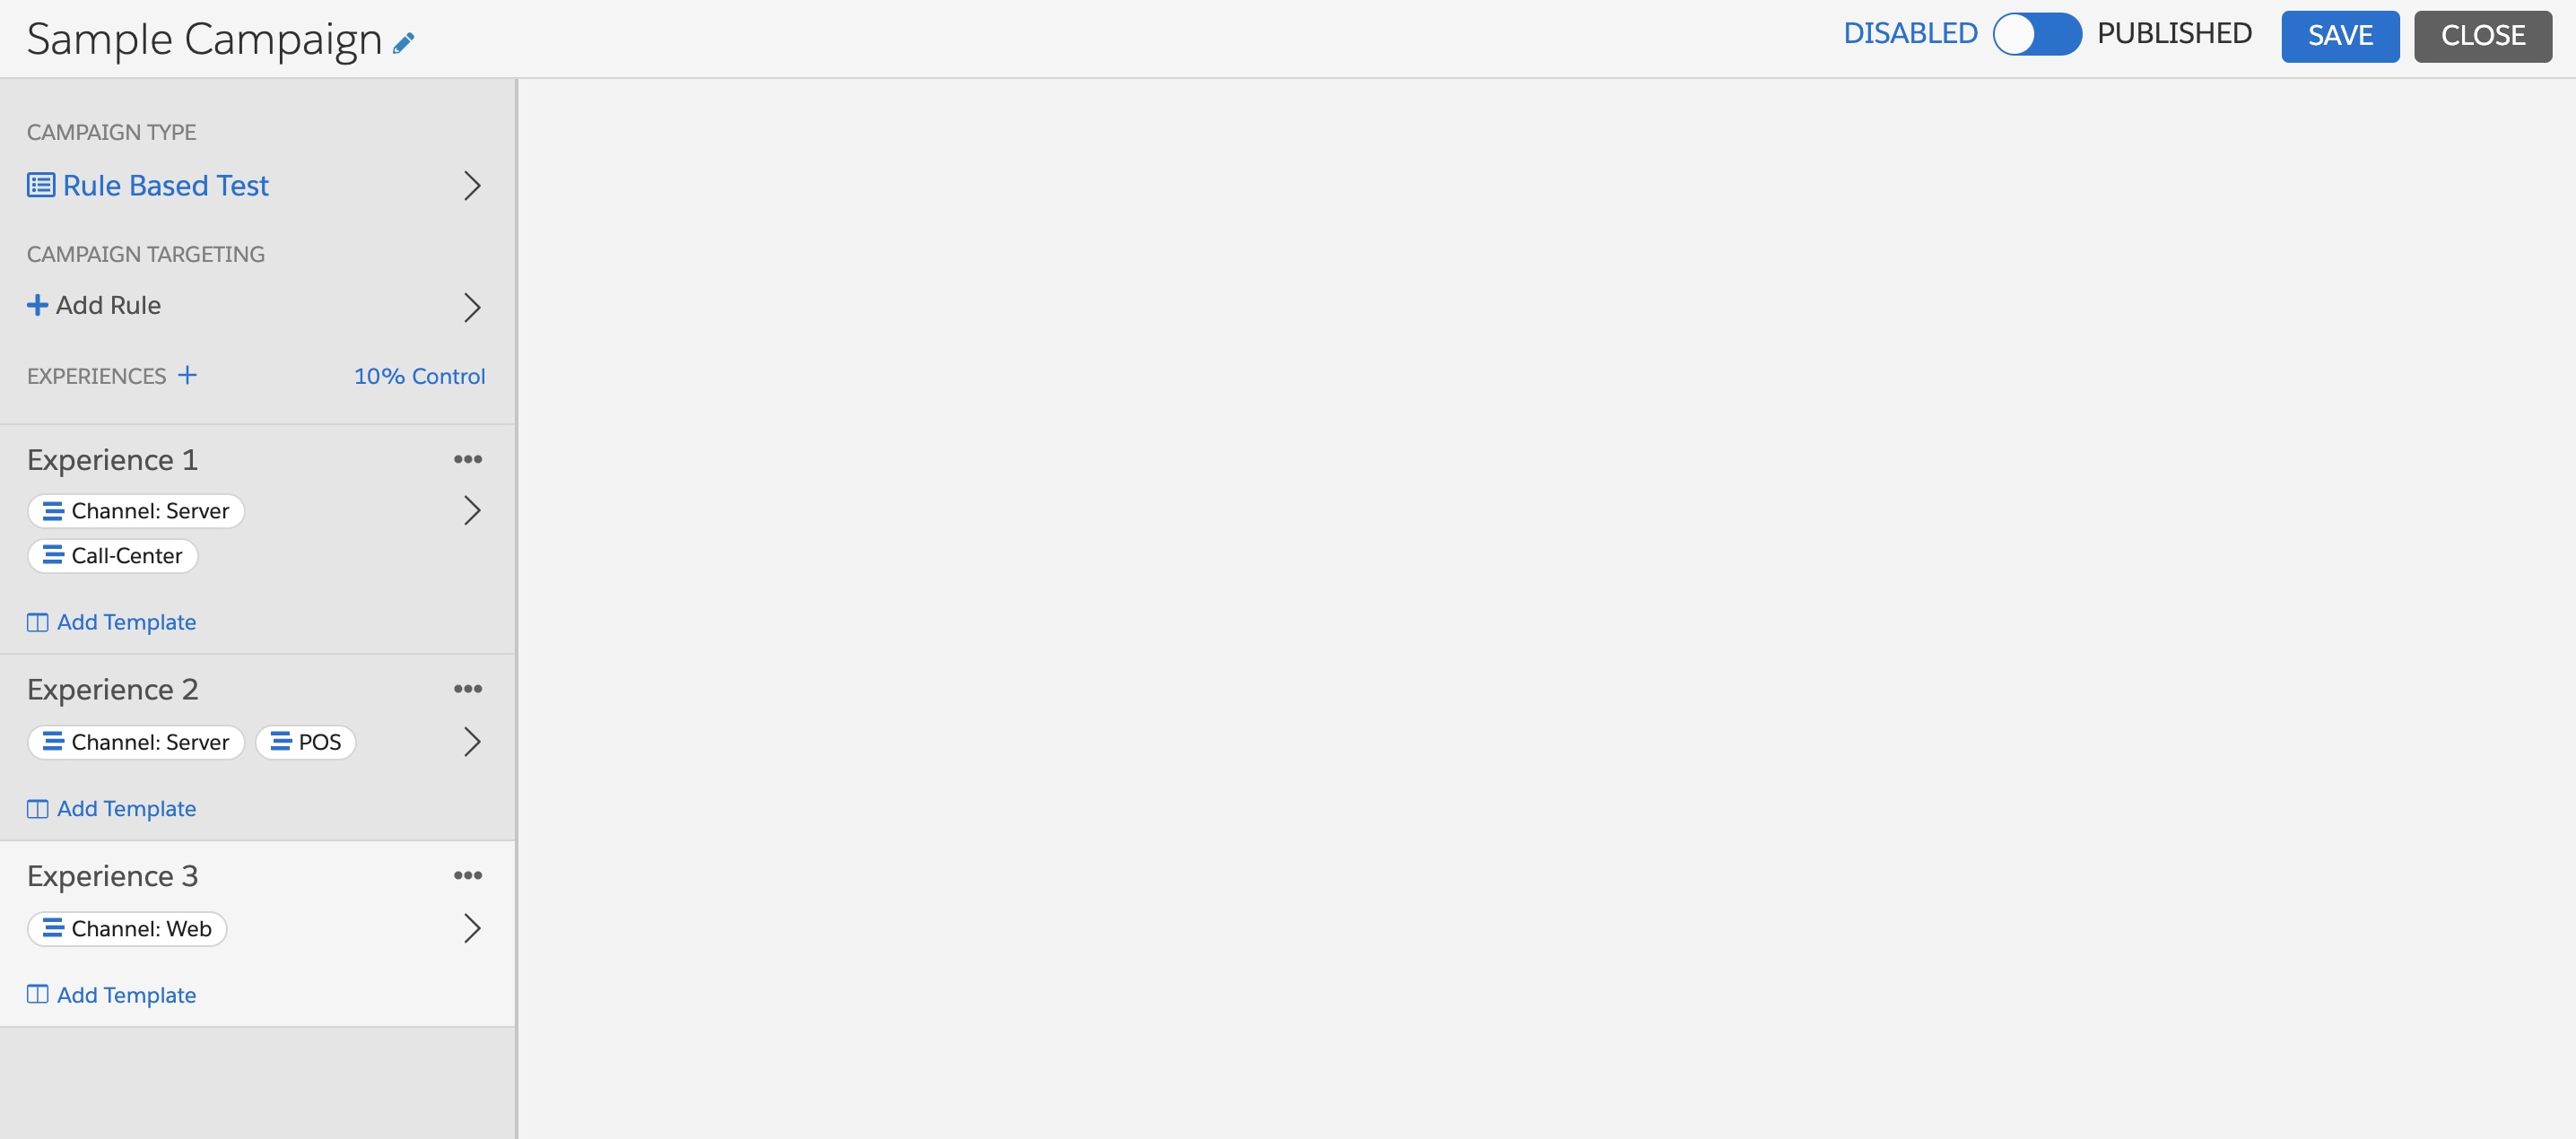
There are two campaign types. A/B Test campaigns split traffic randomly into different groups based on percentages you define. Each group sees a different campaign experience. Rule-Based Test campaigns follow the rules you define to determine which experience to show to each visitor. For example, using a rule-based test, you could target a segment of visitors who had not been to your site in 30 days and show them experience 1, then show experience 2 to visitors who had been to your site in the last 24 hours.
The default campaign type in the campaign interface is A/B Test. To change the campaign type, do the following.
-
Click > next to A/B Test.
-
Choose the campaign type that supports your goal for the campaign.
a. A/B Test b. Rule-Based Test
-
Toggle between A/B Test and Rule Based Test to change the type.
Determine how many experiences you want to have for your campaign. If you’d like to deliver a different campaign experience to various groups of qualified visitors, create additional experiences by cloning the configured experience. You can then modify the next experience using the same template or apply a different template as needed.
To create campaign experiences, do the following.
- Still in Campaign Type, click the following icon to clone an experience.

- Double-click the Experience Name to rename the experience.
- Repeat the cloning and renaming process until you have the desired number of experiences for your campaign.
- The name of each experience shows up in your campaign statistics report. It can be helpful to name each experience with what is unique about that experience so you can interpret the results in reporting. For example, if you are building a cross-channel campaign, it is helpful to name each experience with their respective channel name. For example, you can name your experiences Mobile, POS, Web, and so on, depending on their channel.
- For rules-based campaigns, if a user that qualifies for a campaign also qualifies for multiple experiences, the experience higher in the list of experiences is considered the higher priority experience. You can drag and reorder campaign experiences on the campaign type screen.
Server-side campaigns have the same targeting options available as web campaigns. There are, however, important nuances around the channel rule that have identity and authentication implications. As described in the previous section, server-side campaigns have the campaign-level targeting logic of channel: Server applied by default.
While a business user can choose to remove this logic, its inclusion means that the campaign requires an authenticated request via the /authevent endpoint with channel set to Server in the call in order to return a campaign response.
Additional information around the implications for using or removing the channel: Server logic is as follows:
-
Authenticated Campaigns:
-
channel: Server Rule:
-
Authentication: Whenever
channel: Serveris present (at either the campaign level or experience level), Personalization requires authentication to return a campaign response, asServeris a default “Trusted” channel. (If your Personalization account was provisioned before 1/28/2021, file a support ticket to getchannel: Serveradded as a trusted channel) -
API Calling Pattern: The inbound request that includes
channel: ServerMUST leverage the/autheventendpoint and include an API token. If a POST request is made to the/autheventendpoint without eitherchannel: Serveror an API token included, no campaign response data is returned.For more information on
/autheventand generating an API token, refer to the Authenticated Event Endpoint and the Personalization API Tokens articles. -
Identity: When
channel: Serveris applied to a POST request that goes through the/autheventendpoint, there are two potential identity configuration options (outlined in detail in this article) that determine how a user is referenced. These two identity configuration options are outlined in detail by the following illustrations.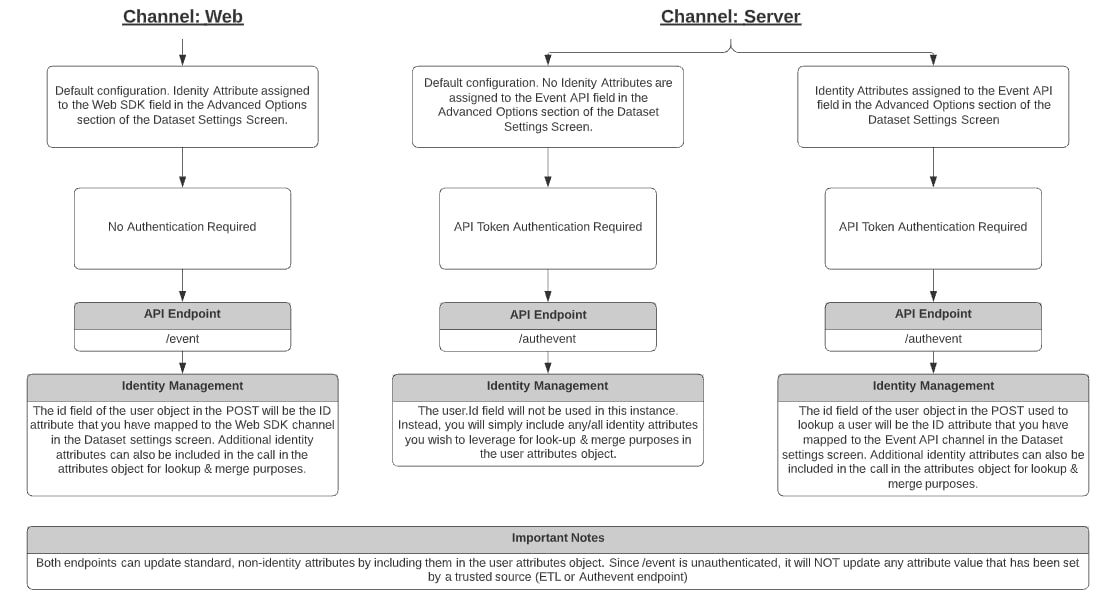
-
-
-
Unauthenticated Campaigns:
- channel: Web Rule
- Authentication: If the default
channel: Servercampaign level rule is removed, you can update a user and get campaign responses returned without authentication. - API Calling Pattern: The inbound request that includes
channel: WebMUST leverage the/eventendpoint. If a POST request is made to the/eventendpoint with no channel value or a different channel value included, you cannot reference an identity attribute and could end up creating new users in the platform. For more information on the/eventendpoint, refer to the Event API documentation. - Identity: When
channel: Webis applied to an inbound request that goes through the/eventendpoint, the value provided foruser.idreferences the Web SDK identity attribute that is configured via the Identity Settings screen. To facilitate additional profile merge scenarios, you can include more than one identity attribute in theuser.attributesobject. Do remember that this behavior is different from when using the/autheventendpoint.
- Authentication: If the default
- channel: Web Rule
-
Hybrid Authenticated & Unauthenticated Campaigns:
-
While A/B/n testing campaigns can ONLY be either fully authenticated or unauthenticated, rules-based campaigns provide additional flexibility via experience level rules. By removing the default campaign level
channel: Serverrule, you can make certain experiences within a campaign either require or not require authentication. To do so, simply apply eitherchannel: Serverorchannel: Webas a rule on the experience.- If you decide to mix
channel: Web&channel: Serverlogic into a single campaign, ensure that you use the correct endpoints and ID values in the call for the respective experiences. - If you include a channel value in the campaign targeting logic that is not either
WeborServer, you will NOT be able to access identity attributes in the campaign.WebandServerare the only channel values with identity support.
- If you decide to mix
-
There are a couple different ways for a user to build a single Server-Side campaign that can power experiences across multiple touch-points.
-
Restrict campaign response to certain applications at the campaign level: If you want to limit a campaign response to only certain applications, you can layer in additional targeting rules via the Source → Application rule. By applying this rule, an inbound request needs to include one of the applications listed on the campaign rule (for example, Mobile, POS, Support) for a response to be returned. This type of targeting helps ensure you are only returning campaign responses relevant to that particular application.
-
Application-specific experiences: If you want to build different experiences for different applications, a business user would leverage a rule-based campaign and apply application targeting logic to the experience. To apply application targeting logic, apply an application rule at the experience level (for example, Mobile or POS). The application is required in the inbound call to return the experience designed for that specific application.
After you have created a campaign, named it, and applied your targeting logic, it’s time to apply a template. To apply a template, do the following.
- Under your first experience, click Add Template.
- The Select Template window displays all published server-side templates. Select the template that you’d like to apply.
After it is selected, the template name will appear under the experience, and the business user can fill in the configuration options that you’ve exposed.
To test a server-side campaign that is built from a template, you need to use a tool to make POST requests. For campaigns that require authentication, you need access to an API token. The campaign response generated by Personalization is the same format as the response generated for web campaigns using the campaign and templates system. If you are unsure about the validity of your API Token, review it with your Personalization account administrator. For more information, see Personalization API Tokens.
-
Create an API POST request. Depending on your campaign’s authentication type, use either of the following POST endpoints.
- Authenticated:
/api2/authevent/{dataset} - Unauthenticated:
/api2/event/{dataset} - Testing a campaign or experience where
channel: Serveris included requires an API token to return a response. By default, a server-side campaign haschannel: Serverconfigured in the campaign targeting logic meaning campaign responses return only for authenticated requests. (If you removed thechannel: Serverlogic, you need to reference the/eventendpoint for unauthenticated posts/responses).
- Authenticated:
-
If using the
/autheventendpoint, you need to leverage Basic Auth & enter your API token credentials your Key is the Username and the Secret as the Password. -
The Body content of the request must be constructed as JSON.
-
You can submit the following two types of test requests. Sample calls that you can copy and paste are available in the next section.
testMessages: experienceId: In this configuration, you would replace theexperienceIdtext with the ID of the campaign experience you are looking to test (see image on the right to learn how to find your campaign experience ID). Testing in this manner will IGNORE campaign rules, but allows you to validate the campaign response data looks correct. By including a specificexperienceId, you ARE able to test an unpublished campaign experience. Testing a specific experience can ONLY be done via the/autheventendpoint. Therefore, if you have an unauthenticated campaign leveraging thechannel:Webrule, in order to test the campaign response for a specific experience while the campaign is unpublished, you still need to usechannel:Serverin the POST.testMessages: experienceId: In this configuration, you would replace theexperienceIdtext with the ID of the campaign experience you are looking to test (see the following image to learn how to find your campaign experience ID). Testing in this manner will IGNORE campaign rules, but allows you to validate the campaign response data looks correct. By including a specific experience ID, you ARE able to test an unpublished campaign experience. Testing a specific experience can ONLY be done via the/autheventendpoint. Therefore, if you have an unauthenticated campaign leveraging thechannel:Webrule, in order to test the campaign response for a specific experience while the campaign is unpublished, you still need to usechannel:Serverin the POST.
When testing campaigns using the
testMessagesparameter, the Campaign Stats Gear still tracks campaign statistics even if the campaign you’re testing is not published.
The ID value you select for a user looks for a user in the system based on the identity attribute that you have assigned to the Event API. For instructions and information on selecting the identity attribute for the Event API, see Configure the Identity System for the Event API.
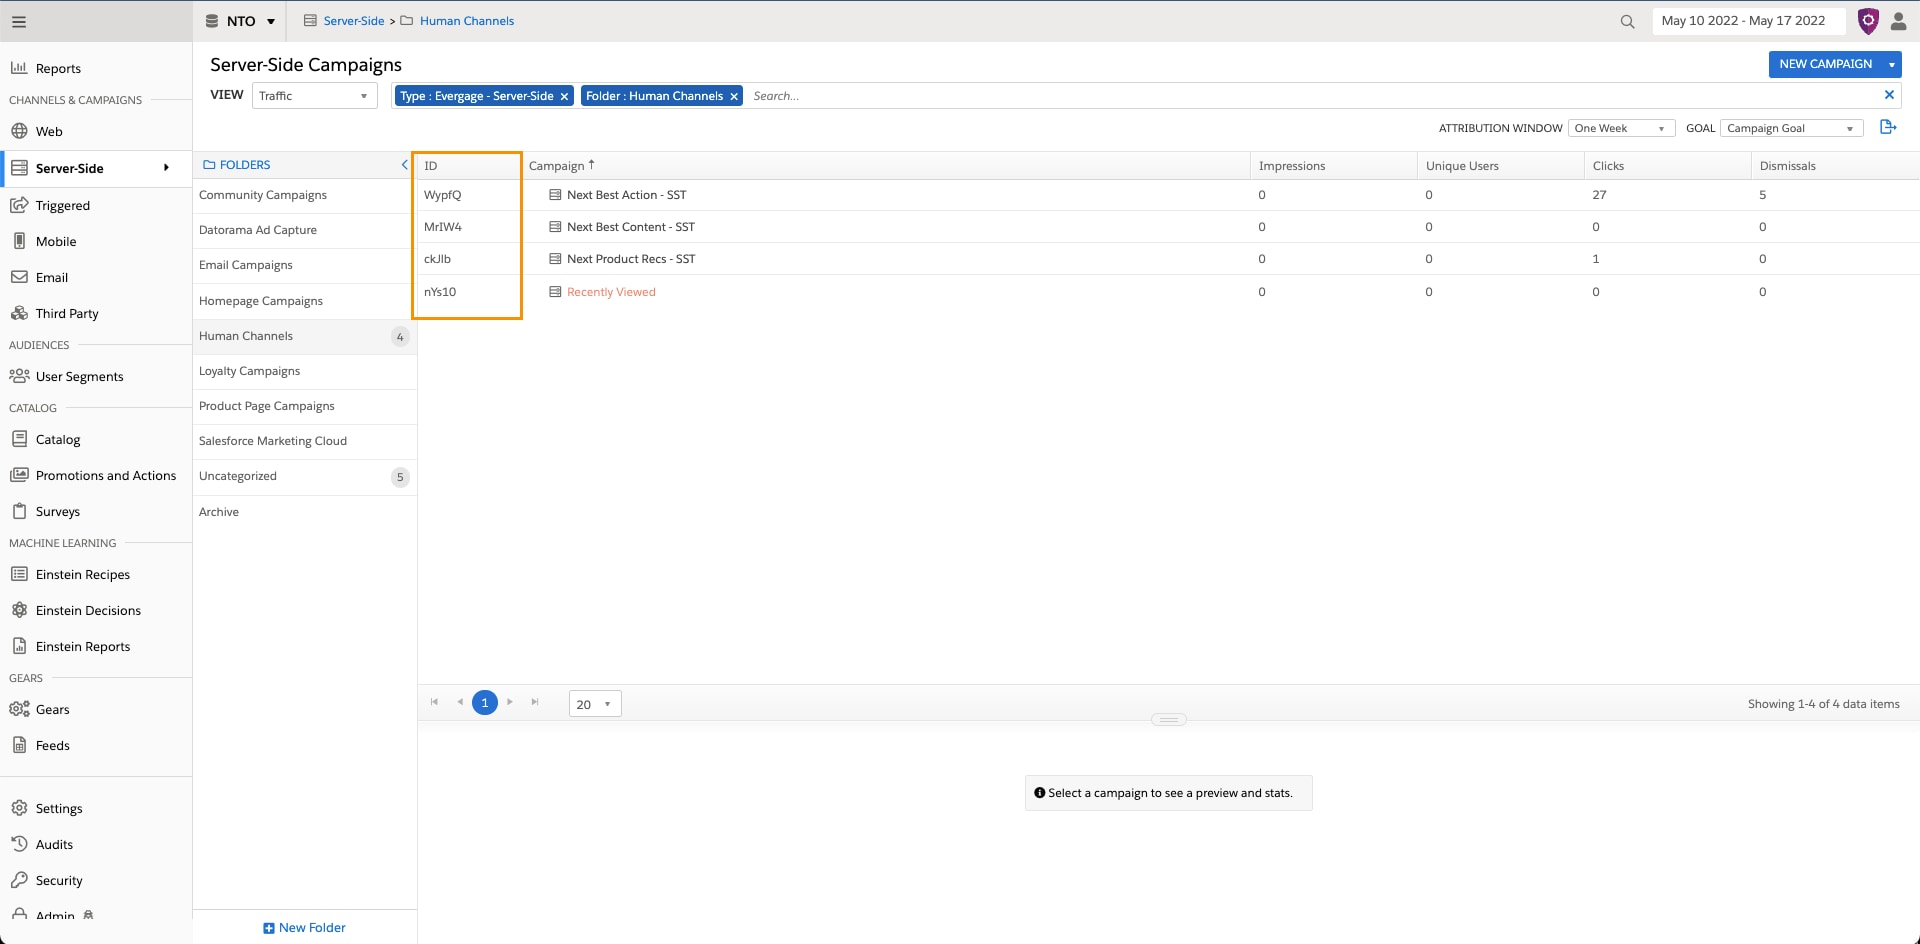
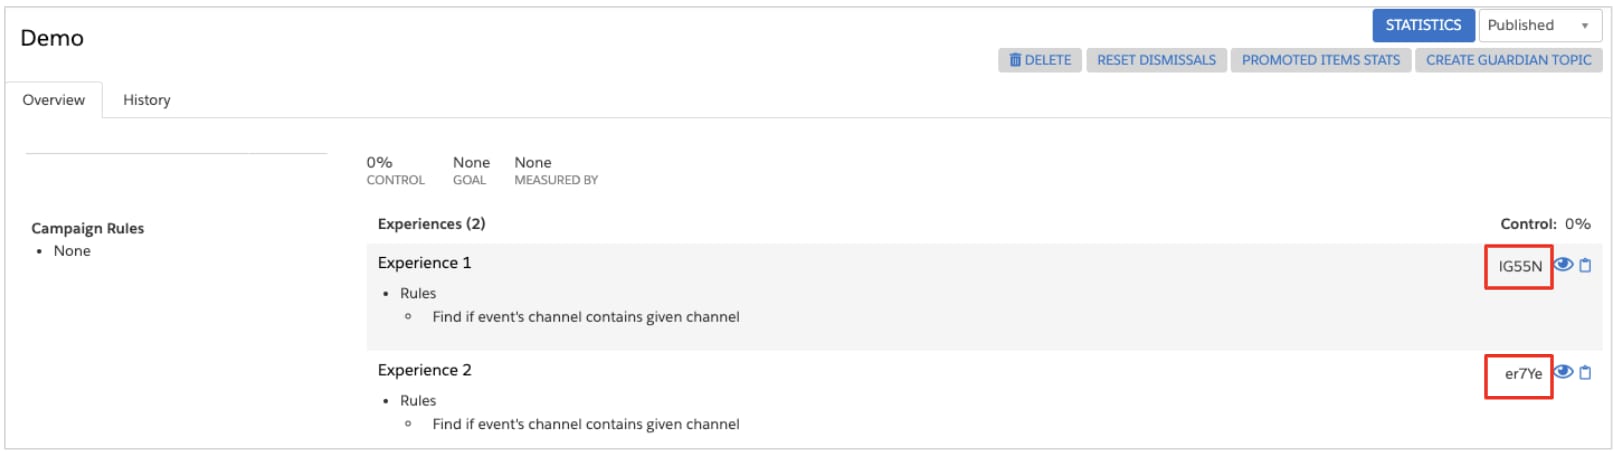
To find your campaign’s experience ID, simply open the Server-Side campaign list screen, select the campaign you are intending to test and scroll down to the Overview section. The experience ID is listed next to the eye icon on the right side of the page, as highlighted in the following screenshot.
In order to test a specific experience, a trusted channel MUST be included in the call. Doing so ensures that ignoring campaign rules does not ignore authentication requirements.
After you have thoroughly tested your campaign, you need to publish it to make it live. The process for publishing a campaign can be done on the campaign list page or while editing the campaign.
- While editing your campaign in the campaign editor, save your changes.
- The SAVE button becomes unavailable indicating that all changes have been saved.
- Slide the toggle to PUBLISHED.
- You receive a confirmation message stating that the campaign was published
- To disable a campaign, slide the toggle to DISABLED.
- You receive another confirmation message stating that the campaign was unpublished.
Campaign Access Controls: To know who has access to create, edit, or publish a campaign, review their user roles on Personalization. Roles-based access is a great way to ensure that campaigns go through the proper approval process before publishing for live traffic. Server-Side campaign & template creation follows the same permissions associated with web campaigns & templates.
To track campaign stats on a Server-Side campaign, you need to work with your web developer to pass stats information like impressions, clicks, and items returned back via the Personalization Event API. Those stats then appear in the campaign statistics report that is automatically generated for the campaign. For more information on how to pass campaign stats back to Personalization, refer to the Campaign Stats Tracking documentation.