
Appearance
Exercise 2: Extend Agents with Flow Actions
In this exercise, you'll extend your agent with a custom action powered by a flow. This custom action allows customer service representatives to issue resort credits to guests.
Step 1: Create the flow
From Setup, open Flows.
Click New Flow.
Leave Start from Scratch selected and click Next.
Select Autolaunched Flow (No Trigger) and click Create.
Open the Resources panel, by clicking the sidebar icon to the left of the Select Elements button.
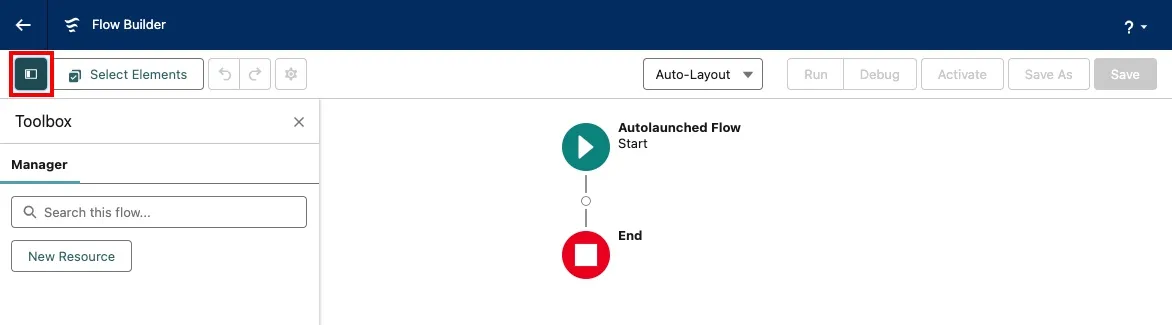
Using the New Resource button, create three variables defined as follows:
Resource Type API Name Description Data Type Available for input Available for output Variable contactIdThe Id of the Contact the credit will be issued to.Text ✅ Unchecked Variable amountThe amount of the resort credit.Number (Decimal places: 0) ✅ Unchecked Variable creditIdThe id of the Credit record that was created.Text Unchecked ✅
TIP
Writing clear and informative descriptions is a crucial part of building actions. It allows the planner to select the right actions, populate inputs with the right values, and correctly interpret outputs.
Create a credit record
Mouse over the circle after the Start element, click +, and select Create Records.
Configure the Create Records element as follows:
Field Value Label Create Credit RecordAPI Name Keep default Description Create a credit record including a Contact Id and the amount of the credit.How to Set the Record Field Values Manually (default) Object Credit Under Set Field Values for the Credit, add the two fields below with their values set as follows:
Field Value Contact__c contactId Amount__c amount Check Manually assign variables.
Set the Variable field to creditId.
Use the screenshot below to confirm that you entered the right values.

Save and activate the flow
Click Save from the top banner.
Configure the flow as follows:
Field Value Label Issue Resort CreditAPI Name Keep default Description Issue a resort credit for a ContactClick Activate.
Click the back arrow button to leave Flow Builder and go back to Setup.
Step 2: Create the agent custom action
From Setup, open Agent Assets and click on the Actions Tab.
Click New Agent Action.
Configure the action as follows:
Field Value Reference Action Type Flow Reference Action Issue Resort Credit Agent Action Label Keep default Agent Action API Name Keep default 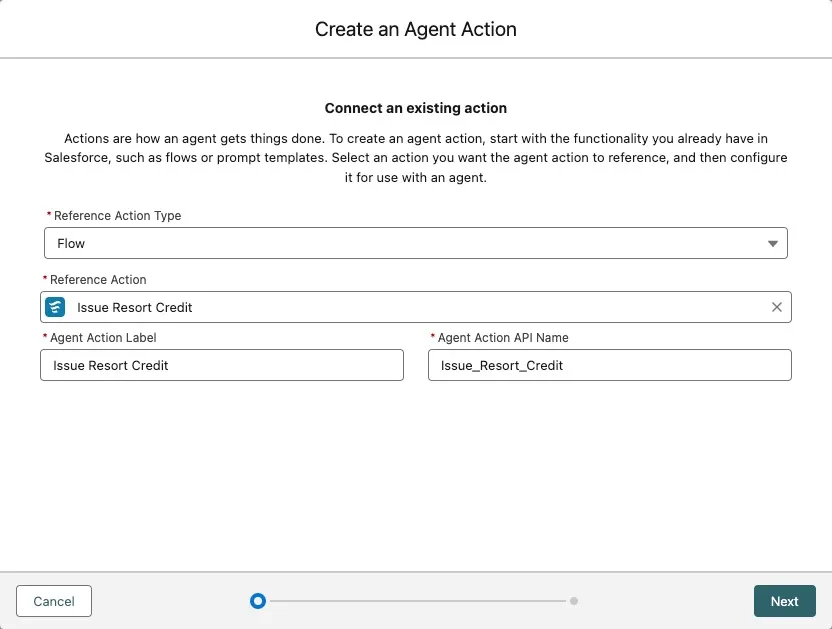
Click Next.
Leave the default instructions in.
Check Show loading text for this action .
Set Loading Text to
Adding credit....Check Require Input for both inputs (
amountandcontactId).Check Show in conversation for the
creditIdoutput.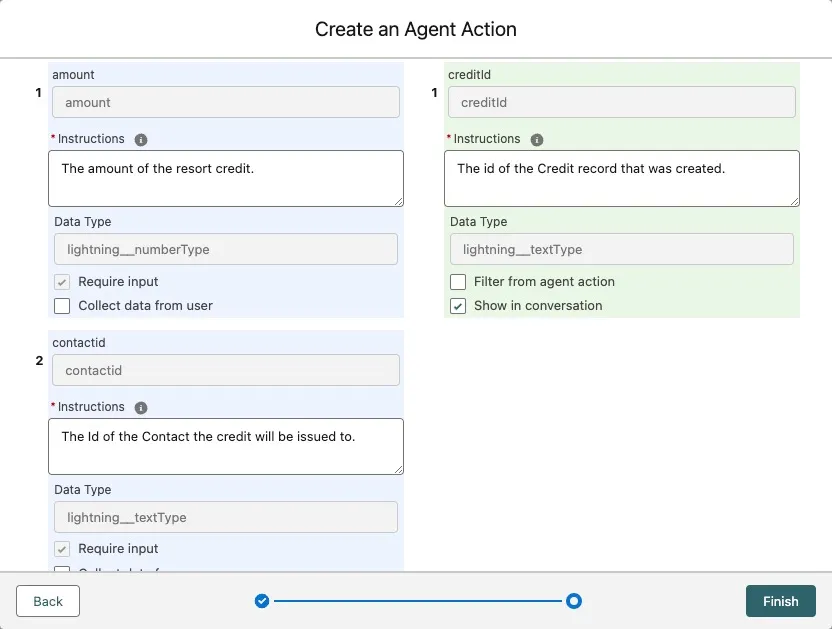
Click Finish.
Step 3: Add the action to your agent
From Setup, open Agentforce Agents (under Agent Studio).
Click on the Einstein Copilot in the list of agents.
Click Open in Builder.
Click Deactivate to deactivate the agent, so that you can add your new custom action.
In the Topics sidebar, click the Hotel Customer Service(or similarly generated named) topic.
Click the This Topic's Actions tab.
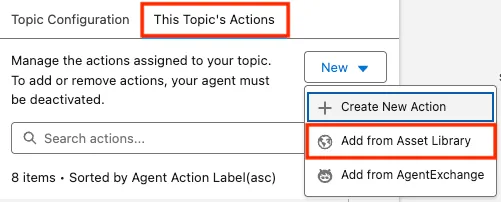
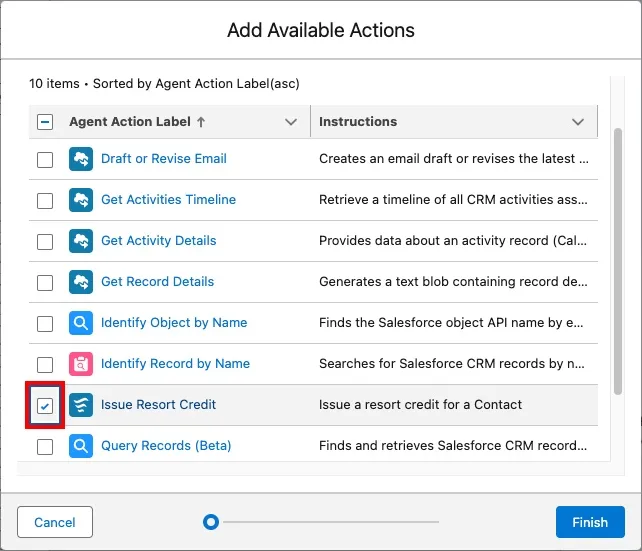
Click New → Add from Asset Library → Create New Action.
Check the Issue Resort Credit action and click Finish.
Step 4: Try it out
In the Conversation Preview panel, enter the following prompt:
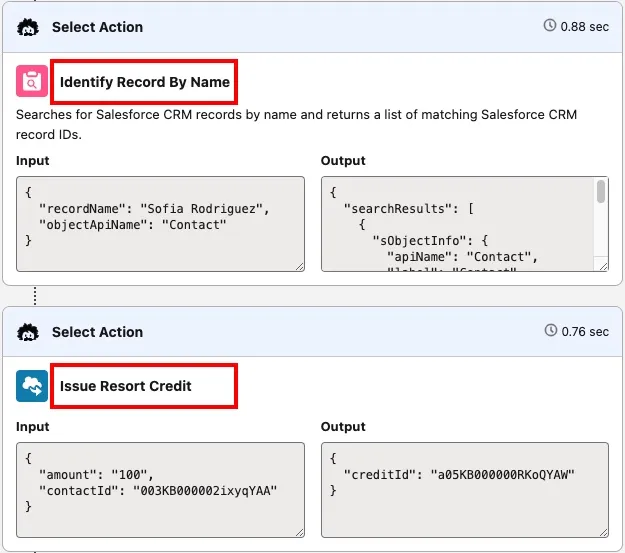
txtIssue $100 resort credit to contact named Sofia RodriguezIn the planner, notice that the reasoning engine first selected the Identify Record By Name action, then the Issue Resort Credit action you just created.
In the Coral Cloud app, navigate to the contact record for Sofia Rodriguez.
Click the Related tab.
Scroll down and verify that you see the resort credit that you just issued using your agent.
