Appearance
Exercise 2: Configure a Service Deployment
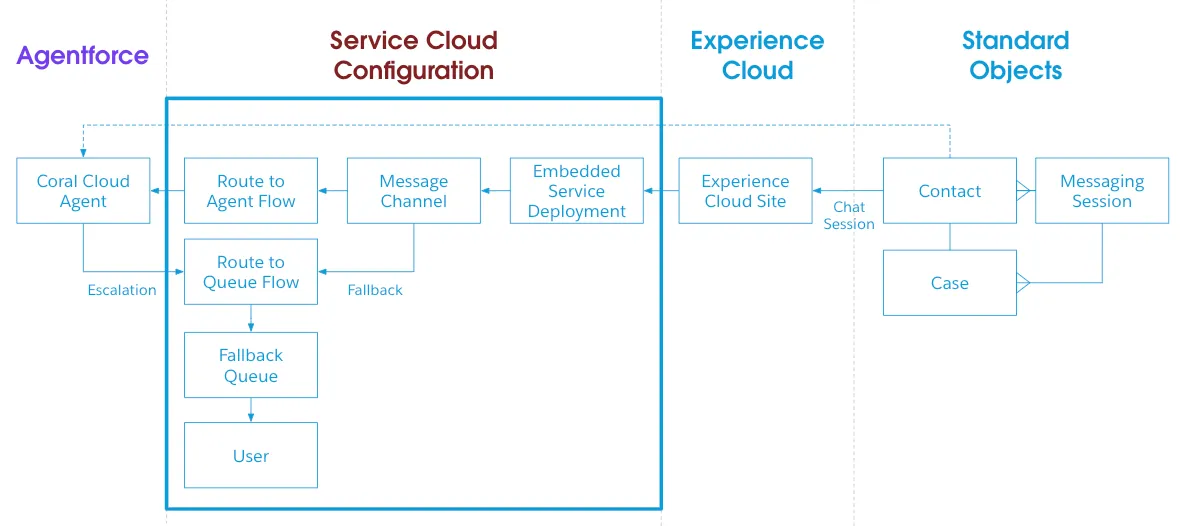
In this exercise you will configure a Service deployment that will expose the Coral Cloud Agent to your customers directly. There are quite a few pieces that need to come together to expose an agent, and this is brought together using Omni-Channel in Service Cloud.

Step 1: Enable messaging and configure Omni-Channel
Messaging enables you to create channels to handle messages received from your customers. In this example, we will use messaging to enable customers to engage with the Coral Cloud Agent.
Enable messaging
In the Setup Quick Find, search for and select Messaging Settings.
Set Messaging to On.
Create a routing configuration
In the Setup Quick Find, search for and select Routing Configurations.
Click on New.
Set field values as follows:
Field Value Routing Configuration Name Agent Routing ConfigurationDeveloper Name Agent_Routing_ConfigurationOverflow Assignee Leave Blank Routing Priority 1Routing Model Most AvailablePush Time-out(seconds) Leave Blank Capacity Type Keep default: InheritedUnits of Capacity 2Percentage of Capacity Leave Blank Click on Save.
Create a queue
In the Setup Quick Find, search for and select Queues.
Click on New.
Set field values as follows:
Field Value Label Messaging QueueQueue Name Messaging_Queue Queue Email Leave Blank Send Email to Members Keep default: FalseRouting Configuration Agent_Routing_ConfigurationSelected Objects Messaging SessionSelected Members Admin UserClick on Save.
Create presence status
In the Setup Quick Find, search for and select Presence Statuses.
Click on New.
Set field values as follows:
Field Value Label AvailableDeveloper Name AvailableStatus Options Keep default: OnlineSelected Channels MessagingClick on Save.
Create a presence status permission set
In the Setup Quick Find, search for and select Permission Sets.
Click on New.
Set field values as follows:
Field Value Label Coral Cloud Service AgentAPI Name Coral_Cloud_Service_AgentDescription This permission set grants access to messaging and the Available Messaging Status.License Keep default: NoneClick on Save.
Under Apps, click on Service Presence Statuses Access.
Click on Edit.
Add Available to Enabled Service Presence Statuses.
Click on Save.
Click on Manage Assignments.
Click on Add Assignments.
Check the box next to Admin User.
Click on Save.
Click on Done.
Create a presence configuration
In the Setup Quick Find, search for and select Presence Configuration.
Click on New.
Set field values as follows:
Field Value Presence Configuration Name Messaging Presence ConfigurationDeveloper Name Messaging_Presence_ConfigurationCapacity 20Every other value should be left to the defaults.
Click on Save.
Create a messaging channel
In the Setup Quick Find, search for and select Messaging Settings.
Click on New Channel.
Click on Start.
Select Messaging for In-App and Web.
Set field values as follows:
Field Value Channel Name Agent ChannelDeveloper Name Agent_ChannelClick on Save.
Step 2: Create Omni-Channel routing flow
Use Flow to route customers to an Agentforce Agent directly from your Experience Cloud site.
Create the Route to Agent flow
In Setup, search for Flow in Quick Find and select Flows.
Click New Flow.
Click on Start From Scratch.
Click on Next.
Select Omni-Channel Flow and click Create.
Open the Toolbox on the right hand side of the builder and Click on New Resource.
Open the Resources panel, by clicking the sidebar icon to the left of the Select Elements button.
Using the New Resource button, create a variables defined as follows:
Resource Type API Name Description Data Type Available for input Available for output Variable recordIdThe recordId is used to assign a messaging session to an Agent.Text ✅ Unchecked Mouse over the circle under the Start element, click +, and select Get Records.
In the right panel, configure the Get Records action as follows:
Field Value Label Get Messaging SessionAPI Name Get_Messaging_SessionDescription Get the related messaging session that you would like to route to an agent. Data Source Salesforce Object Object Messaging SessionCondition Requirements All Conditions Are Met (AND) Define the condition below:
Field Operator Value Id Equals $recordId Leave How Many Records to Store and How to Store Record Data to their defaults.
Mouse over the circle under the Start element, click +, and select Route Work.
In the right panel, configure the Get Records action as follows:
Field Value Label Route to AgentAPI Name Route_to_AgentDescription Route the messaging session to the Coral Cloud Agent How Many Work Records to Route? Keep default: SingleRecord Id Variable $recordIdService Channel MessagingRoute To Agentforce Service AgentAgentforce Service Agent Coral Cloud AgentFallback Queue Select QueueFallback Queue Id Messaging QueueClick on Save.
Set the values as follows:
Field Value Flow Label Route to AgentFlow API Name Route_to_AgentClick on Activate.
Step 3: Update the messaging channel with the routing flow
Associate the Coral Cloud Agent to the newly created routing flow.
Add the Route-to-Agent flow to the messaging configuration
In the Setup Quick Find, search for and select Messaging Settings.
Open the Agent Channel.
Click on the Edit button under Omni-Channel Settings.
Configure the settings as follows:
Field Value Routing Type Omni-FlowFlow Definition Route to AgentFallback Queue Messaging QueueClick on Save.
Click on Activate.
Accept the Terms and Conditions.
Step 4: Create an embedded service deployment
Create an Embedded Service deployment that can be used to distribute your agent.
In the Setup Quick Find, search for and select Embedded Service Deployments.
Click on New Deployment.
Select Messaging for In-App and Web.
Click on Next.
Select Web.
Configure the deployment as follows:
Field Value Embedded Service Deployment Name Agent Web DeploymentAPI Name Agent_Web_DeploymentDomain my.site.comMessaging Channel Agent ChannelClick on Save.
Once the save has been completed, Click on Publish.
Summary
You have just created a custom service agent that can be used to interact with your customers. Next, we will use the service deployment capabilities in Service Cloud to deploy the Agent to a customer-facing Experience Cloud site.