


Health Cloud Administration
 j
jCustomize the Existing Timeline in the Contact Center
You can configure objects to track in the Contact Center’s timeline component. To
customize the existing timeline, first deactivate it. Edit the timeline to add a new object, and
activate it again. Or create a new timeline.
|
Available in: Lightning Experience Available in: Enterprise and Unlimited Editions with Health Cloud |
| User Permissions Needed | |
|---|---|
| To use the Contact Center for Health Cloud | Manage Contact Center for Health Cloud |
- From Setup, in the Quick Find box, enter Timeline and then select Timeline.
-
Next to Contact Center Account Timeline, click
 , and then click Deactivate.
-
Click , and now click
Edit.
- Go to Timeline Related Objects, and click Add New Object.
-
In Related Object, select a related object, such as Clinical Encounter, to the existing
objects: Engagement Interaction, Engagement Topic, and Case.
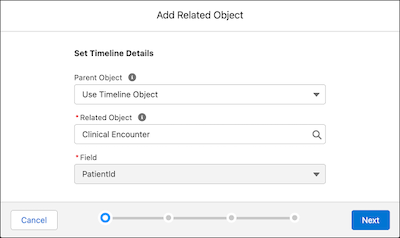
- Customize the record visibility of the related object.
-
Add a title field, subtitle field, timestamp, and fields displayed on the timeline. For
example, configure the timeline to show case records only when the Status field equals “New”.
Select Case Number as the title, Internal Comments as the subtitle, and Closed Date as the
timestamp for the Case object.
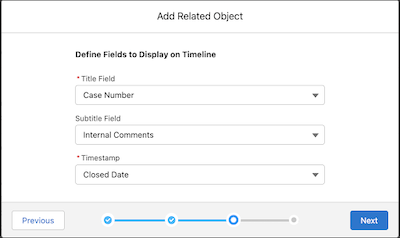
- Add fields to show on the timeline, and click Add.
- Click Activate.
To create a new timeline, first deactivate the existing timeline. Click New Timeline to provide a label and API name. Repeat the steps to add objects, set the visibility of the related object, and add fields to display on the timeline.
- Make Information Easily Viewable with Enhanced Timeline