
Appearance
Exercise 4: Verify Customers with Hybrid Reasoning - Part 2
In this exercise, you'll implement verified-customer guardrails using variables, a dedicated Verify Customers subagent, and conditional logic in Order Issues & Refunds.
Step 1: Create a new subagent (Verify Customers)
First, create a dedicated subagent that handles identity verification.
In Agentforce Builder, click the + sign besides Subagents in the explorer.
Select Create new subagent.
Set the following values:
Field Value Name Verify CustomersDescribe the job you want the subagent to do This subagent verifies a customer's identity before allowing access to sensitive support actions.Click on Create and Open.
Paste the following placeholder into the Instructions Section:
txtVerify a customers identityClick Save to save the changes.
Step 2: Create an action (Send Email with Verification Code)
Next, create the first Flow action used by the Verify Customers subagent.
In the explorer, open Verify Customers.
Click on the + sign besides Actions, and select Create new action.
Set the following values:
Field Value Name Send Email with Verification CodeDescription Sends a verification code to the customer's email address.Reference Action Type FlowReference Action Send Email with Verification CodeClick Create and Open.
Click Save.
Update the following Inputs and Outputs:
Field Value Inputs - customerToVerify Select checkbox Require Input to execute actionOutputs - verificationMessage Select checkbox Show in conversationClick Save.
Step 3: Create an action (Verify Code)
Next, create the second Flow action used by the Verify Customers subagent.
In the explorer, stay in Verify Customers.
Click on the + sign besides Actions, and select Create new action.
Set the following values:
Field Value Name Verify CodeDescription Verifies a user-provided verification code.Reference Action Type FlowReference Action Verify CodeClick Create and Open.
Click Save.
Update the following Inputs and Outputs:
Field Value Inputs - customerCode Select checkbox Require Input to execute actionInputs - customerId Select checkbox Require Input to execute actionInputs - customerType Select checkbox Require Input to execute actionClick Save.
Step 4: Add variables for verified-customer context
Next, create global variables that the agent can use across subagents.
You'll use these variables throughout the rest of the workshop:
IsVerifiedCustomer: Track whether the customer has successfully completed verification.AuthenticationKey: Store the authentication key returned by Send Email with Verification Code so it can be passed into Verify Code.
Create the IsVerifiedCustomer Variable
Click on Variables in the explorer.
Click the New dropdown and select Create a Custom Variable.
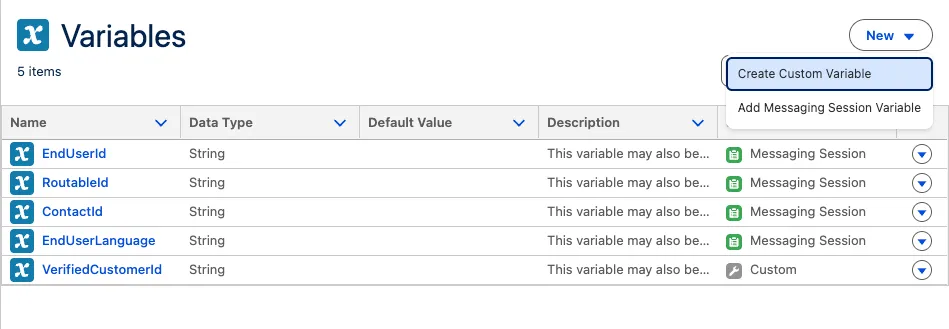
Click Advanced Configuration and enter the following:
Field Value Name IsVerifiedCustomerAPI Name IsVerifiedCustomerData Type BooleanDescription Whether the user is a verified customer or notDefault Value FalseEnable API write access Select checkbox Click Save.
Create the AuthenticationKey Variable
Click the New dropdown and select Create a Custom Variable.
Click Advanced Configuration and enter the following:
Field Value Name AuthenticationKeyAPI Name AuthenticationKeyData Type StringDescription Authentication key used to link email-code issuance to code verificationDefault Value Leave blank Enable API write access Select checkbox Click Save.
Step 5: Add actions to the Verify Customers subagent
Next, add the actions to the subagent and map inputs/outputs to your global variables. This work happens under Actions Available For Reasoning.
Update the Send Email with Verification Code Variable Mappings
Open the Verify Customers subagent.
Expand the Send Email with Verification Code action and map the outputs:
- Set the output for the authentication key by mapping the
AuthenticationKeyvariable to theauthenticationKeyoutput
- Set the output for the authentication key by mapping the
Click Save.
Update the Verify Code Variable Mappings
Expand the Verify Code action and map the outputs:
- Set the input for the authentication key by mapping the
AuthenticationKeyvariable to theauthenticationKeyinput - Set the output for the isVerified key by mapping the
IsVerifiedCustomervariable to theisVerifiedoutput
- Set the input for the authentication key by mapping the
Click Save.
Add and update the Get Customer Profile Variable Mappings
In the Verify Customers subagent, you can reference an existing action by adding a new line after an action bubble.
- Add a new line under the existing actions and on arrow besides Select action, and select Get Customer Profile.
Step 6: Update the Verify Customers subagent instructions
Next, replace the subagent instructions with a clear, step-by-step verification flow. This work happens in the Instructions section.
In the explorer, open Verify Customers.
Replace the subagent instructions with the text below:
txtFollow the below Rules step by step Rules: Step 1: Ask the user for their Email Address or Username. If not provided you will ask for it and you won't proceed After Step 1 please proceed to Step 2 Step 2: Send a verification code to the user using (@SendEmailwithVerificationCodePLACEHOLDER) with the email address or username provided. After Step 2 please proceed to Step 3 Step 3: Wait for the user to provide their verification code. When the users sends through the code, then you must run the (@VerifyCodePLACEHOLDER) action with the code they submitted. After Step 3 please proceed to Step 4 Step 4: If the customer has successfully verified themselves, then retrieve their customer profile using (@GetCustomerProfilePLACEHOLDER) and begin to address them by their Name. Ask the user if they would like you to continue with their request. After Step 4 please proceed to Step 5 Step 5: (Add Logic Placeholder)Click Save.
After you paste the instructions, replace the placeholders by typing
@and selecting:- Send Email with Verification Code
- Verify Code
- Get Customer Profile
For the logic placeholder, type
/and add a Conditional Statement:Select the
IsVerifiedCustomervariable.Leave the default
==operator and set the value totrue.Underneath the conditional logic, open the resource picker again and select Transition.
In the transition subagent, select Agent Router.
In the Add to block pop-over, Click the Else option.
Under the Else branch, paste the text below:
txtProvide the user with the verification message returned from Send Email with Verification Code then return to Step 1.
Click Save.
Step 7: Update the Order Issues & Refunds subagent to use verified context
Next, update the Order Issues & Refunds subagent so sensitive actions run only after the customer is verified. The action input mappings happen under Actions Available For Reasoning, and the conditional/transition work happens in the Instructions section.
In the explorer, open the Order Issues & Refunds subagent.
Under Actions Available For Reasoning, Delete the Get Customer Profile Action.
Click Save.
Update the Order Issue & Refund Subagent Instructions
In the Instructions block, remove the following instructions:
txtRun Get Customer Profile using the customer's email address. Then either: - run Get Related Cases to check for existing cases and provide status, or - run Handle Order Refunds to process a refund when appropriate.Next, type
/to open the resource picker.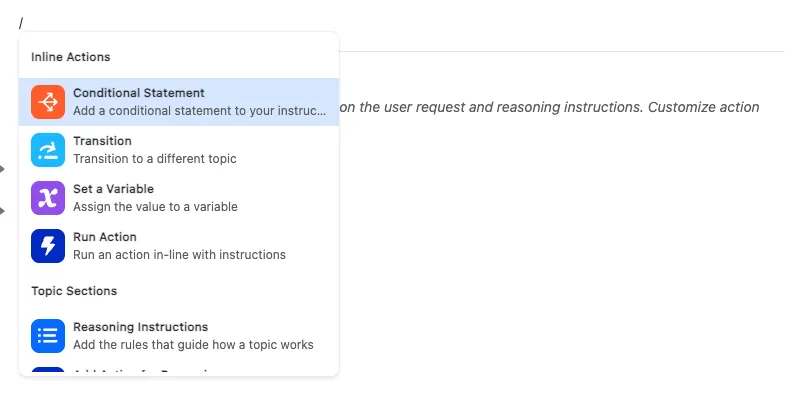
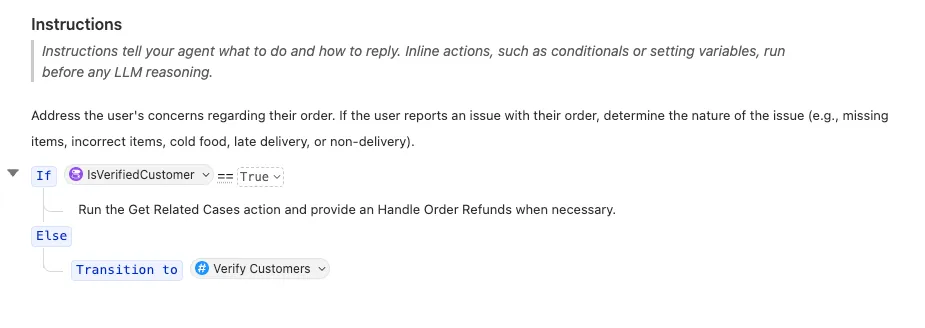
Select Conditional Statement.
Select the
IsVerifiedCustomervariable.Leave the default
==operator and set the value toTrue.Add short, explicit instructions that tell the agent when to run the actions, for example:
txtRun the Get Related Cases action and provide an Handle Order Refunds when necessary. TIP
You may have to use a clean paste by typing
CMD + SHIFT + Von Mac orCTRL + SHIFT + Von PC.In the Add to block pop-over, Click the Else option.
Under the Else block, open the resource picker again and select Transition.
In the transition subagent, select Verify Customers.
Click Save.
Step 8: Test the end-to-end journey
Click Preview.
Enter the following prompt:
txtHi, I'm Alex Morgan. Can you show me all of my cases?Press Enter on your keyboard.
In Interaction Details, confirm the agent transitions to Verify Customers before running any sensitive actions.
If the agent asks for an email address, enter
alex.morgan@example.comand press Enter.In the Interaction Details panel, open the Send Email with Verification Code action and locate the
verificationCodein the output response.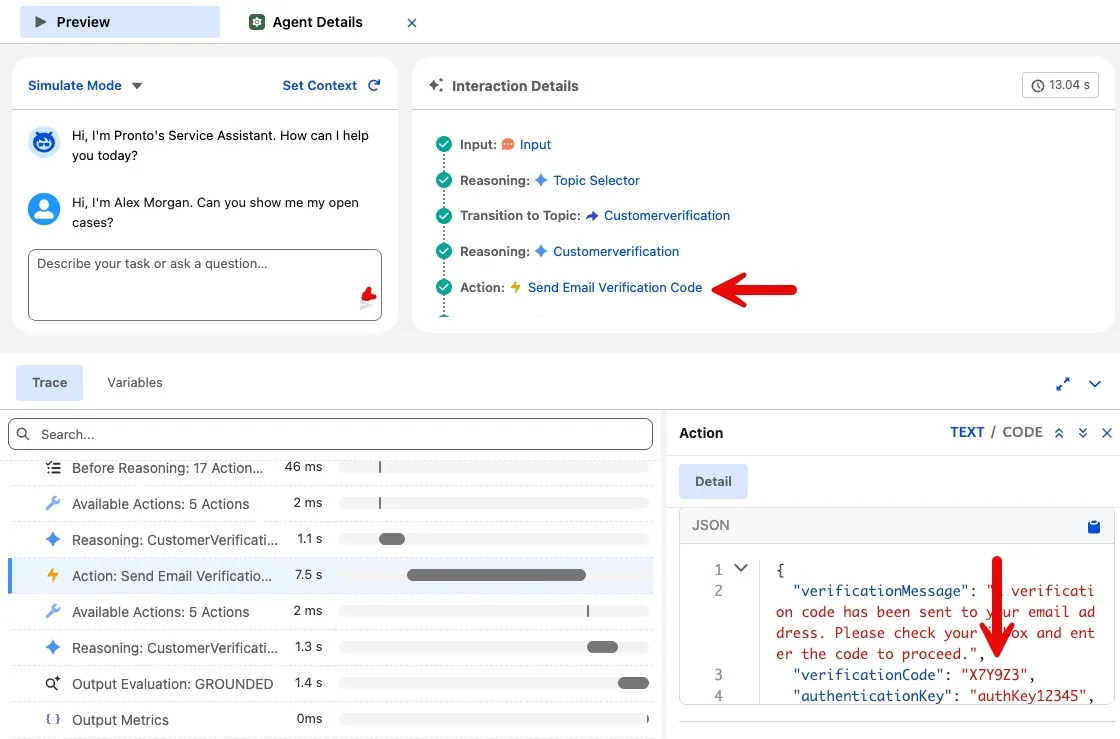
Copy the
verificationCodeand paste it into the agent dialog. Confirm with Enter.After verification completes, confirm the agent returns to Order Issues & Refunds and can run Get Related Cases.
Summary
You have implemented a reusable Verify Customers subagent and hybrid reasoning guardrails so Order Issues & Refunds can require verification before running sensitive actions.