
Appearance
Exercise 1: Configure a Service Deployment
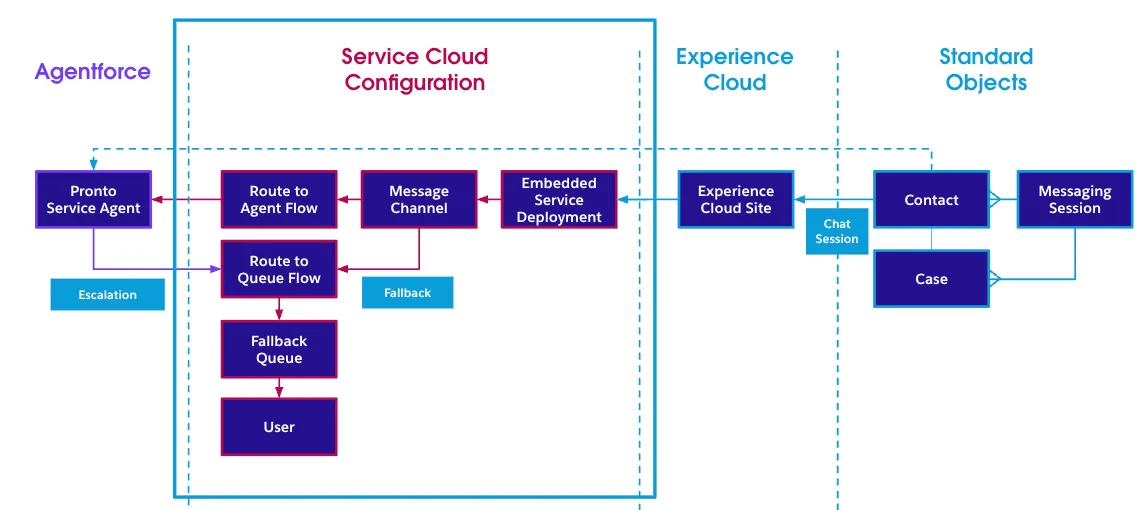
In this exercise, you’ll activate your Pronto service agent and configure Omni-Channel messaging so customer conversations can be routed to it.
TIP
Prerequisite: Complete the Agentforce Builder workshop first and make sure your agent already exists (for example, the Pronto Service Agent). This chapter assumes you’re starting with an agent definition that’s ready to be deployed.
Step 1: Activate the Pronto Service Agent
Using the App Launcher, open the Agentforce Studio app.
Open the Pronto Service Agent.
Click on Commit Version in the top right of the screen.
Confirm by clicking Commit Version in the modal.
Click on Activate.
Confirm by clicking Activate in the modal.
Step 2: Enable messaging and configure Omni-Channel
Messaging enables you to create channels to handle messages received from your customers. In this example, you’ll use messaging to enable customers to engage with your Pronto service agent.
Enable messaging
In the Setup Quick Find, search for and select Messaging Settings.
Set Messaging to On.
Create a routing configuration
In the Setup Quick Find, search for and select Routing Configurations.
Click on New.
Set field values as follows:
Field Value Routing Configuration Name Customer Service Agent Routing ConfigurationDeveloper Name Customer_Service_Agent_Routing_ConfigurationOverflow Assignee Leave Blank Routing Priority 1Routing Model Most AvailablePush Time-out(seconds) Leave Blank Capacity Type Keep default: InheritedUnits of Capacity 2Percentage of Capacity Leave Blank Click on Save.
Create a queue
In the Setup Quick Find, search for and select Queues.
Click on New.
Set field values as follows:
Field Value Label Customer Service Messaging QueueQueue Name Customer_Service_Messaging_Queue Queue Email Leave Blank Send Email to Members Keep default: FalseRouting Configuration Customer_Service_Agent_Routing_ConfigurationSelected Objects Messaging SessionSelected Members Admin UserorOrgFarm EPICClick on Save.
Create presence status
In the Setup Quick Find, search for and select Presence Statuses.
If you already have the Available Presence Status then you do not need to create a new one.
If you do not see an existing Presence Status, Click on New.
Set field values as follows:
Field Value Label AvailableDeveloper Name AvailableStatus Options Keep default: OnlineSelected Channels MessagingClick on Save.
Create a presence status permission set
In the Setup Quick Find, search for and select Permission Sets.
Click on New.
Set field values as follows:
Field Value Label Pronto Service Agent AccessAPI Name Pronto_Service_Agent_AccessDescription This permission set grants access to messaging and the Available messaging status.License Keep default: NoneClick on Save.
Under Apps, click on Service Presence Statuses Access.
Click on Edit.
Add Available to Enabled Service Presence Statuses.
Click on Save.
Click on Manage Assignments.
Click on Add Assignments.
Check the box next to Admin User or OrgFarm EPIC.
Click on Next.
Click on Assign.
Click on Done.
Create a presence configuration
In the Setup Quick Find, search for and select Presence Configuration.
If you already have the Messaging Presence Configuration Configuration then you do not need to create a new one.
If you do not see the existing Configuration, Click on New.
Set field values as follows:
Field Value Presence Configuration Name Messaging Presence ConfigurationDeveloper Name Messaging_Presence_ConfigurationCapacity 20Every other value should be left to the defaults.
Click on Save.
Publish your Experience Cloud site
Search for Digital Experiences in the Setup Quick Find and select All Sites.
Find the Customer Support Site and click on Builder.
If a popup appears, click OK.
Click Publish in the upper right corner.
Click Publish in the confirmation window.
Click Got It.
Click the Experience Builder menu.
Select View to open the published site.
Copy the URL of the published Pronto Customer Support Site..
Create a messaging channel
In the Setup Quick Find, search for and select Messaging Settings.
Click on New Channel.
Click on Start.
Select Enhanced Chat.
Set field values as follows:
Field Value Channel Name Pronto Service AgentDeveloper Name Pronto_Service_AgentDeployment Type WebDomain Paste the URL copied from the previous step, then remove https://and/customers/. Example:https://mydomain.my.site.com/customers/→mydomain.my.site.comClick on Next.
Set field values as follows:
Field Value Routing Type Agentforce Service AgentAgentforce Service Agent Pronto Service AgentFallback Queue Customer Service Messaging QueueClick on Save.
Accept the Terms and Conditions.
Click on Save.
Scroll to the bottom of the page and click on Save.
Step 3: Update the embedded service deployment
UPdate an Embedded Service deployment that can be used to distribute your agent.
In the Setup Quick Find, search for and select Embedded Service Deployments.
Open the Pronto_Service_Agent Embedded Service.
Click on Publish.
Summary
In this exercise, you activated your Pronto service agent and configured Omni-Channel messaging so customer conversations can be routed to it.